With MySQL master slave replication, we will sync the database between the source and destination servers in real time. We will have master (source) and slave (destination). The backup will move in one direction from the master to the slave.
- a. Configure Master (8 steps)
- b. Configure Slave (5 steps)
- c. Secure Connection with SSL (3 steps)
- f. Connect Slave to Master (5 steps)
- G. Reboot Slave Server Safely (6 steps)
a. Configure Master
1. [Master] First, we need to know which databases to sync within our MySQL master slave replication system. In our case, we will sync all databases on Master but we need to add them one by one in the 50-server.cnf configuration file as you can’t do that in a single line. So, let’s check the databases on Master by logging to the MySQL console by running the below command on PuTTY SSH client or any Linux terminal as below:
root@mail:~# mysqlTo enable autocomplete in MySQL command prompt, just run the below command after you log into MySQL:
MariaDB [(none)]> \#Then try to enter any database and for exapmle run a command like this:
MariaDB [sitebase_db]> describe sometable[press TAB]You can read more about it here.
Please note that you can use the command above alone in case your root user has a password and you use a CNF file at the base directory of the server. You can refer to this part: Install MariaDB on Ubuntu (part: Use CNF File to Login to MariaDB on Ubuntu Without a Password).

List All Databases
Now, let’s list all databases by running the command:
MariaDB [(none)]> show databases;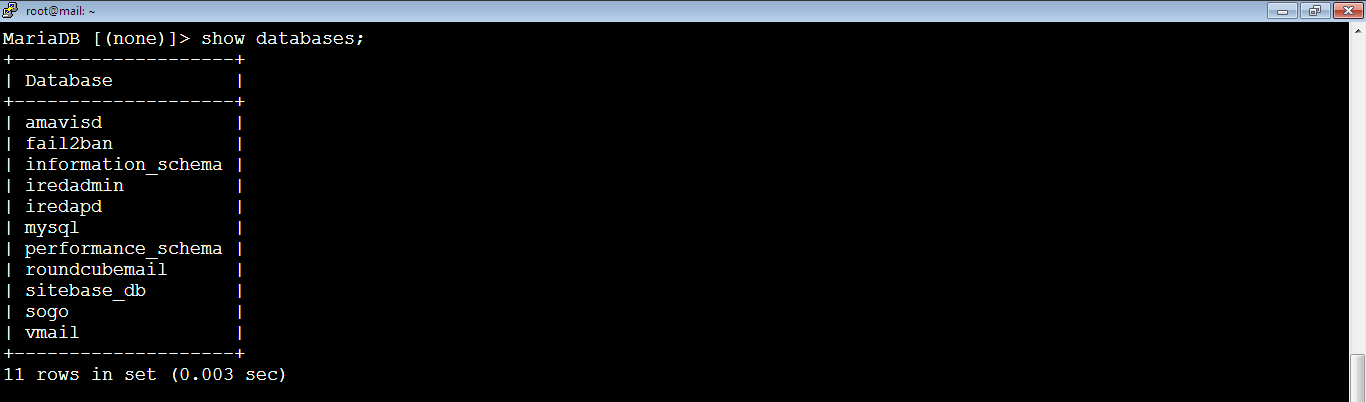
So, we need to sync these databases:
amavisd
fail2ban
information_schema
iredadmin
iredapd
mysql
performance_schema
roundcubemail
sitebase_db
sogo
vmail
Enable Binary Log and MySQL Master Slave Replication
Open 50-server.cnf File
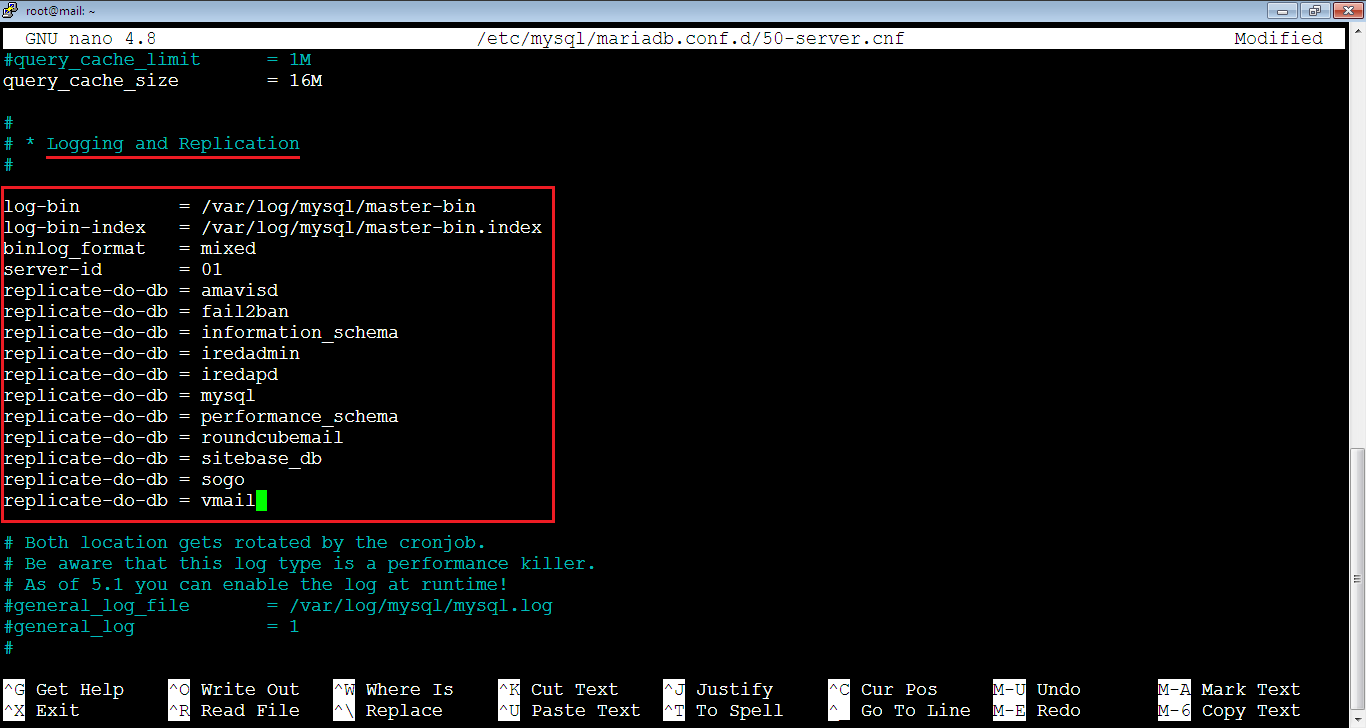
2. [Master] Enable binary log and replication on Master. Open the 50-server.cnf file by running the command below:
root@mail:~# nano /etc/mysql/mariadb.conf.d/50-server.cnfThen, find the Logging and Replication section in [mysqld] unit. After that, add the following lines but you need to replace the name of the databases below with the databases we you want to sync. In our case, we will sync all databases as below:
log-bin         = /var/log/mysql/master-bin
log-bin-index   = /var/log/mysql/master-bin.index
binlog_format   = mixed
server-id       = 01
replicate-do-db = amavisd
replicate-do-db = fail2ban
replicate-do-db = information_schema
replicate-do-db = iredadmin
replicate-do-db = iredapd
replicate-do-db = mysql
replicate-do-db = performance_schema
replicate-do-db = roundcubemail
replicate-do-db = sitebase_db
replicate-do-db = sogo
replicate-do-db = vmail
Your file should look like below. Don’t close the file.
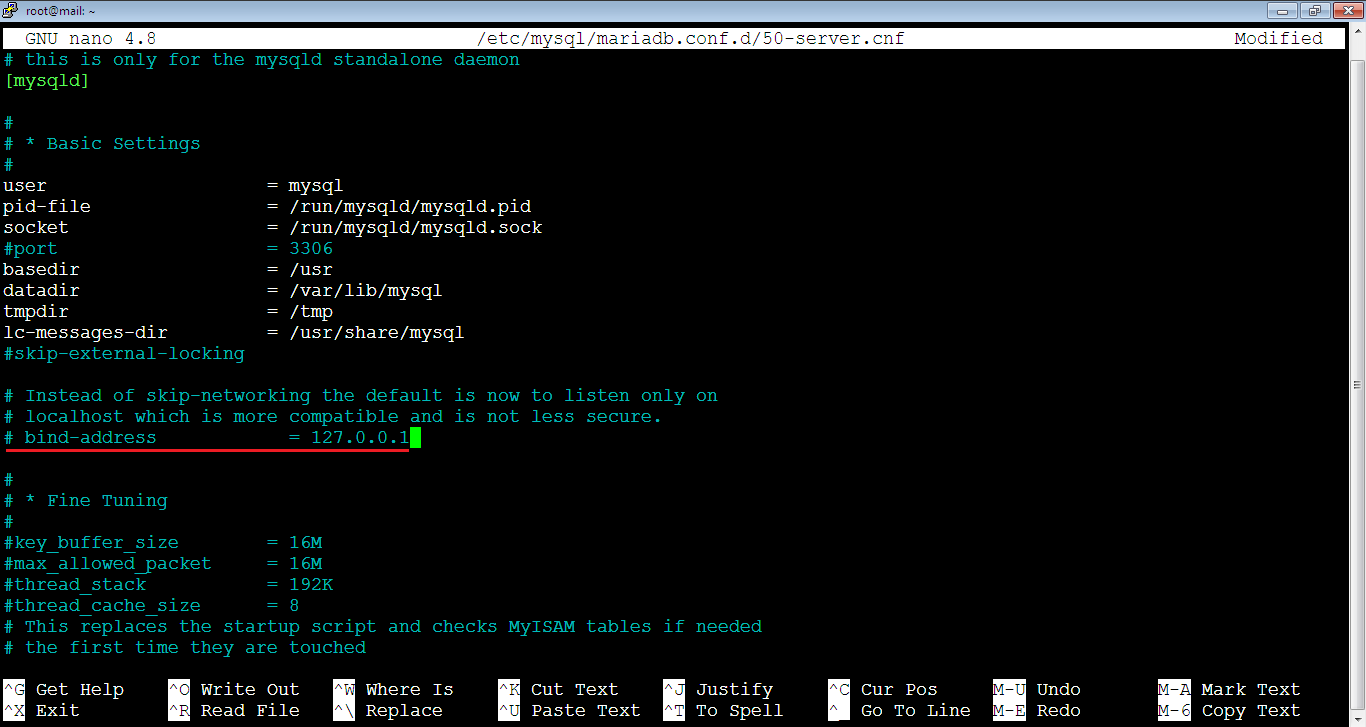
3. [Master] In the same file: 50-server.cnf which is still open, find the line: bind-address = 127.0.0.1, then comment it by adding a hash symbol (#) in front of it, like below. The purpose is to enable MySQL server to listen to other servers.
# bind-address = 127.0.0.1It should look like this:
Enable Error Log
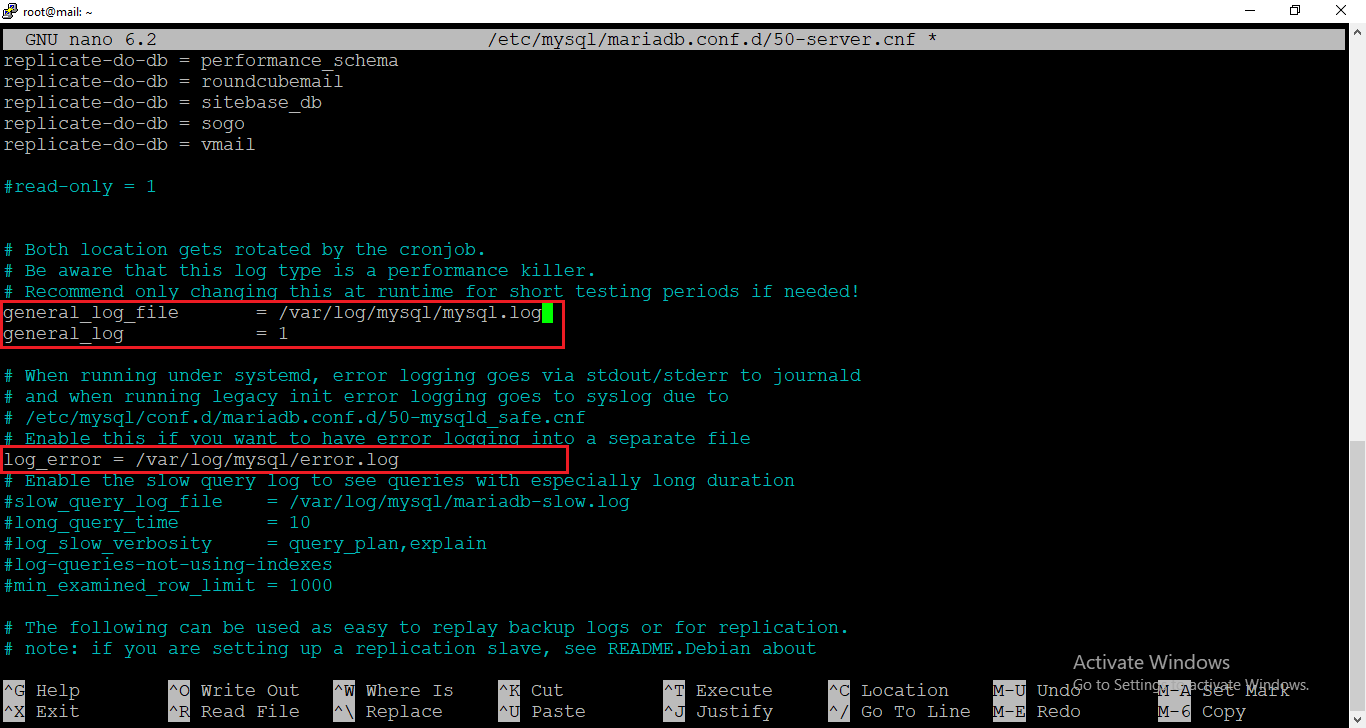
4. [Master] Keep the 50-server-cnf file open because we will enable error log. So, find the below lines in [mysqld] unit:
general_log_file       = /var/log/mysql/mysql.log
general_log            = 1
log_error = /var/log/mysql/error.log
Then, uncomment them. That is to say, remove the hash symbol (#) at the beginning of each line if it’s commented (inactive). It should look like below eventually:
To check the error log later, you need to run the below command:
root@mail:~# tail -100 /var/log/mysql/error.logIn case you want to check MySQL log, run the below command:
root@mail:~# tail -100 /var/log/mysql/mysql.logNote that the number: 100, is the number of recent lines, you can change it. Now, you can close the 50-server-cnf file. In case the /var/log/mysql/error.log file was empty, it means a log-rotate happened. So, you need to list all the files in the directory: /var/log/mysql/ to see the other error.log files. You might see error.log.1, error.log.2, etc. Therefore, you need to check their logs too.
5. [Master] Restart MariaDB server by running the below command:
root@mail:~# service mariadb restart
Create MySQL Master Slave Replication User
6. [Master] To create MySQL master slave replication user on Master server, enter MySQL console from root user by running the below command:
root@mail:~# mysqlThen, run the below MySQL command to create a replication_user MySQL user on Master. Note that you should replace the password below which is 12345678 with your own password. The password is simple because it’s just an example, you should add a strong password.
MariaDB [(none)]> create user 'replication_user'@'%' identified by '12345678';
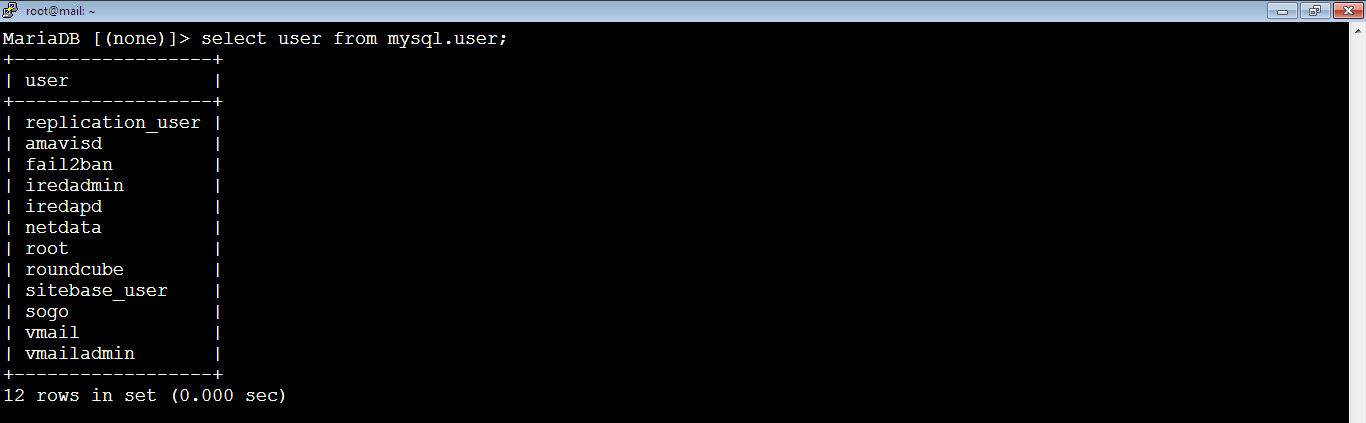
After that, we should make sure that replication_user has been created. So, run the below MySQL command:
MariaDB [(none)]> select user from mysql.user;As you see, it’s there.
7. [Master] Grant “replication slave” privilege to replication_user MySQL user which we’ve just created earlier by running the below command:
MariaDB [(none)]> grant replication slave on *.* to replication_user require ssl;We should use ssl connection since our servers are on the public internet.

If you don’t want to use SSL but would like to connect over private network, you can run the below command to cancel the SSL requirements:
MariaDB [(none)]> grant replication slave on *.* to replication_user require none;8. [Master] Flush privileges table by running the command:
MariaDB [(none)]> flush privileges;
b. Configure Slave
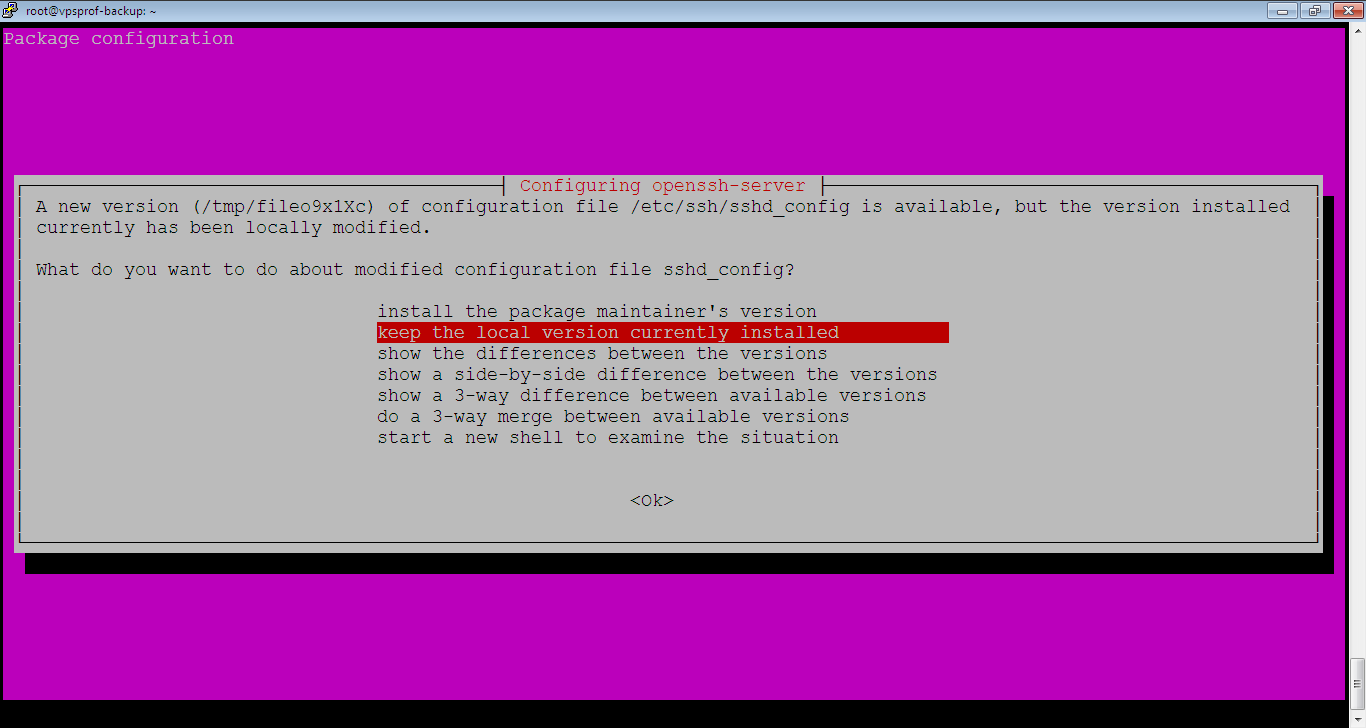
1. [Slave] Install the latest version of MariaDB on Slave (destination server). For this purpose, follow the instructions in this article: Install MariaDB on Ubuntu
Sometimes during the upgrade process apt upgrade command, you get popups like the one below about updating the packages configuration. So, don’t change anything, just hit Enter key and keep it as default. Do this for any similar popup.
Enable Binary Log and MySQL Master Slave Replication
2. [Slave] Enable binary log and replication on Slave. Open the 50-server.cnf file by running the following command:
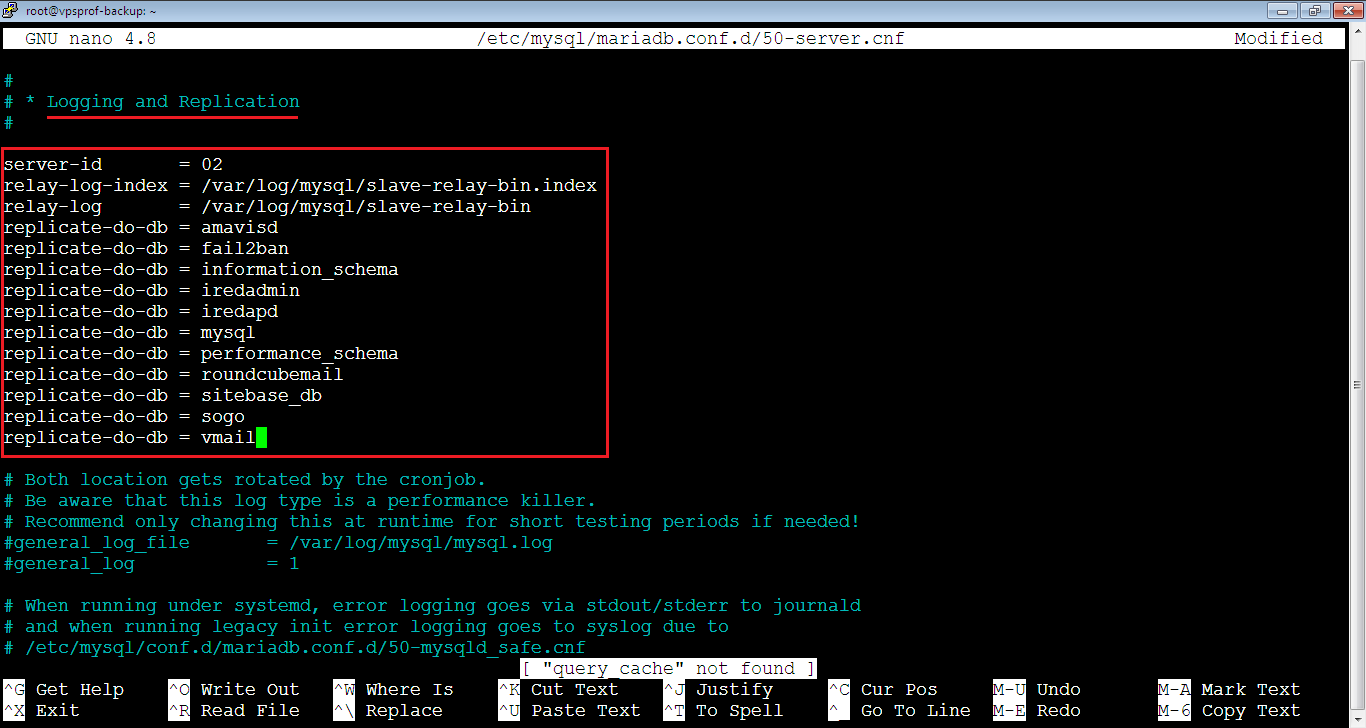
root@vpsprof-backup:~# nano /etc/mysql/mariadb.conf.d/50-server.cnfThen, find the Logging and Replication section in [mysqld] unit. After that, add the following lines but you need to replace the name of the databases below with the databases you want to sync.
server-id       = 02
relay-log-index = /var/log/mysql/slave-relay-bin.index
relay-log       = /var/log/mysql/slave-relay-bin
replicate-do-db = amavisd
replicate-do-db = fail2ban
replicate-do-db = information_schema
replicate-do-db = iredadmin
replicate-do-db = iredapd
replicate-do-db = mysql
replicate-do-db = performance_schema
replicate-do-db = roundcubemail
replicate-do-db = sitebase_db
replicate-do-db = sogo
replicate-do-db = vmail
Your file should look like below:
Don’t close the file, wait…
Enable Error Log
3. [Slave] Enable error log, same as what we did on Master earlier.
Prevent from Duplication Error
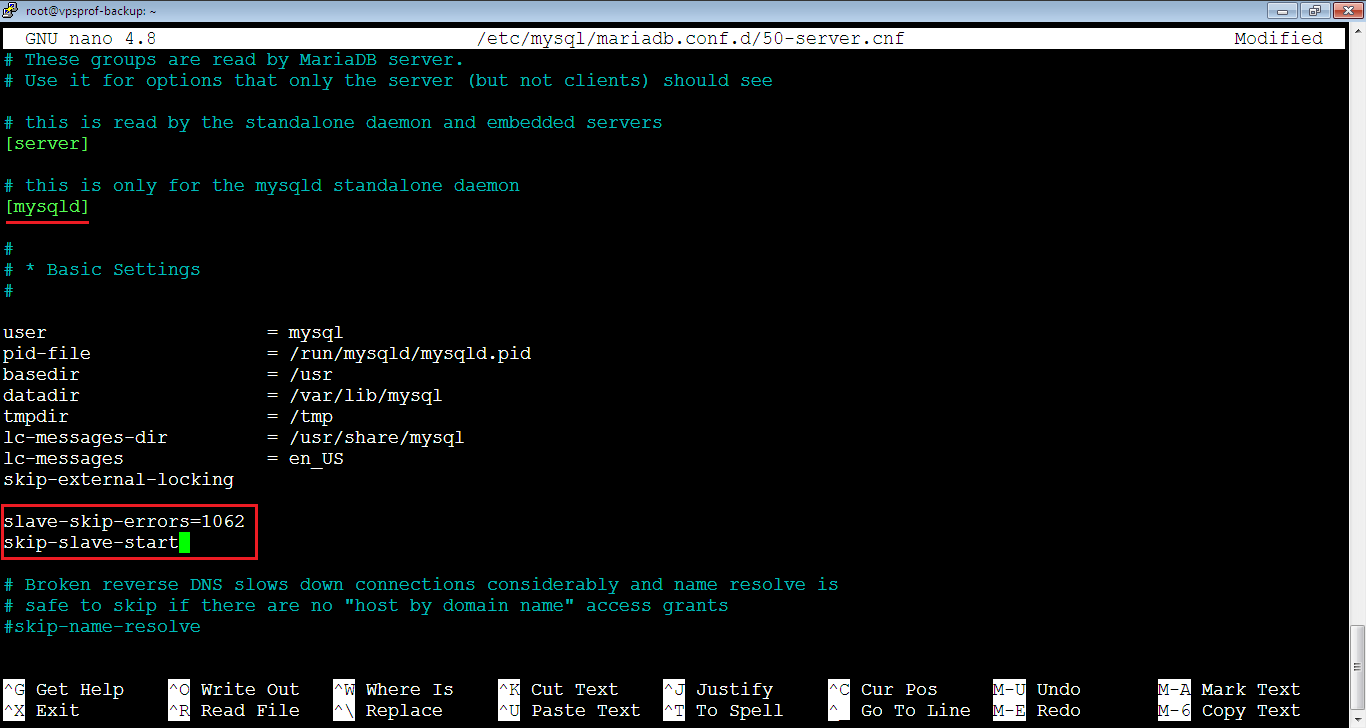
4. [Slave] Add the below two lines to the same file which is open now to prevent from duplication error on Slave when running MySQL master slave replication:
slave-skip-errors=1062
skip-slave-start
The file should look like below. Close and save the file.
5. [Slave – not required] We didn’t enable binary logging on Slave, but if the Slave will act as master for another server, we can enable it by adding these 3 lines below the lines we’ve just added above:
log-bin       	= /var/log/mysql/02-bin
log-bin-index 	= /var/log/mysql/02-bin.index
binlog_format 	= mixed
Also, add the following line as well below the lines above:
log_slave_updates = ON6. [Slave] Restart MariaDB server by running the below command:
root@vpsprof-backup:~# service mariadb restartc. Secure Connection wtih SSL
1. [Master] Now, we need to add any of your website’s Letsencrypt SSL certificates to Master to have a secure connection with Slave. For this purpose, we will add the TLS certificate of the email server project: mail.vpsprof.com which we already obtained here: TLS Certificate Installation (part: a. Install Certbot and Obtain TLS Certificate). In case you didn’t install the email server, you can use the SSL certificate of the website’s domain you hosted on your server. In our tutorial, our website is gainbybrain.com and we explained how to obtain its certificate here: Nginx Virtual Hosts Configuration (part: b. Obtain SSL Certificate). To list the available certificate folders, run the below command:
root@mail:~# ls /etc/letsencrypt/live
Then, open 50-server.cnf file by running the command below:
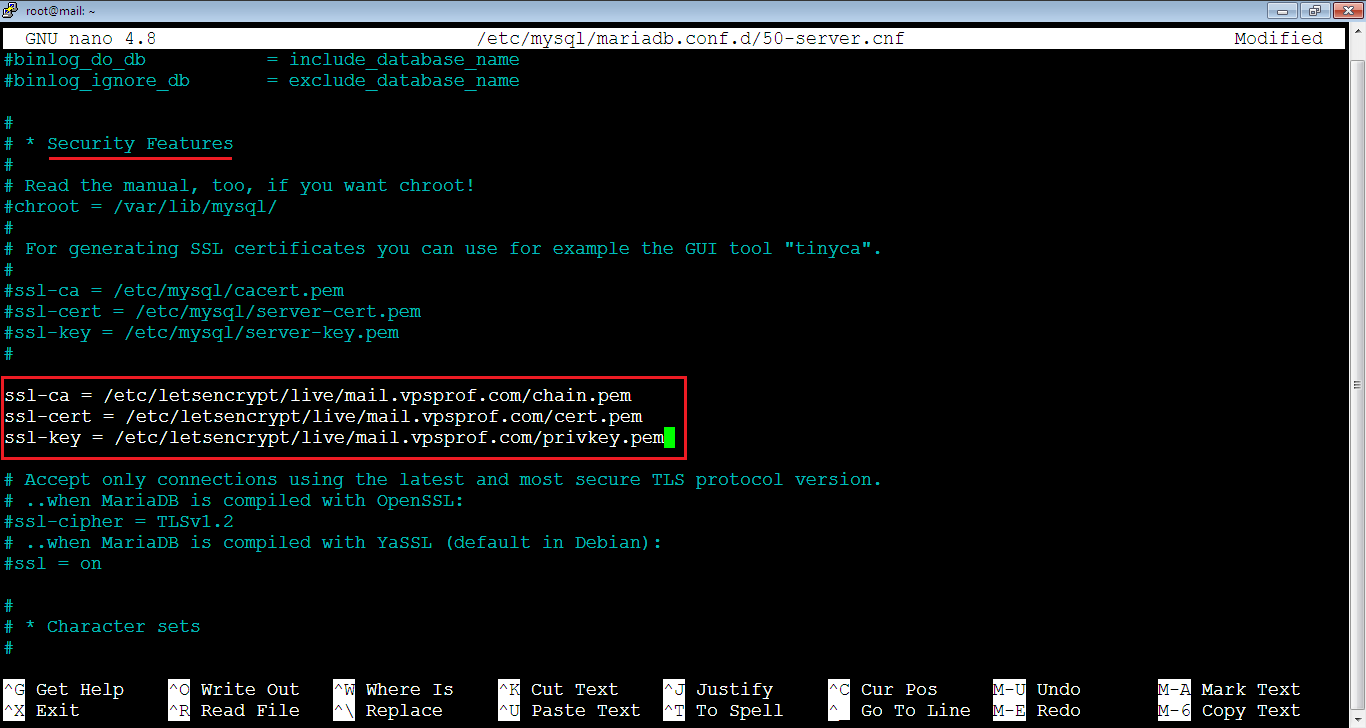
root@mail:~# nano /etc/mysql/mariadb.conf.d/50-server.cnfAfter that, find Security Features section in [mysqld] unit. Then, add the following lines (make sure to replace the website below with the name of your website):
ssl-ca = /etc/letsencrypt/live/mail.vpsprof.com/chain.pem
ssl-cert = /etc/letsencrypt/live/mail.vpsprof.com/cert.pem
ssl-key = /etc/letsencrypt/live/mail.vpsprof.com/privkey.pem
Note that the file should look like below:
2. [Master] Grant MySQL the permission to access the SSL files using the following two commands:
root@mail:~# setfacl -R -m "u:mysql:rx" /etc/letsencrypt/archive/root@mail:~# setfacl -R -m "u:mysql:rx" /etc/letsencrypt/live/
In case the ACL service is not installed, you can install it easily by running the command:
root@mail:~# apt install acl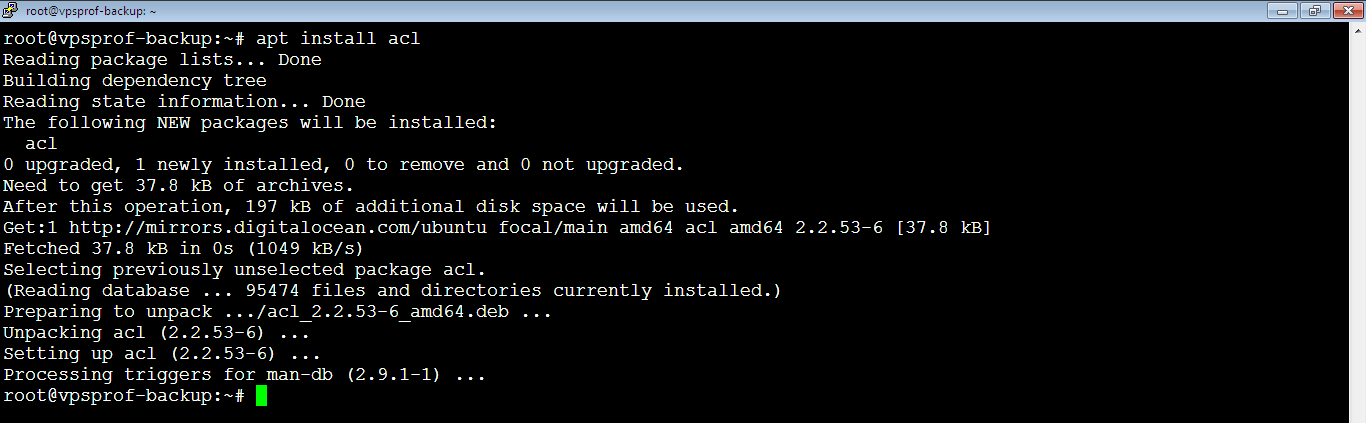
Note that sometimes when you reboot your server, MySQL stops working. So you should read the error in the error log by running the command:
root@mail:~# tail -f /var/log/mysql/error.logIf you see something similar to the error below:
2023-08-15 12:58:40 0 [Note] InnoDB: Creating shared tablespace for temporary tables
2023-08-15 12:58:40 0 [Note] InnoDB: Setting file './ibtmp1' size to 12 MB. Physically writing the file full; Please wait ...
2023-08-15 12:58:40 0 [Note] InnoDB: File './ibtmp1' size is now 12 MB.
2023-08-15 12:58:40 0 [Note] InnoDB: 10.6.12 started; log sequence number 12706705524; transaction id 14639661
2023-08-15 12:58:40 0 [Note] Plugin 'FEEDBACK' is disabled.
2023-08-15 12:58:40 0 [Note] InnoDB: Loading buffer pool(s) from /var/lib/mysql/ib_buffer_pool
SSL error: Unable to get private key from '/etc/letsencrypt/live/mail.vpsprof.com/privkey.pem'
2023-08-15 12:58:40 0 [ERROR] Failed to setup SSL
2023-08-15 12:58:40 0 [ERROR] SSL error: Unable to get private key
2023-08-15 12:58:40 0 [ERROR] Aborting
It means it’s because the permission lost to /etc/letsencrypt/live/ and /etc/letsencrypt/archive/ directoriesas we are using SSL in 50-server.cnf file. So, the solution is step #2 above; to grant MySQL the permission to access the SSL files using the following two commands, then restart MariaDB server.
root@mail:~# setfacl -R -m "u:mysql:rx" /etc/letsencrypt/archive/root@mail:~# setfacl -R -m "u:mysql:rx" /etc/letsencrypt/live/Or, you can comment SSL lines in 50-server.cnf as below, then restart MariaDB server.
#ssl-ca = /etc/letsencrypt/live/mail.vpsprof.com/chain.pem
#ssl-cert = /etc/letsencrypt/live/mail.vpsprof.com/cert.pem
#ssl-key = /etc/letsencrypt/live/mail.vpsprof.com/privkey.pem
3. [Master] Restart MariaDB server by running the below command:
root@mail:~# service mariadb restart4. [Master] Log to Master MariaDB console (MySQL console) by the running the command:
root@mail:~# mysqlCheck if SSL Connection is Enabled
Then, check if it uses SSL now by running the command:
MariaDB [(none)]> show global variables like "%ssl%";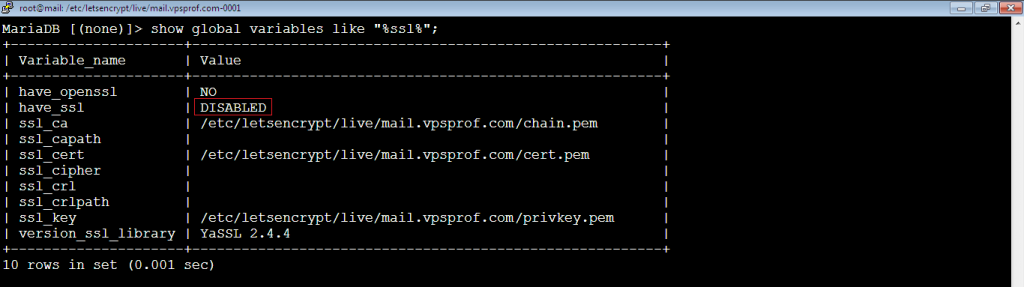
As you see, SSL connection is still disabled. Usually it’s because the certificate Private Key is in PKCS8 format and we should convert it to PKCS1 format. The PKCS8 key starts with:
-----BEGIN PRIVATE KEY-----So, let’s verify that by checking the file content by running the command below to open it:
root@mail:~# nano /etc/letsencrypt/live/mail.vpsprof.com/privkey.pemThen, notice what’s on top which means it’s PKSC8 key.
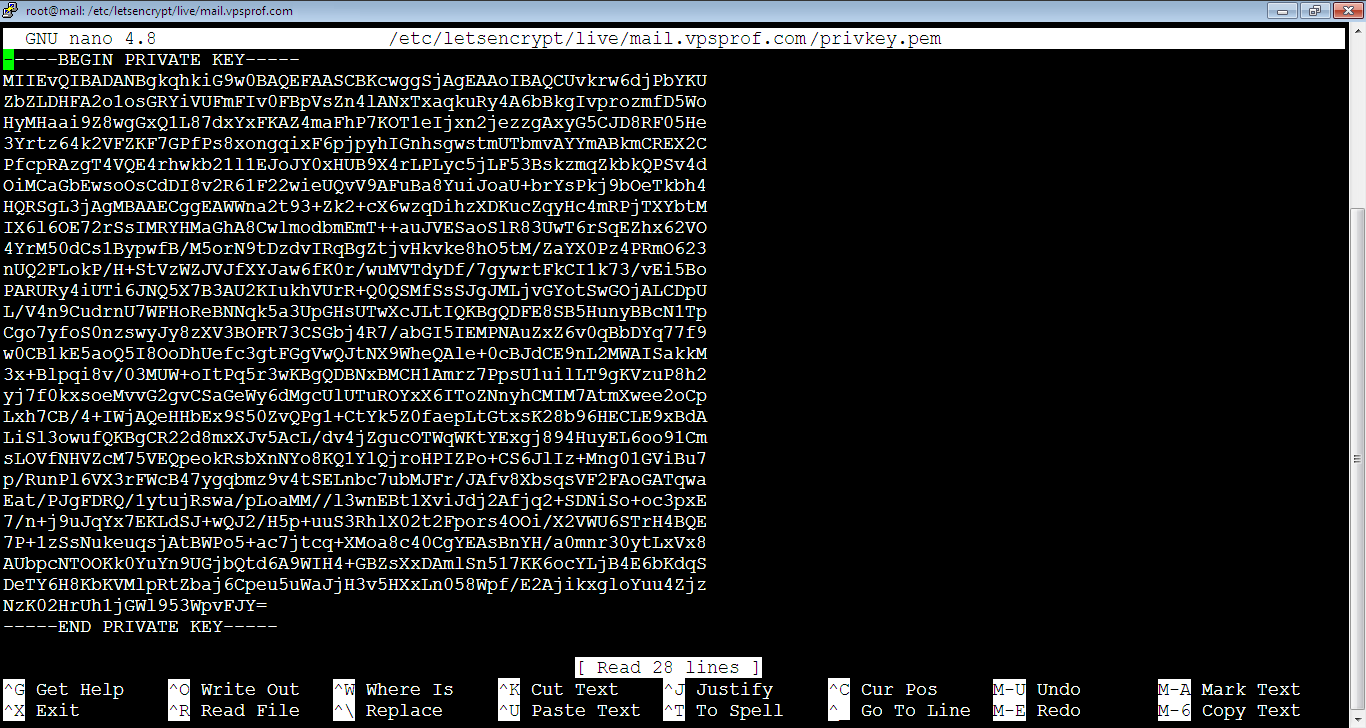
Convert Certificate’s Private Key from PKCS8 to PKCS1
Note that the general command to convert the key to PKCS1 is like below:
openssl rsa -in /path/to/pkcs8 -out /path/to/pkcs1So, let’s apply the command above on our Private Key (privkey.pem). Don’t forget to replace the domain below with your own domain.
root@mail:~# openssl rsa -in /etc/letsencrypt/live/mail.vpsprof.com/privkey.pem -out /etc/letsencrypt/live/mail.vpsprof.com/privkey.pem
Now, let’s check the key after the conversion, open it:
root@mail:~# nano /etc/letsencrypt/live/mail.vpsprof.com/privkey.pemAs you see, it beings with:
-----BEGIN RSA PRIVATE KEY-----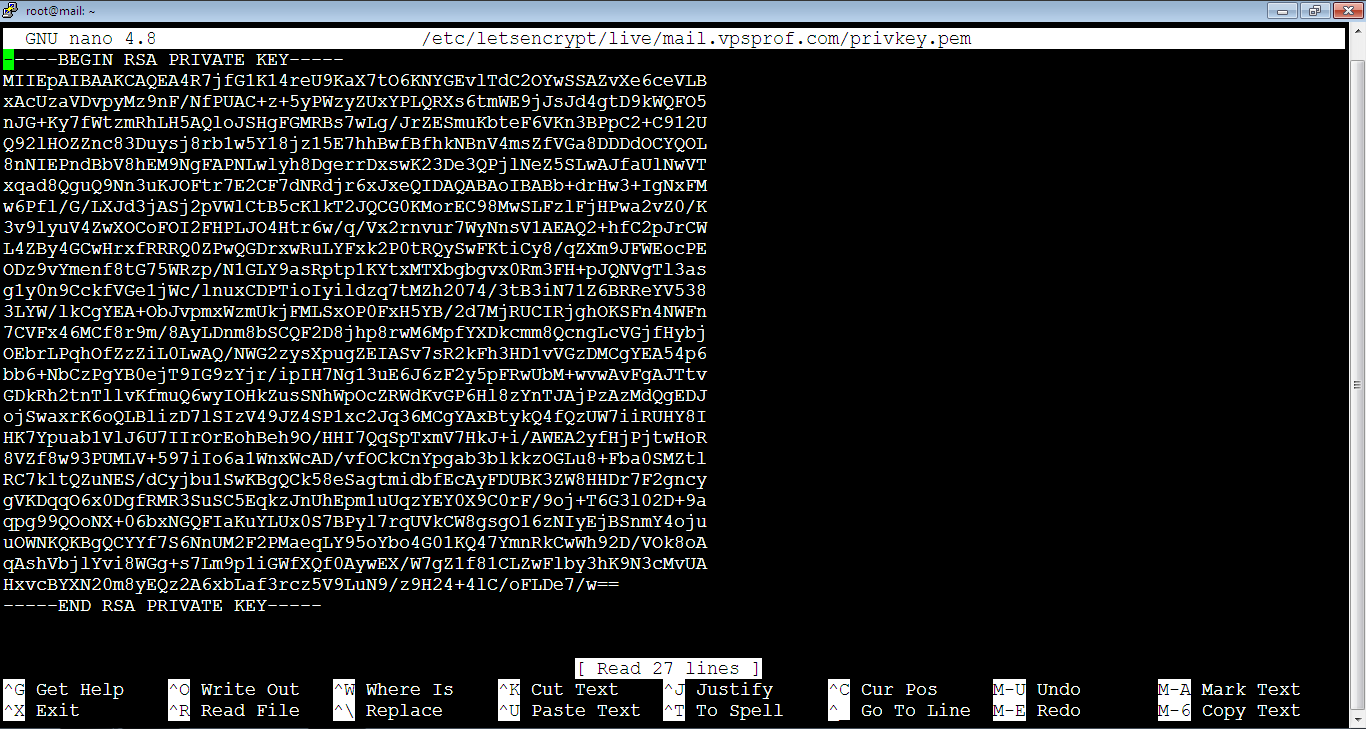
Now, restart MariaDB server for the changes to take the effect:
root@mail:~# service mariadb restartThen, login to MariaDB Console and check the SSL if it’s enabled by running:
MariaDB [(none)]> show global variables like "%ssl%";
As you see, it works now! The SSL is enabled on Master.
In case it doesn’t work, run the below commands again to grant MySQL the permission to access the SSL files. Then, restart MariaDB on master server.
root@mail:~# setfacl -R -m "u:mysql:rx" /etc/letsencrypt/archive/root@mail:~# setfacl -R -m "u:mysql:rx" /etc/letsencrypt/live/root@mail:~# service mariadb restartNote that enabling SSL on Master might cause problems with logging to your email address on Roundcube. That is to say, if you try to login to: postmaster@vpsprof.com you won’t get a response. This happens because Ubuntu 20 improved the security level. In order to solve this problem, open the OpenSSL configuration file by running the below command. If you’re running Ubuntu 22.04 LTS, you don’t need to add the below.
root@mail:~# nano /usr/lib/ssl/openssl.cnfThen, put at the beginning of the file this line:
openssl_conf = default_confAfter that, put at the end of the file these lines:
[ default_conf ]

ssl_conf = ssl_sect

[ssl_sect]

system_default = ssl_default_sect

[ssl_default_sect]

MinProtocol = TLSv1
CipherString = DEFAULT:@SECLEVEL=1
Then, close and save the file. Don’t forget to restart MariaDB Server for the changes to take effect:
root@mail:~# service mariadb restartd. Test SSL Connection
SSL Login from Slave to Master
1. [Slave] To test SSL connection, we need to login from Slave to Master’s user: replication_user. The command is like below:
root@vpsprof-backup:~# mysql -h Master_IP_Address -u replication_user -p --ssl;Note that the IP address of the master is: 144.91.72.55, so we need to run the below command on Slave.
root@vpsprof-backup:~# mysql -h 144.91.72.55 -u replication_user -p --ssl
2. [Slave] You will be asked to enter the password of the replication_user. So, enter the password then hit Enter key.

Opps! We got the following error:
ERROR 2026 (HY000): SSL connection error: unsupported protocolBut don’t worry. This happens because Ubuntu 20 improved the security level, as we mentioned earlier. These security improvement prevented from logging to Roundcube after enabling SSL on Master. To solve this problem, we will do the same steps we applied on Master earlier. Open the OpenSSL configuration file by running the below command. If you use Ubuntu 22.04 LTS, you may not need this.
root@vpsprof-backup:~# nano /usr/lib/ssl/openssl.cnfThen, put at the beginning of the file this line:
openssl_conf = default_confAfter that, put at the end of the file these lines:
[ default_conf ]

ssl_conf = ssl_sect

[ssl_sect]

system_default = ssl_default_sect

[ssl_default_sect]

MinProtocol = TLSv1
CipherString = DEFAULT:@SECLEVEL=1
Don’t forget to restart MariaDB Server for the changes to take effect:
root@vpsprof-backup:~# service mariadb restartNow, let’s try again:
root@vpsprof-backup:~# mysql -h 144.91.72.55 -u replication_user -p --ssl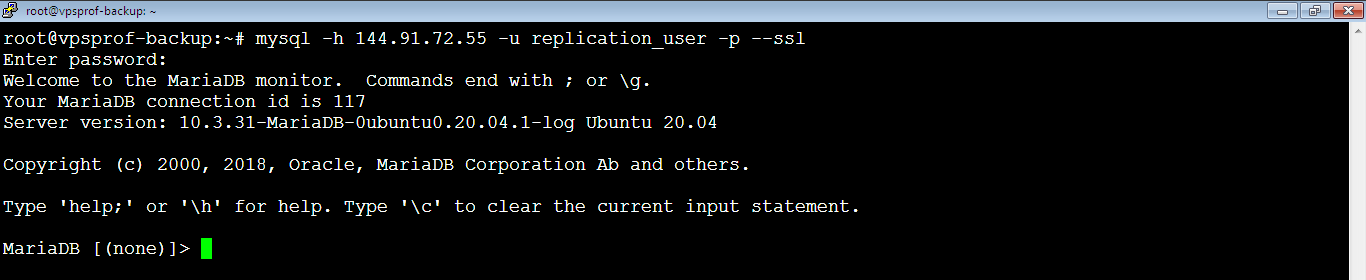
And here we go! We’re able to access Master‘s database from Slave via SSL connection.
Important note: you must make sure that the slave can listen to Master server on port 3306. Otherwise, you won’t be able to run the command above to connect to the master.
If you get an error similar to this after a long waiting time:
root@vpsprof-backup:~# ERROR 2002 (HY000): Can't connect to server on (115) mysqlOn Slave, check the opened ports on Master by running the command:
root@vpsprof-backup:~# nmap 144.91.72.55If nmap service is not installed, just install it. You should see port 3306 open as below:
root@vpsprof-backup:~# nmap 144.91.72.55
Starting Nmap 7.80 ( https://nmap.org ) at 2023-06-04 01:09 UTC
Nmap scan report for mail.vpsprof.com (144.91.72.55)
Host is up (0.070s latency).
Not shown: 989 filtered ports
PORT     STATE SERVICE
22/tcp   open  ssh
25/tcp   open  smtp
80/tcp   open  http
110/tcp  open  pop3
143/tcp  open  imap
443/tcp  open  https
465/tcp  open  smtps
587/tcp  open  submission
993/tcp  open  imaps
995/tcp  open  pop3s
3306/tcp open  mysql
If port 3306 is not the list, you should check if there’s any firewall preventing the Slave from listening to master’s port 3306. In Ubuntu 22.04 LTS, nftables service has been introduced and you can check the opened ports by running the command:
root@mail:~# nano /etc/nftables.confIf port 3306 is not added there, add it on Master server as seen below:
        # ssh
        tcp dport 22 accept

        # http, https
        tcp dport 80 accept
        tcp dport 443 accept

        # smtp, submission, smtps
        tcp dport 25 accept
        tcp dport 587 accept
        tcp dport 465 accept

        # pop3, pop3s
        tcp dport 110 accept
        tcp dport 995 accept

        # imap, imaps
        tcp dport 143 accept
        tcp dport 993 accept

        # mysql - added on june 4, 2023
        tcp dport 3306 accept
Don’t forget to restart nftables service by running the command:
root@mail:~# service nftables restartNow when you check Master’s port 3306 from the Slave by running nmap command, it should be shown and you will be able to connect to Master from Slave.
But you should allow connection to port 3306 on the Master from the Slave only, for security purposes. This can be done from nftables or easily from UFW firewall by running these simple commands on Master:
root@mail:~# ufw allow from 137.184.33.153 to any port 3306
root@mail:~# ufw allow 22,25,80,110,143,443,587,465,993,995/tcpThen enable ufw by running the command:
root@mail:~# ufw enableTo see the status of the ufw, run the command:
root@mail:~# ufw status numberedTo delete any rule, just run:
root@mail:~# ufw delete rule_number3. [Slave] Let’s check the status of the Master from the Slave by running the command:
MariaDB [(none)]> status;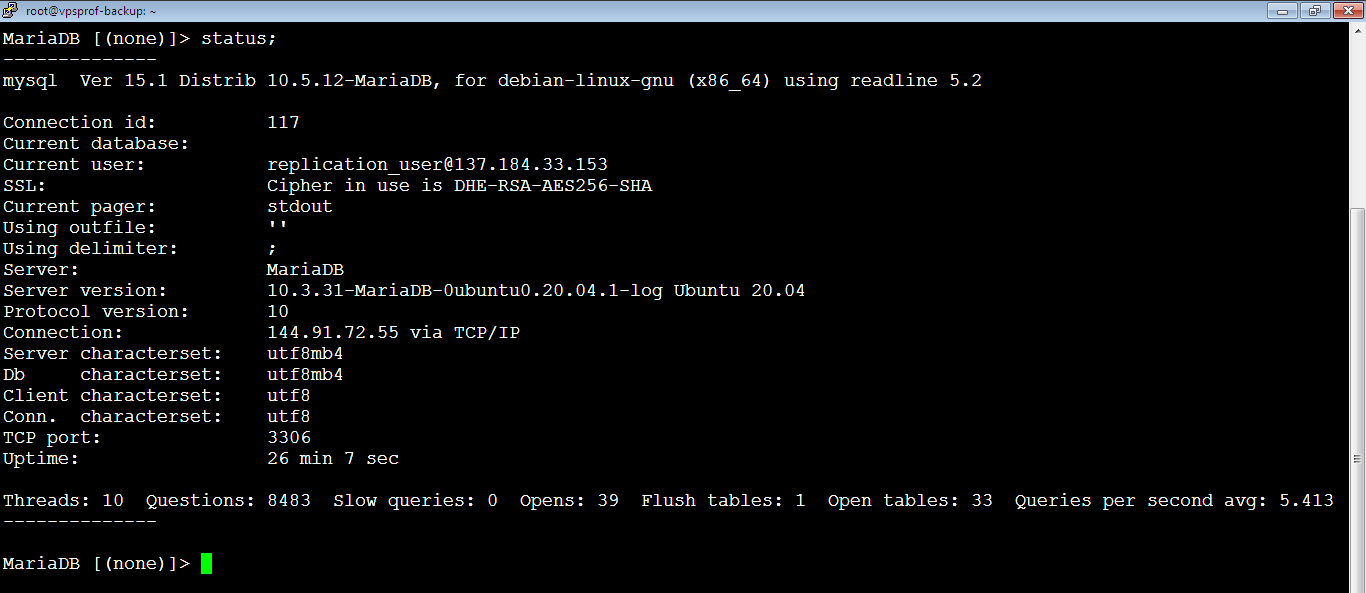
e. Export All Databases from Master and Import Into Slave
Lock Master's Database
1. [Master] Run this MySQL command on Master to prevent any change to database before copying the database from the Master to Slave.
MariaDB [(none)]> flush tables with read lock;Note that the export will not work if you run the above command when you export the whole database (which contains separate databases). It works only if you export a single database. We researched on how to make it work for the whole database and yes, we got it!
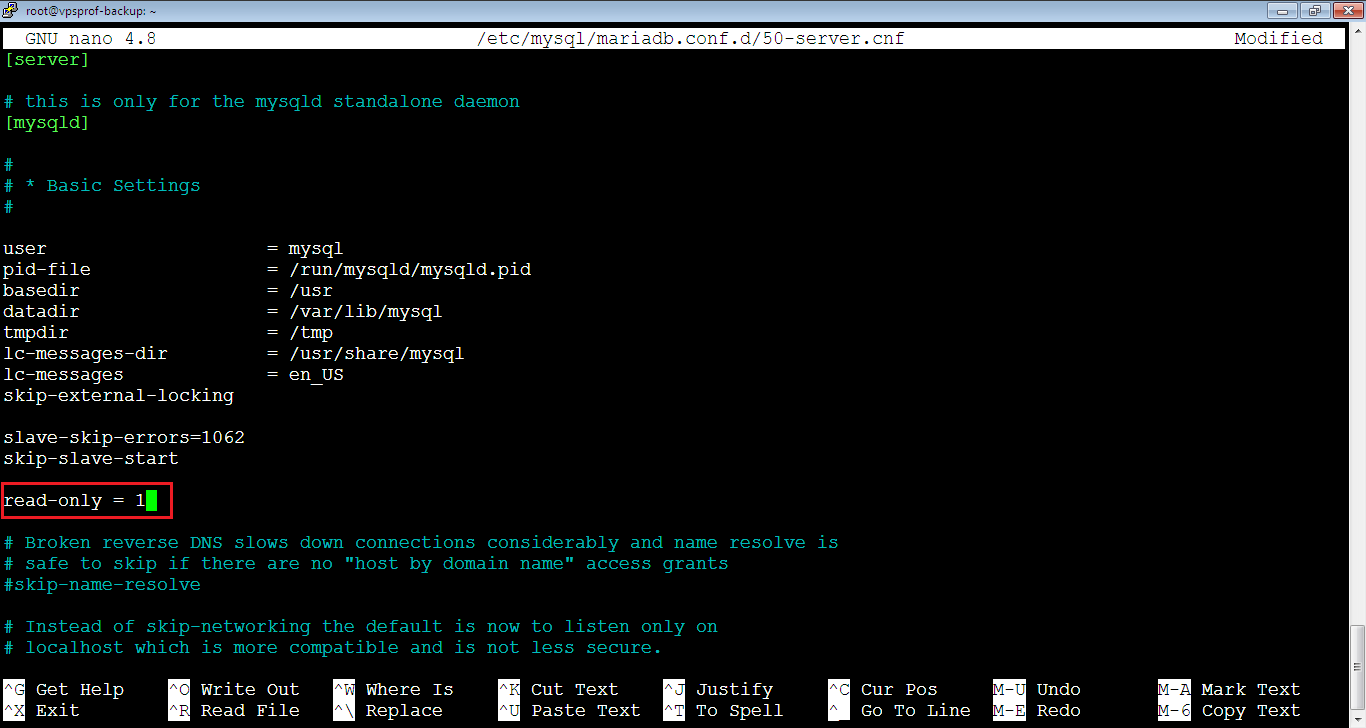
If you want to lock the database on Master with the ability to export the whole database and also to keep your website running and viewable so visitors can view it (read only) but without any writing access, like clicking on Add to Cart button, for instance, because it’s write process for some plugins. Just add the line read-only = 1 in 50-server.cnf file below the synced databases in the file. No need to lock tables, ignore the command above: flush tables with read lock;
root@mail:~# nano /etc/mysql/mariadb.conf.d/50-server.cnfread-only = 1Then restart MariaDB server for the changes to take effect:
root@mail:~# service mariadb restartIt works like a charm – we tested it.
Note: If you’re using MySQL (not MariaDB) and want to lock only one database (disable write access), run the below command. It’s used if you want to migrate a single database separately for a particular website. You don’t want to disable write access for all websites (i.e. all their databases).
ALTER DATABASE database_name READ ONLY = 1;To unlock the database (enable write access), run the command:
ALTER DATABASE database_name READ ONLY = 0;Unfortunately, it doesn’t work on MariaDB, if you run it, you will get a similar error:
MariaDB [(none)]> ERROR 1064 (42000): You have an error in your SQL syntax; check the manual that corresponds to your MariaDB server version for the right syntax to use near 'READ ONLY = 0' at line 1
Read more about it here.
Now, if you want to use the first command (we don’t recommend) which doesn’t allow you to export the whole database: flush tables with read lock; as below:

If you’re on live server, the website will go offline and when you exist MariaDB console (MySQL console) by typing exit, quit or pressing Ctrl+C, the lock will be released. You can also use the command: unlock tables to release the lock but don’t exist MariaDB Console now because we need to keep the lock until we transfer the files to the slave. You need to start new PuTTY session or new Terminal session now for the Master.
2. [Master] We need to send all databases from Master to Slave, we’ve to do three easy things:
First Method: Using the Bash Scripts We Created Before
1. [Master] Generate Backup ZIP Files on Master via backup.sh Script
First: we need to run the backup.sh bash script (from new PuTTY session or new Terminal session) to generate new zip file for all databases on Master. Simply, you need to run the below command but you should be sure that the backup.sh bash script is setup alright to backup all databases.
root@mail:~# bash /var/master_backup/backup.shWe already explained this here: Backup MySQL and Site Files on Source Server
2. [Master] Sync master_backup Directory to Send Backup to Slave
Second: we need to send the generated zip files from Master to Slave by using the Rsync utility to sync the master_backup directory on both servers. As we use iNotifyWait utility which we explained here: Real Time Sync via iNotifyWait. The backup zip files that we generated in the previous step via the backup.sh script should be sent automatically to Slave. However, you can force that manually if any delay happens by any reason by running the command below which is explained here: Rsync Linux User Creation and Test (Sync Backup Directory Between Source and Destination Servers part). Note that the Slave IP address is: 37.184.33.153, you should replace it with the IP address with your Slave.
root@mail:~# flock -n lock_file -c "rsync -vzru -e 'ssh -p 22' --rsync-path='sudo rsync' /var/master_backup/ rsyncuser@137.184.33.153:/var/master_backup/"3. [Slave] Import the Zipped Backup File
Third: import the zip file for all databases that you sent from Master to Slave. This can be done easily by checking the latest zip file for all databases by running this command:
root@vpsprof-backup:~# ls -la /var/master_backup/databases/allThen, run the below command but make sure to replace all-databases-backup-zip-file-without-zip-extension with the backup zip file for all databases without adding the .zip extension in the command.
root@vpsprof-backup:~# bash /var/master_backup/restore_db.sh all-databases-backup-zip-file-without-zip-extension allWe already explained this here: Restore MySQL on Destination Server from Backup (part b. Restore All MySQL Databases via restore_db.sh Bash Script).
Second Method: Using Native Commands
1. [Master] Create Temporary Directory for the Databases You Will Export
What we will do here, it’s very easy. We will create a temporary directory that will contain all databases that will be sent to Slave server. Run the command:
root@mail:~# mkdir /var/www/html/temp_db2. [Master] Export the Required Databases
Export the database you want to send to slave by running this command. You can use root instead of sitebase_user if there’s no user assigned to the database.
root@mail:~# mysqldump -u sitebase_user -p sitebase_db > /var/www/html/temp_db/sitebase_db.sqlDo this for all databases.
3. [Master] Send All Exported Database Files to Slave
Once you’re done, send the folder temp_db by Rsync to Slave server by syncing the website directory temp_db on both servers by running the below command:
root@mail:~# rsync -vzru -e 'ssh -p 22' /var/www/html/temp_db/ root@144.91.72.55:/var/www/html/temp_db/4. [Slave] Import the Databases
Now, it’s the time to import the database on the Slave server but BE CAREFUL before doing this step as it will erase any previous database if it exists. If the database and the user don’t exist on Slave, you should create them by following the instructions in the Create New MySQL Database blog post.
Now, run the command to import the database:
root@vpsprof-backup:~# mysql -u sitebase_user -p sitebase_db < /var/www/html/sitebase/sitebase_db.sqlIf you don’t want to make a user for every database on the slave , ou can use the root and the command will be like this:
root@vpsprof-backup:~# mysql -u root -p sitebase_db < /var/www/html/sitebase/sitebase_db.sqlDo this for all databases.
Lock Slave's Database
3. [Slave] Once we’re done with the data transfer from Master to Slave and to keep the data on Slave consistent with the master, we will disable writing to Slave database (read-only).
Open again the 50-server.cnf file by running the command:
root@vpsprof-backup:~# nano /etc/mysql/mariadb.conf.d/50-server.cnfThen, add the below line inside the [mysqld] section:
read-only = 1The file will look like below, close and save the file.
4. [Slave] Restart MariaDB server by running the below command:
root@vpsprof-backup:~# service mariadb restartf. Connect Slave to Master Mysql
1. [Master] Let’s check the binary log numbers which are the name of the binary log file in use and the position number of the last written event by running the command on MySQL console:
MariaDB [(none)]> show master status;
Note that when you enable read-only in 50-server.cnf file on Master’s database, the Position will be always 343 as below:
MariaDB [(none)]> show master status;
+-------------------+----------+--------------+------------------+
| File              | Position | Binlog_Do_DB | Binlog_Ignore_DB |
+-------------------+----------+--------------+------------------+
| master-bin.000061 |      343 |              |                  |
+-------------------+----------+--------------+------------------+
1 row in set (0.000 sec)
Establish MySQL Master Slave Replication Connection
2. [Slave] Run the below command to establish the connection between the Master and the Slave. Make sure to run it on the SLAVE.
MariaDB [(none)]> change master 'master01' to master_host='Master_IP_Address',
master_user='Replication_User_In_Use',
master_password='Password_of_Replication_User',
master_port=3306,
master_log_file='Master_Binary_Log_File_Name',
master_log_pos=Master_Binary_Log_File_Position,
master_connect_retry=10,
master_use_gtid=slave_pos,
master_ssl=1;
And here when we replace the variables with our own variables:
MariaDB [(none)]> change master 'master01' to master_host='144.91.72.55',
master_user='replication_user',
master_password='12345678',
master_port=3306,
master_log_file='master-bin.000061',
master_log_pos=504933,
master_connect_retry=10,
master_use_gtid=slave_pos,
master_ssl=1;
Start Slave
3. [Slave] Start Slave by running the command:
MariaDB [(none)]> start slave 'master01';
Check MySQL Master Slave Replication Status
4. [Slave] Check the replication status by running the below command:
MariaDB [(none)]> show slave 'master01' status\G;To make sure that the replication is successful, the values of the two variables below must be Yes.
Slave_IO_Running: Yes
Slave_SQL_Running: Yes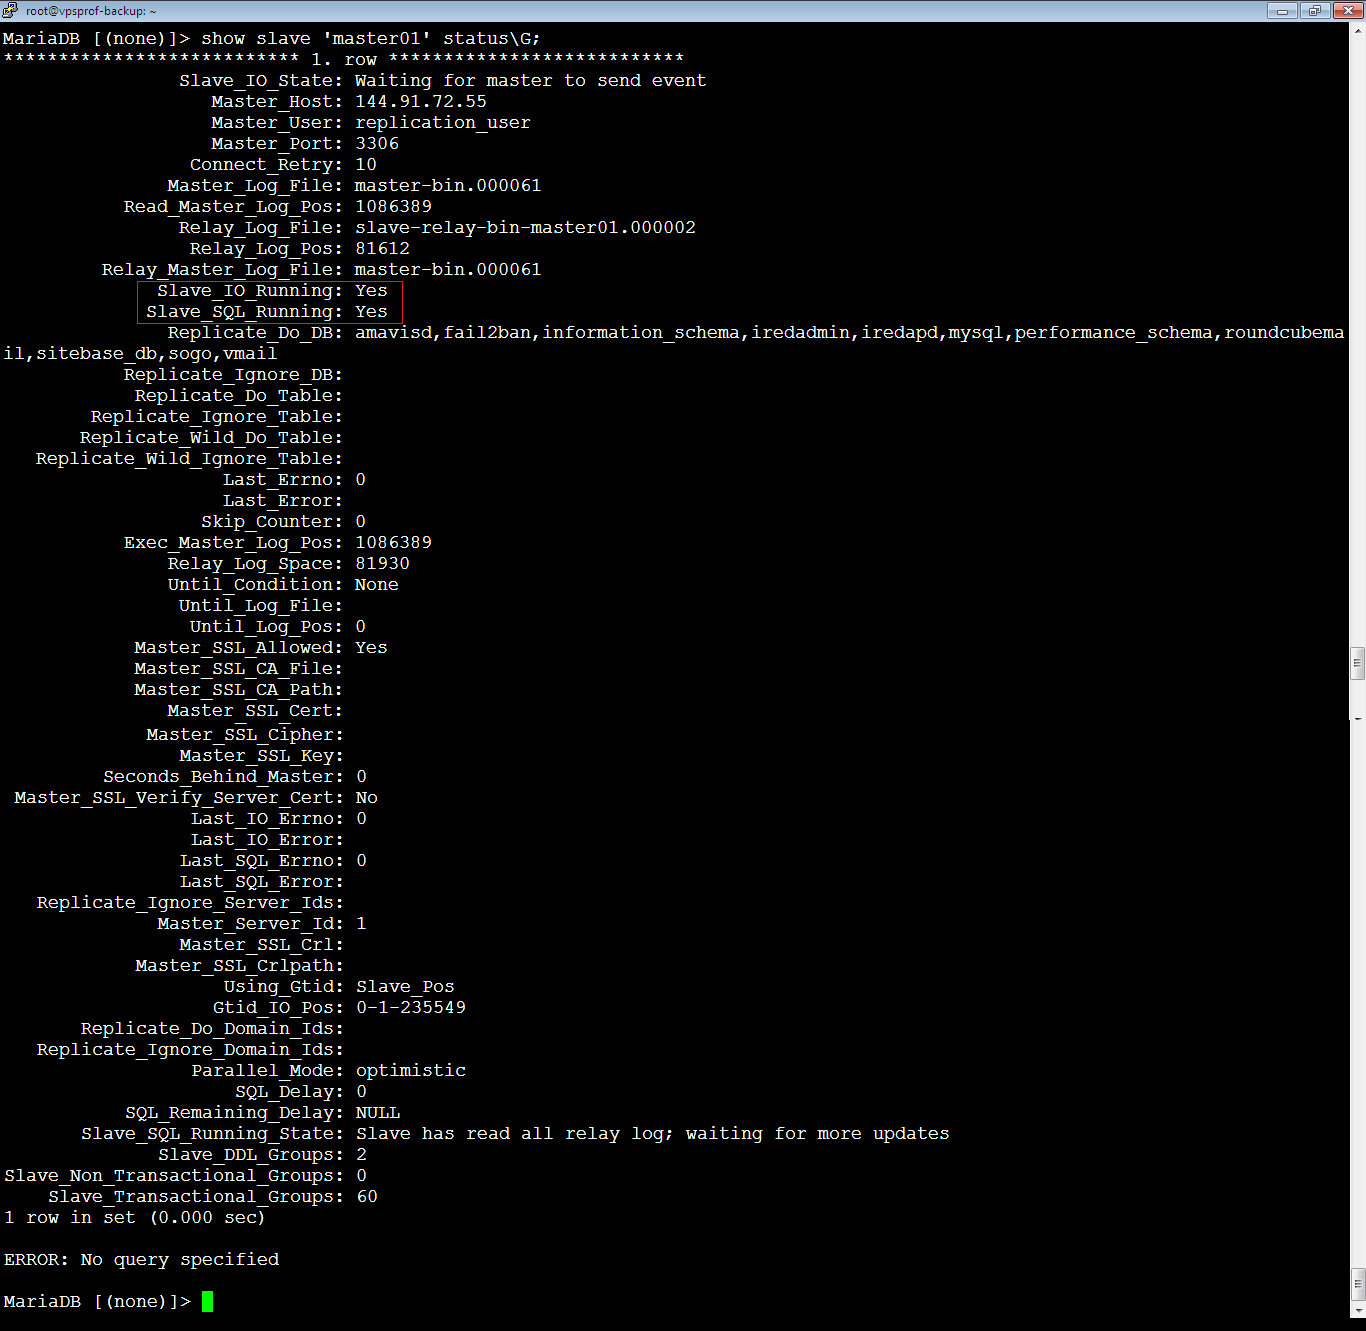
Also, you can check the gtid (Global Transaction ID) for both the Master and the Slave, they should be the same. This number changes whenever any operation done on Master database, for example, you can try sending an email or opening an email, it will change.
Find gtid on Master
Headline connect master to slave
To check the gtid on Master, run the below command:
MariaDB [(none)]> show variables like 'gtid_binlog_pos';
Find gtid on Slave
To check the gtid on Slave, run the below command:
MariaDB [(none)]> show variables like 'gtid_slave_pos';
Unlock Master's Database
5. [Master] Now, you should release the lock by exiting MariaDB Console on first session that we used to lock the database by typing exit, quit or pressing Ctrl+C. Or you can run the below command on same session that locked the database:
MariaDB [(none)]> unlock tables;In case you lost the connection with the first session that you used to lock tables, you can unlock the database by restarting MariaDB on Master:
root@mail:~# service mariadb restartWith that being said, you shouldn’t restart your MariaDB server on Master after locking the Master’s database.
Stop Slave
6. [Slave] If the replication wasn’t successful for any reason or if you want to restart it, first, you need to stop the Slave by running the below command:
MariaDB [(none)]> stop slave 'master01';Reset MySQL Master Slave Replication Connection
Then you need to reset the whole connection by running the below commands:
MariaDB [(none)]> reset slave 'master01' all;After that, fix the problem and Establish the connection again. Note that restarting MariaDB server (service mariadb restart) on Slave will result in stopping the replication process while restarting MariaDB on Master will not stop the replication process.
To resume the replication after restarting MariaDB server on Slave, just start the Slave as below.
MariaDB [(none)]> start slave 'master01';If you want to reset the whole replication process, run the below commands on both Master and Slave respectively. But be careful, use this statement with caution to ensure you do not lose any wanted binary log file data and GTID execution history.
MariaDB [(none)]> reset master;MariaDB [(none)]> reset slave;In case after you run the replication, you get such the below error when you check the replication status on Slave:
Got fatal error 1236 from master when reading data from binary log: 'Error: connecting slave requested to start from GTID X-X-X, which is not in the master's binlog
It’s so easy. First, stop Slave by running the command:
MariaDB [(none)]> stop slave 'master01';Then, go the Master MySQL command and check the value of gtid_binlog_pos variable by running the command:
MariaDB [(none)]> show variables like 'gtid_binlog_pos';MariaDB [(none)]> show variables like 'gtid_binlog_pos';
+-----------------+--------+
| Variable_name | Value |
+-----------------+--------+
| gtid_binlog_pos | 0-1-92 |
+-----------------+--------+
1 row in set (1.825 sec)
Get the value then set it to Slave’s gtid_slave_pos variable by running the command:
MariaDB [(none)]> SET GLOBAL gtid_slave_pos = '0-1-92';Finally, start slave by running the following command. You shouldn’t see this error but make sure that both databases on Master and Slave are identical.
MariaDB [(none)]> start slave 'master01';Reboot Slave Server Safely
Sometimes your Ubuntu server will show you this note:
*** System restart required ***So, you need to reboot your Slave server without affecting the replication. You need to follow these easy steps:
1. [Master] enable read-only on Master by adding read-only=1 to 50-server.cnf file as we did earlier. First, open 50-server.cnf file by running the below comand:
root@mail:~# nano /etc/mysql/mariadb.conf.d/50-server.cnfThen add or uncomment the below line if it does exist:
read-only=1Once you’re done, reboot MariaDB server on Master:
root@mail:~# service mariadb restart2. [Slave] Stop slave by running the command:
MariaDB [(none)]> stop slave 'master01';3. [Slave] Flush tables on Slave by running the below command:
MariaDB [(none)]> flush tables;4. [Slave] Reboot Ubuntu server on Slave by running the command:
root@mail:~# reboot5. [Slave] Start slave by running the below command:
MariaDB [(none)]> start slave 'master01';6. [Master] Comment the line read-only=1 in 50-server.cnf file then restart MariaDB on Master for the changes to take effect.
Undo the Replication
Note that, if you want to undo the replication, you need to reset 50-server.cnf file and after that, you need to reboot your server. If you don’t reboot your server, MariaDB server might not restart. To reboot your server, run:
root@mail:~# rebootIt’s highly recommended that you take a snapshot for your server OS before rebooting your server, as sometimes rebooting causes damage to the OS which prevents from starting the server.
If you want to add a new database to the replication, you should follow our super easy article here: Add New Database to Replication.