
Before starting the backup process between two servers via Rsync utility, we need to create a unique Linux user for the Rsync utility for security purposes.
1. [Destination server] We need to create a unique Linux user for Rsync utility on the destination server, run the below command:
root@vpsprof-backup:~# useradd -m rsyncuser
2. [Destination server] Add a password for rsyncuser we’ve just created by running the below command then submit the new password two times as below:
root@vpsprof-backup:~# passwd rsyncuser
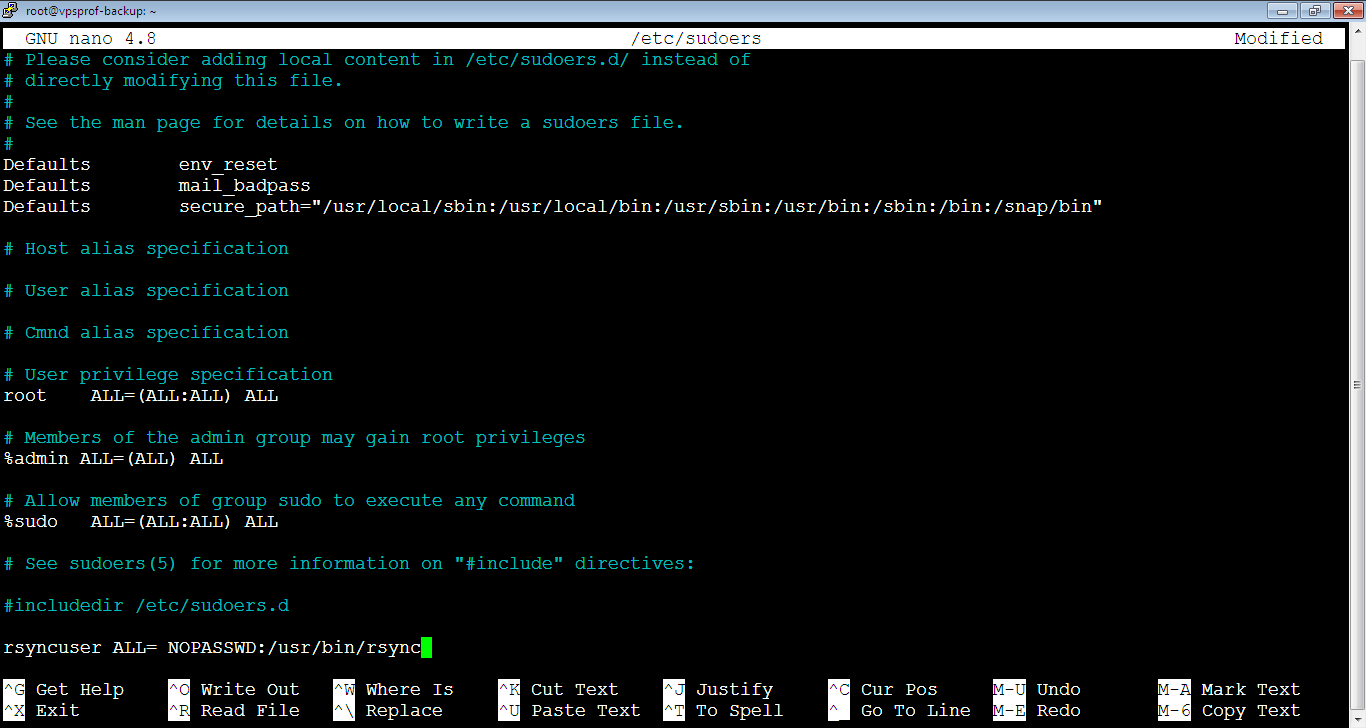
3. [Destination server] Enter the file: /etc/sudoers, on the destination server by running the following command:
root@vpsprof-backup:~# nano /etc/sudoersThen add at the end of the file this line to enable the permission for rysncuser by adding it to sudoers:
root@vpsprof-backup:~# rsyncuser ALL= NOPASSWD:/usr/bin/rsyncNote that the file should look like below at the end. If so, close and save the file.
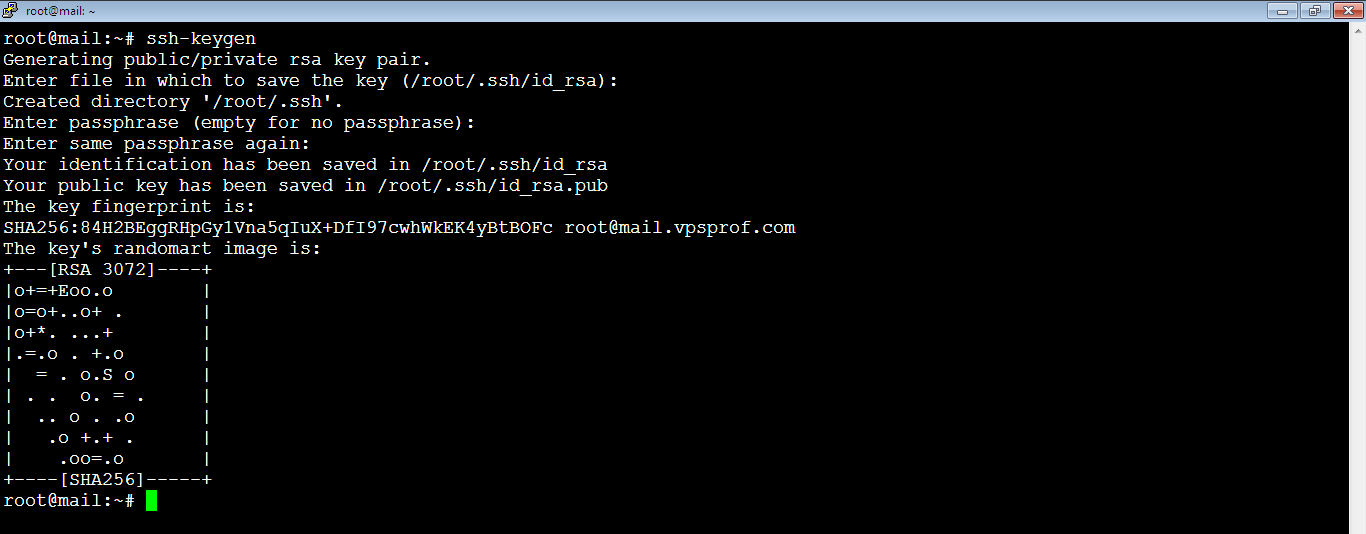
4. [Source server] Go to the source server then run the below command to generate a public SSH key:
root@mail:~# ssh-keygenAfter that, the prompt will ask you this question:
Enter file in which to save the key (/root/.ssh/id_rsa):You need to hit Enter key to keep the default directory.
Then, you will be asked for the passphrase, hit Enter key twice to confirm it without typing anything in the passphrase field.
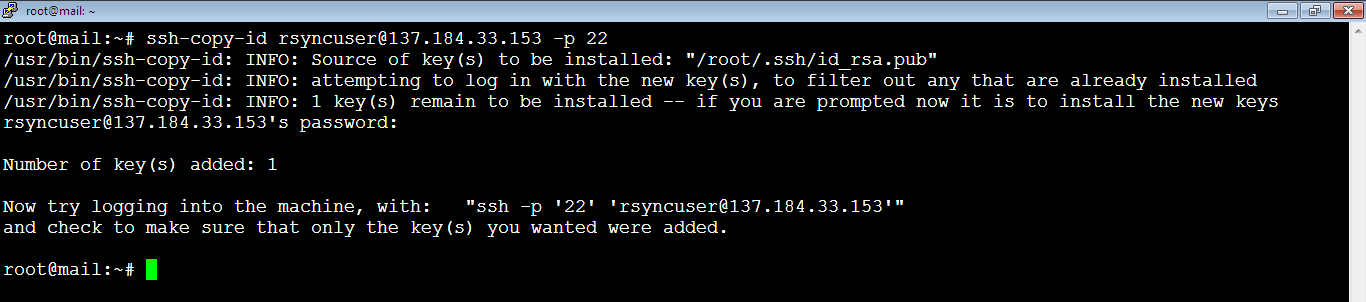
5. [Source server] Send the public key generated to the user rsyncuser on the destination server to establish the connection using the below command. Don’t forget to replace the IP address in bold with your own IP address if you haven’t added it in the golden box on top.
root@mail:~# ssh-copy-id rsyncuser@137.184.33.153 -p 22If you run the command above on Ubuntu 22.04 LTS, you will get the error below:
/usr/bin/ssh-copy-id: ERROR: Too many arguments. Expecting a target hostname, got: .....To solve this problem, in Ubuntu 22.04 LTS, you don’t need to add the port if the ssh port on the destination server is 22, so the command should be like below:
root@mail:~# ssh-copy-id rsyncuser@137.184.33.153You need to confirm and type “yes”, then hit Enter key. After that, to enter rsyncuser password and hit Enter key. The output should be like below:
root@mail:~# ssh-copy-id rsyncuser@137.184.33.153
/usr/bin/ssh-copy-id: INFO: Source of key(s) to be installed: "/root/.ssh/id_rsa.pub"
The authenticity of host '137.184.33.153 (137.184.33.153)' can't be established.
ED25519 key fingerprint is SHA256:zZp4YoRI19UhX7Eee7aDvX5pQElCKmQ6AnNUvCnRihk.
This key is not known by any other names
Are you sure you want to continue connecting (yes/no/[fingerprint])? yes
/usr/bin/ssh-copy-id: INFO: attempting to log in with the new key(s), to filter out any that are already installed
/usr/bin/ssh-copy-id: INFO: 1 key(s) remain to be installed -- if you are prompted now it is to install the new keys
rsyncuser@137.184.33.153's password:

Number of key(s) added: 1

Now try logging into the machine, with:   "ssh 'rsyncuser@137.184.33.153'"
and check to make sure that only the key(s) you wanted were added.
In case you get something similar to the below error messages:
@@@@@@@@@@@@@@@@@@@@@@@@@@@@@@@@@@@@@@@@@@@@@@@@@@@@@@@@@@@
@    WARNING: REMOTE HOST IDENTIFICATION HAS CHANGED!     @
@@@@@@@@@@@@@@@@@@@@@@@@@@@@@@@@@@@@@@@@@@@@@@@@@@@@@@@@@@@
IT IS POSSIBLE THAT SOMEONE IS DOING SOMETHING NASTY!
Someone could be eavesdropping on you right now (man-in-the-middle attack)!
It is also possible that a host key has just been changed.
The fingerprint for the RSA key sent by the remote host is
6e:45:f9:a8:af:38:3d:a1:a5:c7:76:1d:02:f8:77:00.
Please contact your system administrator.
Add correct host key in /home/hostname /.ssh/known_hosts to get rid of this message.
Offending RSA key in /var/lib/sss/pubconf/known_hosts:4
RSA host key for pong has changed and you have requested strict checking.
Host key verification failed.
Run the below ocmmand:
root@mail:~# ssh-keygen -R 137.184.33.153
Then connect again:
root@mail:~# ssh-copy-id rsyncuser@137.184.33.153You will get a prompt to enter the password of the rsyncuser, type the password then hit Enter key.
And it’s all done! Now we can use the rsyncuser on the destination server to sync the data between the two servers. Furthermore, we can disable the root access on the destination server for security purposes.
Sync Backup Directory Between Source and Destination Servers
6. [Source server] Let’s test the Rsync now. For this purpose, we will run the below command to sync the master_backup directory which we created in this article from the source server to the destination server. We don’t need to create any directory on the destination server as the Rsync utility will create it automatically. Don’t forget to replace your IP address with the IP address below.
root@mail:~# flock -n lock_file -c "rsync -vzru -e 'ssh -p 22' --rsync-path='sudo rsync' /var/master_backup/ rsyncuser@137.184.33.153:/var/master_backup/"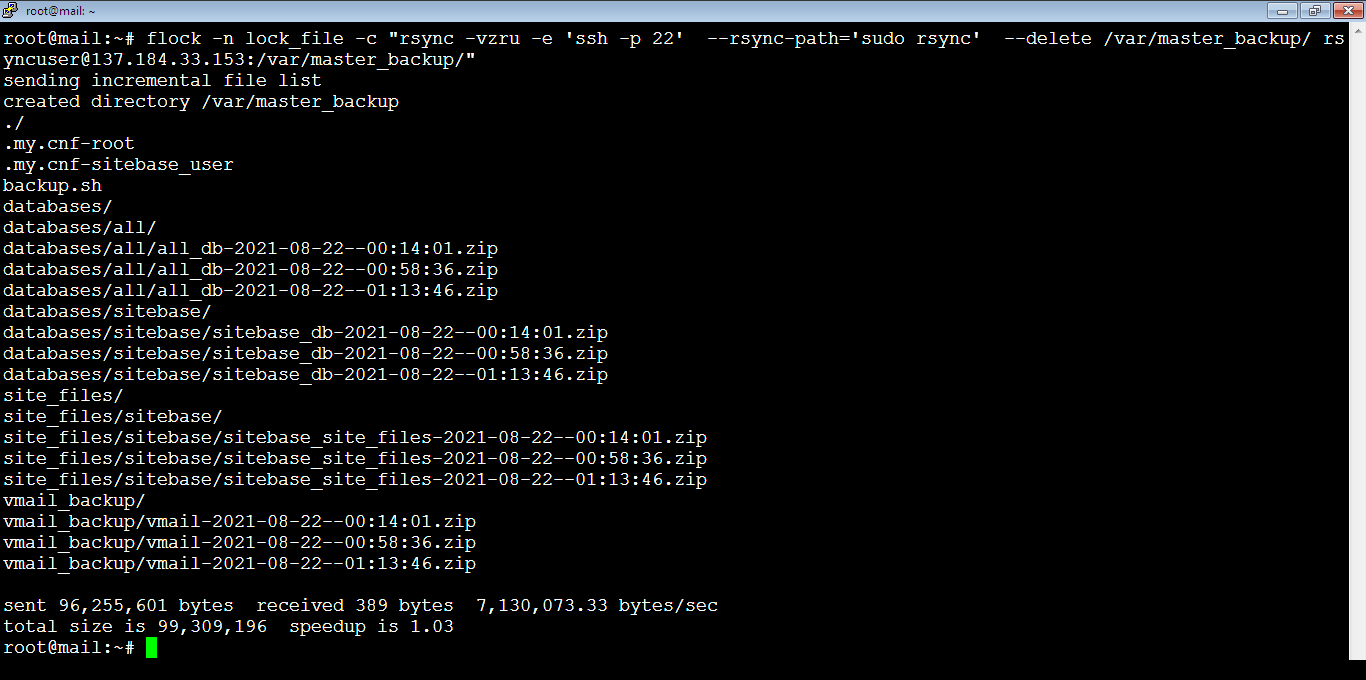
And as you see, it works! We didn’t enter any password to sync between the two servers! the --delete option is to sync with delete on destination, you can remove it if you don’t wish to delete any directory or file on the destination server
In case you got errors like the two below on Ubuntu 22.04 LTS, it means that the destination server has had an issue transferring files via Rsync. Rebooting the destination server should resolve the problem, but I noticed that when this error occurs on a Contabo East USA region server, after rebooting from the console or Contabo admin panel, the destination server will not start. So be careful and take a snapshot of the destination server when this error occurs. So once you reboot your VPS, and it doesn’t start, you can roll back the snapshot, and it will work normally, and you will not see this error.
I was syncing one folder on the destination server with the same folder on two source servers (with different content in each folder on each server). Maybe this was the reason for the Rsync error to occur on the destination server.
rsync: connection unexpectedly closed (0 bytes received so far) [sender]
rsync error: unexplained error (code 255) at io.c(231) [sender=3.2.7]
kex_exchange_identification: read: Connection reset by peer
rsync: connection unexpectedly closed (0 bytes received so far) [sender]
rsync error: unexplained error (code 255) at io.c(235) [sender=3.1.3]You can also run a simple test to make sure that the destination server has an issue. Run this simple command on the source server.
root@mail:~# ssh rsyncuser@137.184.33.153You will get a similar error like below. If you try to access another server, it will work without any problem.
root@mail:~# ssh rsyncuser@137.184.33.153
ssh: connect to host 137.184.33.153 port 22: Connection refused
We Found the Reason! Manage Fail2Ban
It was Fail2Ban on the backup server (destination server). It seems that we entered a wrong password for a couple of times, so Fail2Ban banned any SSH connection from the source server. You need to stop Fail2Ban and make your transfer then enable it gain by running the below commands:
root@vpsprof-backup:~# service fail2ban stopOnce you finish the transfer, run the below:
root@vpsprof-backup:~# service fail2ban startYou can see the source server IP that it got banned by running the command:
root@vpsprof-backup:~# fail2ban-client status sshdYou should find the source IP address in the list like below:
Status for the jail: sshd
|- Filter
|  |- Currently failed: 3
|  |- Total failed:     16
|  `- File list:        /var/log/auth.log
`- Actions
   |- Currently banned: 16
   |- Total banned:     18
   `- Banned IP list:   142.93.64.12 161.97.65.166 180.101.88.198 180.148.4.194                                                                                         218.92.0.112 218.92.0.22 218.92.0.24 218.92.0.27 218.92.0.29 222.102.214.75 35.1                                                                                        92.179.181 43.131.241.206 61.177.172.136 61.177.172.140 218.92.0.107 218.92.0.31
To unban IP from the above (jail name sshd), run the command:
root@vpsprof-backup:~# fail2ban-client set sshd unbanip 161.97.65.166You will get a result like this, you will see number 1 means successful operation
root@vpsprof-backup:~# fail2ban-client set sshd unbanip 161.97.65.166
1
Note: the jail name here is sshd.
To ban IP manually, same as above, run a command like this:
fail2ban-client set JAIL_NAME banip IP_ADDRESSExample of ban and unban for the jail name roundcube:
We get the status here first by running
root@vpsprof-backup:~# fail2ban-client status roundcubeStatus for the jail: roundcube
|- Filter
| |- Currently failed: 1
| |- Total failed: 3
| `- File list: /var/log/mail.log
`- Actions
|- Currently banned: 0
|- Total banned: 0
`- Banned IP list:Lets ban the IP 161.97.65.166, we don’t want it to be login to roundcube mail. Run the below command
root@vpsprof-backup:~# fail2ban-client set roundcube banip 161.97.65.166Now, let’s see the status after the ban, run the below command:
root@vpsprof-backup:~# fail2ban-client status roundcubeStatus for the jail: roundcube
|- Filter
| |- Currently failed: 1
| |- Total failed: 3
| `- File list: /var/log/mail.log
`- Actions
|- Currently banned: 1
|- Total banned: 1
`- Banned IP list: 161.97.65.166
To unban the IP 161.97.65.166, run the command
root@vpsprof-backup:~# fail2ban-client set roundcube unbanip 161.97.65.166Now, let’s see the status after the unban. Note that total banned means in the past. Currently banned = 0, means no one is banned. Run the below command:
root@vpsprof-backup:~# fail2ban-client status roundcubeYou will not see the banned IP in the Banned IP list line below.
Status for the jail: roundcube
|- Filter
|  |- Currently failed: 1
|  |- Total failed:     3
|  `- File list:        /var/log/mail.log
`- Actions
   |- Currently banned: 0
   |- Total banned:     1
   `- Banned IP list:
7. [Destination server] Now let’s make sure that the master_backup directory has been created on the destination server, run the below command:
root@vpsprof-backup:~# ls /var
As you see, it’s there! You can also check the directories and files inside, they should be exactly same as the source server.