We will show you here how to restore MySQL on the destination server easily from the backup that we synced via Rsync and iNotifyWait utilities by running a simple bash script.
- a. Create Restore Script
- b. Restore All MySQL Databases via restore_db.sh Bash Script
- c. Single Database Restoration via restore_db.sh Bash Script
- d. Single Database Restoration via import_db.sh Bash Script (improved script)
Create Restore Script
We will create a simple script to restore MySQL database quickly and effectively.
1. Open an empty file on the source server inside master_backup directory by running the command below on PuTTY SSH client or any Linux terminal:
root@mail:~# nano /var/master_backup/restore_db.sh2. Then, add the below script inside it. If you use different name for the backup directory, please change it in the code.
#!/bin/bash

# NOTE: THE FILE HAS TO BE INSIDE THE SAME FOLDER AND YOU SHOULD NOT ADD .ZIP TO THE FILE NAME
# EXAMPLE: if you want to restore the database of sitebase, the backup zip file has to be inside /var/websites_backup/databases/sitebase

# Only change the below if you want to move the backup to another folder
# **********************************************************************
backup_dir="/var/master_backup/"

# Example of inputs from the prompt
# *********************************
# FILE_NAME=sitebase_db-2020-07-03--11:00:01
# ALIAS=all or =sitebase
FILE_NAME=$1
ALIAS=$2

echo ""
read -p "THE CURRENT DATABASE << ${ALIAS}_db >> WILL BE REPLACED, ARE YOU SURE? Type: restore or import, to proceed: "  prompt
if [[  $prompt == "restore" || $prompt == "import" ]]
then
        # Dangerous Stuff Here
        echo "Restoring has started..."
else
        echo ""
        echo "Wrong input, sync with delete hasn't been done"
        echo ""
        exit 0
fi


# Variables required for the MySQL query
# **************************************
echo ""
DB_USER=$ALIAS"_user"
DB_NAME=$ALIAS"_db"
if [[ $ALIAS =~ all ]]
then
        DB_USER=root
        # the database name that will be used in the MySQL query
        DB_NAME=""
fi
backup_folder=$backup_dir"databases/"$ALIAS


# Variables required to output the inputs
# ***************************************
if [[ $ALIAS =~ all ]]
then
        echo "Database Name: All Databases"
else
        echo "Database Name: $DB_NAME"
fi
echo  "Directory: $backup_folder"


# We use printf because it processes new lines, unlike echo
printf "\n\n"

unzip -p $backup_folder/$FILE_NAME.zip > $backup_folder/$FILE_NAME.sql
mysql -u $DB_USER -p $DB_NAME < $backup_folder/$FILE_NAME.sql


printf "\n\n"
echo  "If no errors above, it's successful :)"
printf "\n\n"
3. In order to send the file we’ve just created restore_db.sh from the source to the destination server, we just need run Rsync on the source server to sync the backup directory master_backup between two servers. Any change in the source directory will be reflected in the destination directory. Run the below command. Don’t forget to replace the IP address below with your own IP address.
root@mail:~# flock -n lock_file -c "rsync -vzru -e 'ssh -p 22' --rsync-path='sudo rsync' --delete /var/master_backup/ rsyncuser@137.184.33.153:/var/master_backup/"Rsync will only send the files that got change. As you see, it sent the resotre_db.sh file as it was the only change in the backup directory.

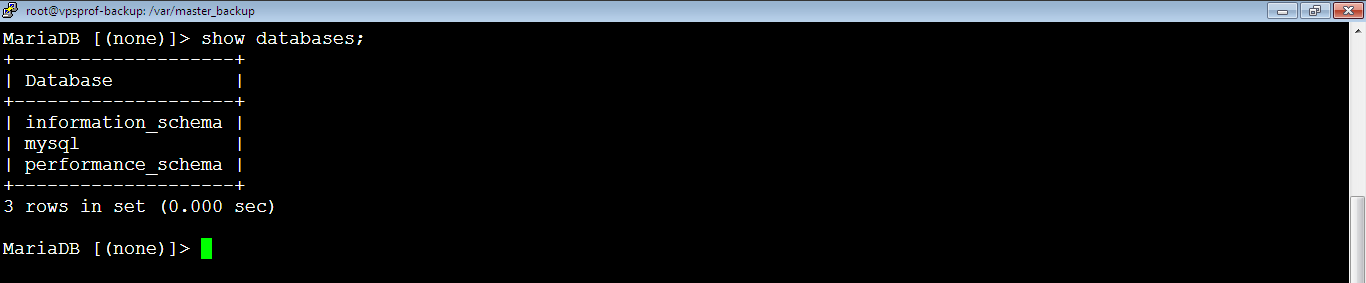
4. Go to destination server’s MySQL console then enter the console by running the command:
root@vpsprof-backup:~# mysqlAfter that, run the below command to see the current databases:
MariaDB [(none)]> show databases;As you see, here are the current databases available:
5. Install the unzip utility on the destination server as we need it in our bash script to unzip the zipped backup files by running the below command:
root@vpsprof-backup:~# apt install unzip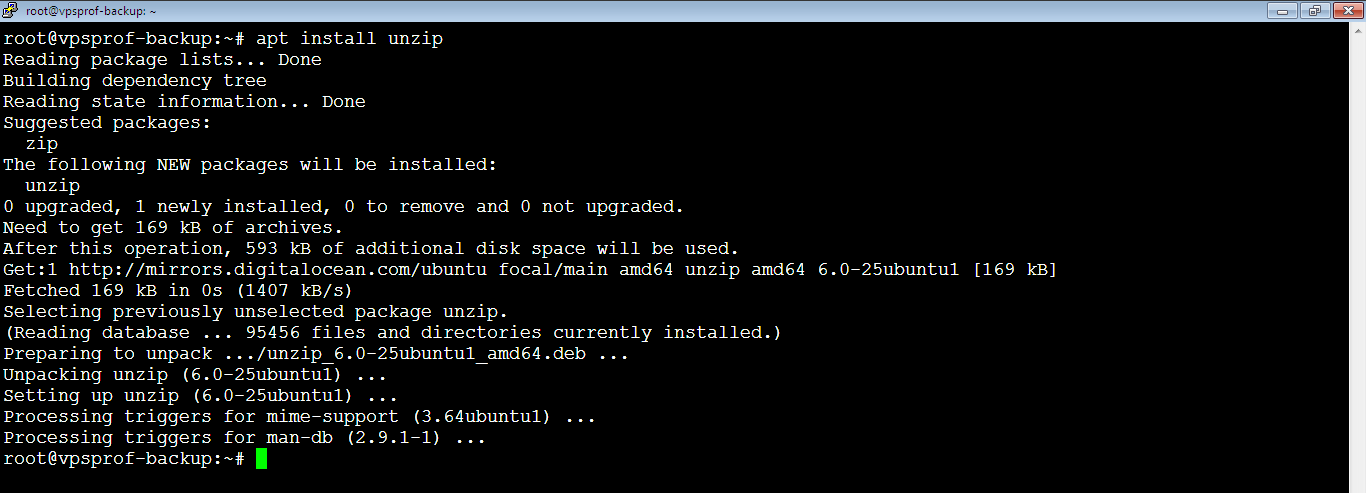
b. Restore All MySQL Databases via restore_db.sh Bash Script
6. Now, let’s test the restore_db.sh script by trying to import (restore) all databases on destination server (backup server) because this server has no databases and no database users other than root user. First, we need to find the zip file to import by running the command:
root@vpsprof-backup:~# ls -la /var/master_backup/databases/all
We will import the latest zipped file, which is: all_db-2021-08-22--01:13:46.zip which belongs to all databases including all the database users.
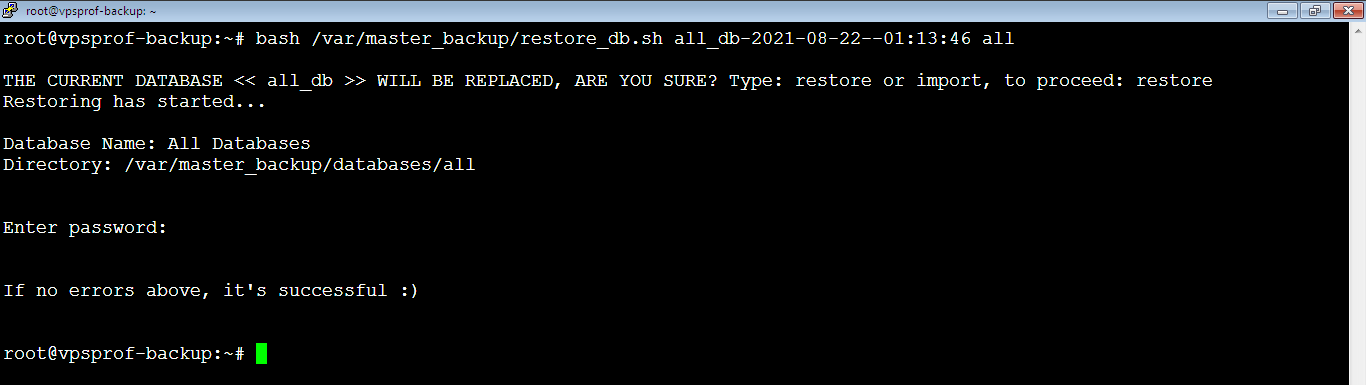
Now, run the bash script with two inputs. First input is the zipped database file name without the .zip extension which is: all_db-2021-08-22--01:13:46. Second input is the alias of the website which is: all, because in our case we will import all databases for all projects. If we will import the database of the sitebase project only, the alias will be sitebase. Don’t forget to replace the file name with your own file name because every file has different name as the name is derived from the date and the time.
root@vpsprof-backup:~# bash /var/master_backup/restore_db.sh all_db-2021-08-22--01:13:46 allYou will get a prompt to confirm because it’s dangerous process, to confirm you should type restore or import. After typing: restore, we got another prompt to enter the password of the root.

Table ‘User’ Exists Error
Enter the root password then hit Enter key. Oppps! We got the error below!

The error says the table user exists. We don’t know why but to resolve it, simply just delete mysql database which includes the users table by running this MySQL command after logging to MySQL prompt.
MariaDB [(none)]> drop database mysql;
Now try again running the restore_db.sh script:
root@vpsprof-backup:~# bash /var/master_backup/restore_db.sh all_db-2021-08-22--01:13:46 allAs you see below, no errors after entering the password 🙂 So it worked!
7. Let’s make sure it worked by listing the current databases on the destination server by running the MySQL command:
MariaDB [(none)]> show databases;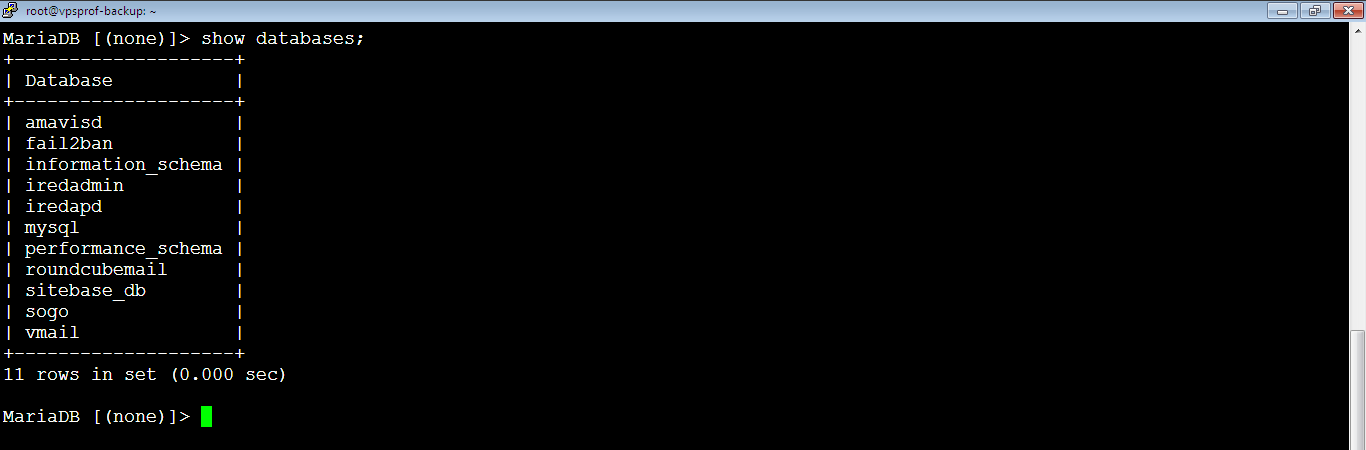
As you see, the databases on the destination server are identical to the databases on the source server.
8. Don’t forget to flush privileges on the destination server, because if you don’t flush privileges, you might not be able to login to the imported users like sitebase_user. Run the below command to flush privileges:
MariaDB [(none)]> flush privileges;After flushing privileges, all the previous passwords for the users on the destination (backup) server will be changed because the import process replaces the mysql database on destination server completely which includes all the users and their passwords. So, to login to MySQL console via root user, you need to use the same MySQL root password on the source server. You can change root password by following the hints here: Create New MySQL Database (Change Database User Password part). In the article, we changed the password of sitebase_user, you can apply the same on root user as below):
MariaDB [(none)]> ALTER USER 'root'@'localhost' IDENTIFIED BY 'yourNewPassword';Also, to login to MySQL console from root user without entering the password every time, you need to update the CNF file with the new password for the root user, follow the hints here: Install MariaDB on Ubuntu (Use CNF File to Login to MariaDB on Ubuntu Without a Password part).
c. Single Database Restoration via restore_db.sh Bash Script
9. [Bonus] You don’t need to apply this but we will explain how to import and restore MySQL for a single database instead of all databases. Let’s show you how to import the latest backup of the sitebase database project. Run the list command below to list the backup zip files for the sitebase project:
root@vpsprof-backup:~# ls -la /var/master_backup/databases/sitebase
As you see, the latest file is: sitebase_db-2021-08-22--01:13:46.zip which belongs to the sitebase project (alias).
Now, run the bash script same as what we did before for all databases with two inputs. First input is the zipped database file name without the .zip extension which is: sitebase_db-2021-08-22--01:13:46. Second input is the alias of the website which is: sitebase. Don’t forget to replace the file name with your own file name because every file has different name as the name is derived from the date and the time.
root@vpsprof-backup:~# bash /var/master_backup/restore_db.sh sitebase_db-2021-08-22--01:13:46 sitebaseYou will get a prompt to confirm because it’s dangerous process. In order to confirm, you should type restore or import. After typing: restore, we got another prompt to enter the password of the sitebase_user. Enter the password then hit Enter key and that’s it! No errors, it worked as seen below.
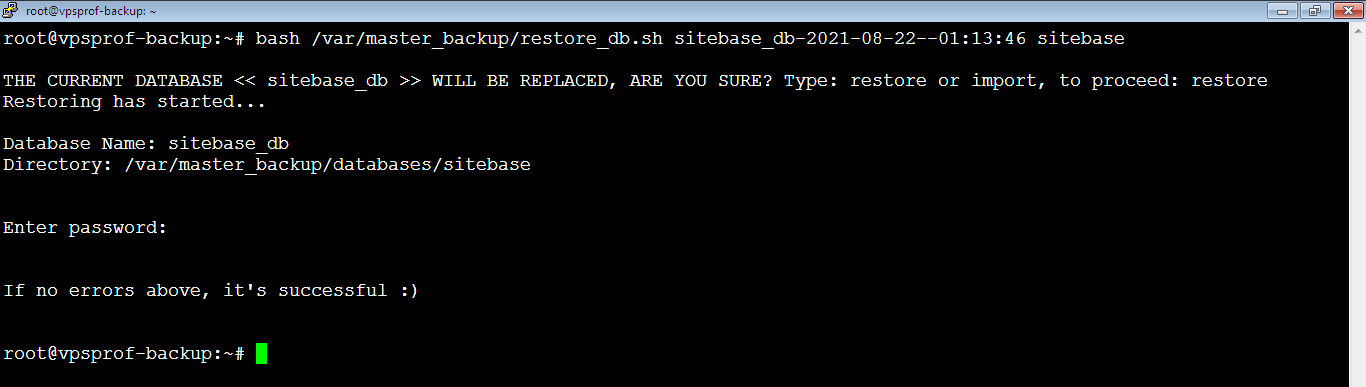
As the imported database (sitebase_db) doesn’t include users like the mysql database, we don’t need to run MySQL command: flush privileges.
Single Database Restoration via import_db.sh Bash Script
Here’s another script that works for all cases and it’s the best version. Let’s explain how it works. The general command to run this script is as below:
bash import_db.sh database_user database_name database_folder database_file_without_zipLet’s say that we will import all databases file (all_db-2023-03-07--17:40:47.zip) which exists inside the folder all in the backup directory (/var/master_backup/databases/all) that we created before. We will use the root user. The command should be:
bash import_db.sh root all_db all all_db-2023-03-07--17:40:47Another example, let’s say that we want to import the database file (site1_db-2020-07-03--11:00:01.zip) that locates inside the folder name random which is in the backup directory (/var/master_backup/databases/random). We will import into MySQL database name (site1_db) and we will use the user site1_user. The command should look like below:
bash import_db.sh site1_user site1_db random site1_db-2020-07-03--11:00:01#!/bin/bash
# NOTE: THE FILE YOU WANT TO IMPORT SHOULD NOT ADD .ZIP TO THE FILE NAME
#============================================
# VARIABLES BELOW (Change if you want)
#============================================
BACKUP_DIR="/var/master_backup"
DATABASE_BACKUP_PARENT_FOLDER="databases"
# A. INPUT FROM THE PROMPT
#=========================
DB_USER=$1
DB_NAME=$2
FOLDER=$3
FILE_NAME=$4
# B. INPUT FROM THE FILE
#=======================
# TO IMPORT ALL DATABASES UNDER ROOT USER
#DB_USER="root"
#DB_NAME="all_db"
#FOLDER="random"
#FILE_NAME="all_db-2020-07-03--11:00:01"
# TO IMPORT STORE/SITE DATABASES UNDER THEIR OWN USERS
#DB_USER="site1_user"
#DB_NAME="site1_db"
#FOLDER="random"
#FILE_NAME="site1_db-2020-07-03--11:00:01"
# TO IMPORT ANY DATABASE UNDER ROOT USER
#DB_USER="root"
#DB_NAME="mysql"
#FOLDER="random"
#FILE_NAME="mysql-2020-07-03--11:00:01"
#===========================================
# VARIABLE ABOVE (Change if you want)
#===========================================
# The store document root name in /var/www/html
#STORE_ALIAS=storebase
#STORE_ALIAS=store1
#STORE_ALIAS=store2
#STORE_ALIAS=store3
#STORE_ALIAS=store4
echo ""
read -p "BE CAREFUL!!! You will IMPORT the following:
Database User = $DB_USER
Database Name = $DB_NAME
Folder = $FOLDER
File to Import = $FILE_NAME
Type <Yes> to confirm: " prompt
if [[ $prompt == "Yes" || $prompt == "Yes" ]]
then
echo ""
echo "Correct, the task has started..."
echo ""
else
echo ""
echo "Wrong input"
echo ""
exit 0
fi
#printf "\n"
#echo "******************************************************************"
#echo "******************************************************************"
#echo "THIS IS IMPORT - DANGEROUS - BE AWAKE BEFORE EXECUTING THIS SCRIPT"
#echo "******************************************************************"
#echo "******************************************************************"
#printf "\n\n"
#echo "THE CURRENT DATABASE << ${STORE_ALIAS}_db >> WILL BE REPLACED, ARE YOU SURE?"
#printf "\n"
#echo "Database backup file: $FILE_NAME"
# The below IF statement and variables set doesn't work, so make research later.
# When we import all databases, the database in mysql query should be empty.
#db_name_in_mysql_query=$DB_NAME
#if [[ $DB_NAME == "all_db" ]]
#then
# db_name_in_mysql_query=""
#fi
if [[ $DB_NAME == "all_db" ]]
then
db_name_in_mysql_query=""
else
db_name_in_mysql_query=$DB_NAME
fi
backup_folder=$BACKUP_DIR/$DATABASE_BACKUP_PARENT_FOLDER/$FOLDER
#DB_USER=${STORE_ALIAS}_user
#DB_NAME=${STORE_ALIAS}_db
#backup_folder=$backup_dir"database/${STORE_ALIAS}"
# Below to import all databases at once
#DB_USER=root
#DB_NAME=""
#backup_folder=$backup_dir"database/all"
# We use printf because it processes new lines, unlike echo
printf "\n\n"
unzip -p $backup_folder/$FILE_NAME.zip > $backup_folder/$FILE_NAME.sql
mysql -u $DB_USER -p $db_name_in_mysql_query < $backup_folder/$FILE_NAME.sql
printf "\n\n"
echo "If no errors above, it's successful :)"
printf "\n\n"