You might need to add new database while the replication is running. This can be done easily but you need to follow the right sequence in order to avoid inconsistency.
If you haven’t created MySQL Master Slave Replication system yet, you should follow our super easy article to create it quickly here: MySQL Master Slave Replication Setup. Then, you can add a new database to the replication as per the guides in this article.
In this article, we will go through the following:
- c. Create New Database and User on Slave (1 steps)
- d. Add the New Database to Replication in 50-server.cn File (2 steps)
- e. Export New Database to Slave (3 steps)
- f. Import New Database into Slave (5 steps)
- g. Resume Replication with new Database (2 steps)
a. Update the Backup Environment for the New Website
For example, we want to create a new website, the new database name which will be added to replication is: site1_db while the new database user is: site1_user. The folder name (alias) in /var/www/html directory should be: site1.
Create Backup Folders and CNF File via automatic_backup_environment.sh Script
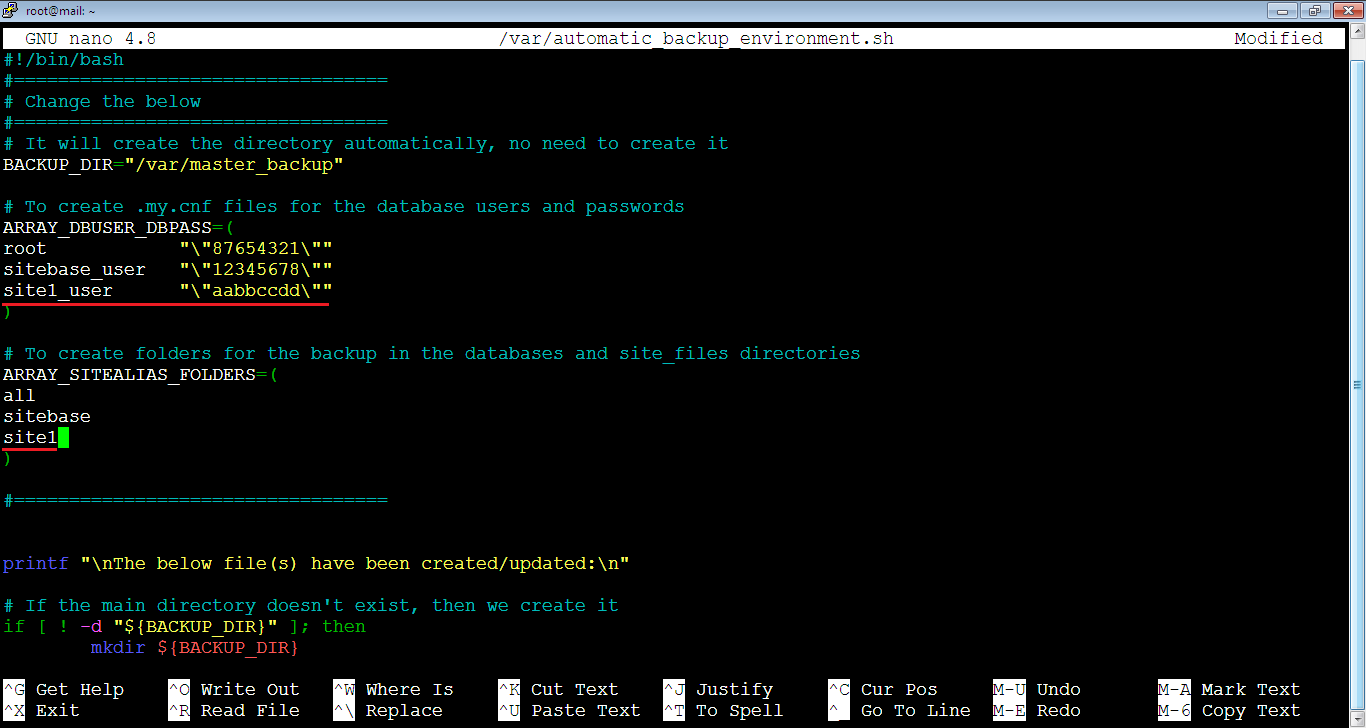
1. [Master] We will add the new database and the user along with the alias of the project’s folder (name of the folder) to the automatic_backup_environment.sh file which we already explained here: Backup Infrastructure Setup (part: b. Automatic Creation). We should do this to include the new website in the backups. Let’s add our new project to generate the folders automatically. So, open the automatic_backup_environment.sh file by running the below command on PuTTY SSH client or any Linux terminal:
root@mail:~# nano /var/automatic_backup_environment.shThen, add the new project variables as seen below in bold style in two arrays. You should add strong password instead of aabbccdd.
#!/bin/bash
#==================================
# Change the below
#==================================
# It will create the directory automatically, no need to create it
BACKUP_DIR="/var/master_backup"

# To create .my.cnf files for the database users and passwords
ARRAY_DBUSER_DBPASS=(
root            "\"87654321\""
sitebase_user   "\"12345678\""
site1_user      "\"aabbccdd\""
)

# To create folders for the backup in the databases and site_files directories
ARRAY_SITEALIAS_FOLDERS=(
all
sitebase
site1
)
#==================================
# Change the above
#==================================
Note that the file should look like below:
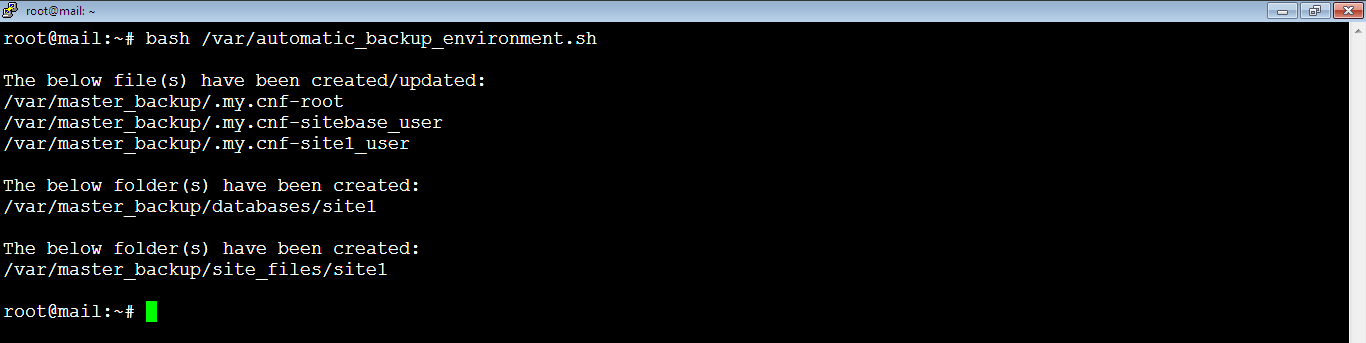
2. [Master] Close, save and run the file by running the command:
root@mail:~# bash /var/automatic_backup_environment.shThe script will create CNF files and folders automatically for the new website (site1) as seen below:
Add the New Website to backup.sh Script
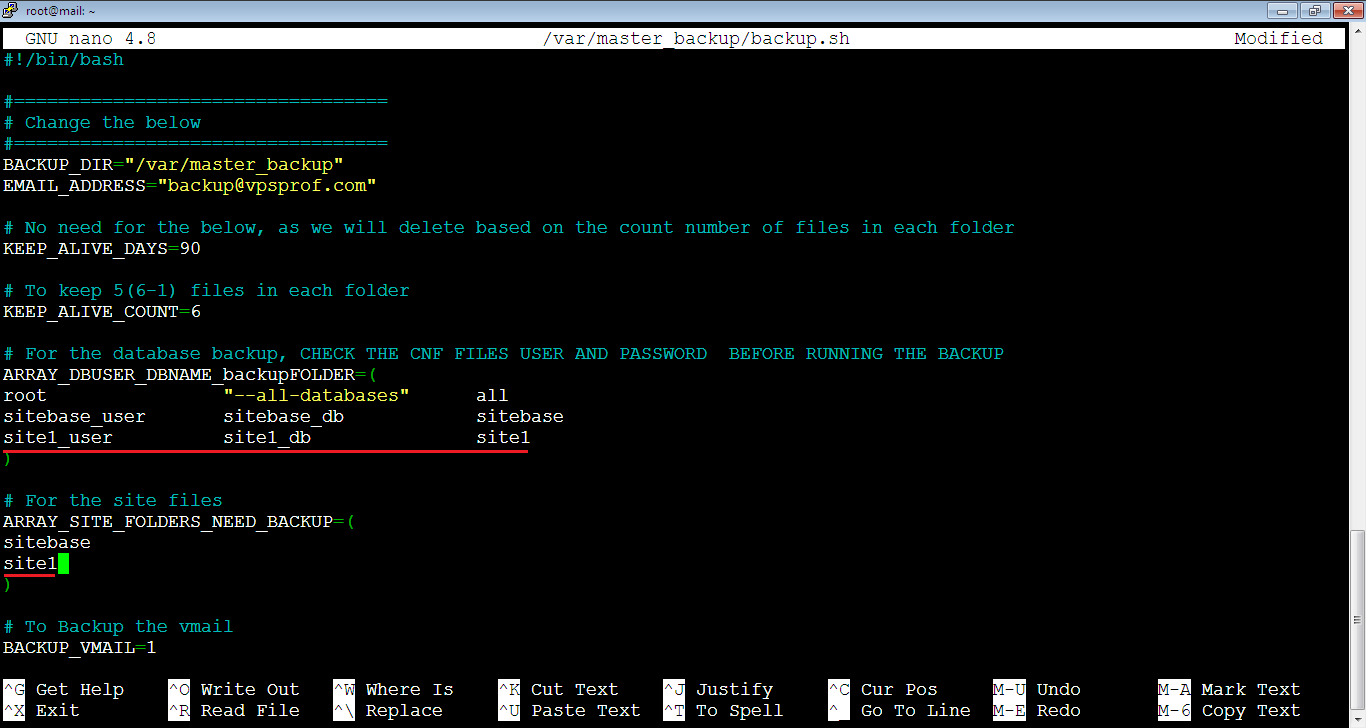
3. [Master] Also, we will add the new database and the user along with the alias of the project’s folder (name of the folder) to the backup.sh file. Open the file by running:
root@mail:~# nano /var/master_backup/backup.shThen, add the new project variables as seen below in bold style in two arrays.
#!/bin/bash

#==================================
# Change the below
#==================================
BACKUP_DIR="/var/master_backup"
EMAIL_ADDRESS="backup@vpsprof.com"

# No need for the below, as we will delete based on the count number of files in each folder
KEEP_ALIVE_DAYS=90

# To keep 5(6-1) files in each folder
KEEP_ALIVE_COUNT=6

# For the database backup, CHECK THE CNF FILES USER AND PASSWORD  BEFORE RUNNING THE BACKUP
ARRAY_DBUSER_DBNAME_backupFOLDER=(
root                "--all-databases"      all
sitebase_user       sitebase_db            sitebase
site1_user          site1_db               site1
)

# For the site files
ARRAY_SITE_FOLDERS_NEED_BACKUP=(
sitebase
site1
)

# To Backup the vmail
BACKUP_VMAIL=1
#==================================
# Change the above
#==================================
Your file should look like below:
Now, close and save the file.
b. Create New Database and User on Master
1. [Master] We will create the database by logging to MariaDB console first by running the below command. The database now is empty but if you create a new website it will be filled with data.
MariaDB [(none)]> mysqlThen, run the below command:
MariaDB [(none)]> CREATE DATABASE site1_db;2. [Master] Create user for the new database by running the following command. You should add strong password instead of: aabbccdd
MariaDB [(none)]> CREATE USER 'site1_user'@'localhost' IDENTIFIED BY 'aabbccdd';3. [Master] connect the database with the user, so we will grant privileges on site1_db to the site1_user by running the command:
MariaDB [(none)]> GRANT ALL PRIVILEGES ON site1_db.* TO 'site1_user'@'localhost' WITH GRANT OPTION;Note that you can refer to the article here about creating and managing your new database: Create New MySQL Database.
Create Test Table Inside the New Database
4. [Master] Let’s add some test content to the database if you still haven’t added a new website to fill this database. We can create a test table inside the site1_db by entering inside the database first by running the following command:
MariaDB [(none)]> use site1_db;
Then, create test table, the general command is:
CREATE TABLE table_name (column_name column_type);So, our command will be:
MariaDB [(none)]> CREATE TABLE test_table (test_column1 INT);
In order to make sure that the new table has been created, run the below command:
MariaDB [site1_db]> show tables;
c. Create New Database and User on Slave
1. [Slave] We will do the same for the Slave, we will create an empty database only. Also, we we will create a database user too. This is because if we will export the zip file of site1_db only to Slave, the user we created on Master will not be exported as it’s inside the mysql database which we will not export. So, run the below MariaDB commands to create an empty database and user:
MariaDB [(none)]> CREATE DATABASE site1_db;MariaDB [(none)]> CREATE USER 'site1_user'@'localhost' IDENTIFIED BY 'aabbccdd';In addition, run this command to grant privileges on site1_db to site1_user:
MariaDB [(none)]> GRANT ALL PRIVILEGES ON site1_db.* TO 'site1_user'@'localhost' WITH GRANT OPTION;d. Add the New Database to Replication in 50-server.cnf File
1. [Master & Slave] Open 50-server-cnf file on both Master and Slave by running the command:
nano /etc/mysql/mariadb.conf.d/50-server.cnfThen, add the new database site1_db to the databases that we already added to the replication in Master and Slave 50-server-cnf file.
.
.
.
.
.

replicate-do-db = roundcubemail
replicate-do-db = sitebase_db
replicate-do-db = sogo
replicate-do-db = vmail
replicate-do-db = site1_db
After that, close and save 50-server-cnf file on Master and Slave.
e. Export New Database to Slave
Lock Master's Database
1. [Master] Lock the database on Master by entering MariaDB console and running the following command:
MariaDB [(none)]> flush tables with read lock;Now, you need to connect to Master via new SSH session because if you exist MariaDB console the lock will be released.
Generate Backup ZIP Files on Master via backup.sh Script
2. [Master] We will now generate the backup zip file for the database using backup.sh script by running the below command:
root@mail:~# bash /var/master_backup/backup.shSync master_backup Directory to Send Backup to Slave
3. [Master] Then, we will sync the backup directory between Master and Slave manually if iNotifyWait script wasn’t running. So, run the below command. Note that you should replace the IP address with your own IP address if you haven’t replaced it in the box on top.
root@mail:~# flock -n lock_file -c "rsync -vzru -e 'ssh -p 22' --rsync-path='sudo rsync' --delete /var/master_backup/ rsyncuser@137.184.33.153:/var/master_backup/"f. Import New Database into Slave
1. [Slave] In order to import the database to the Slave, we need to unlock the database first. Open 50-server-cnf file again:
root@vpsprof-backup:~# nano /etc/mysql/mariadb.conf.d/50-server.cnfUnlock Slave's Database
Then, find read-only = 1 line that we added to prevent from any change on Slave database, change the value to 0 or comment the whole line by adding hash symbol in front of it. So, do one of the below:
# read-only = 1Or:
read-only = 02. [Slave] Restart MariaDB server for the unlock changes to take effect. In case we don’t restart it, we won’t be able to import the database as the write privilege will be prohibited.
root@vpsprof-backup:~# service mariadb restartImport the Zipped Backup File
3. [Slave] Import the zip file for site1_db that we sent from Master to Slave. This can be done easily by checking the latest zip file for site1_db by running the following command:
root@vpsprof-backup:~# ls -la /var/master_backup/databases/site1Then, run the restore_db.sh script to import by running the command:
root@vpsprof-backup:~# bash /var/master_backup/restore_db.sh site1-database-backup-zip-file-without-zip-extension site1We already explained this process in details earlier in this article: Restore MySQL on Destination Server from Backup (part b. Restore All MySQL Databases via restore_db.sh Bash Script).
In case you don’t unlock the database on the slave, you will get the error seen below:
ERROR 1290 (HY000) at line 22: The MariaDB server is running with the --read-only option so it cannot execute this statement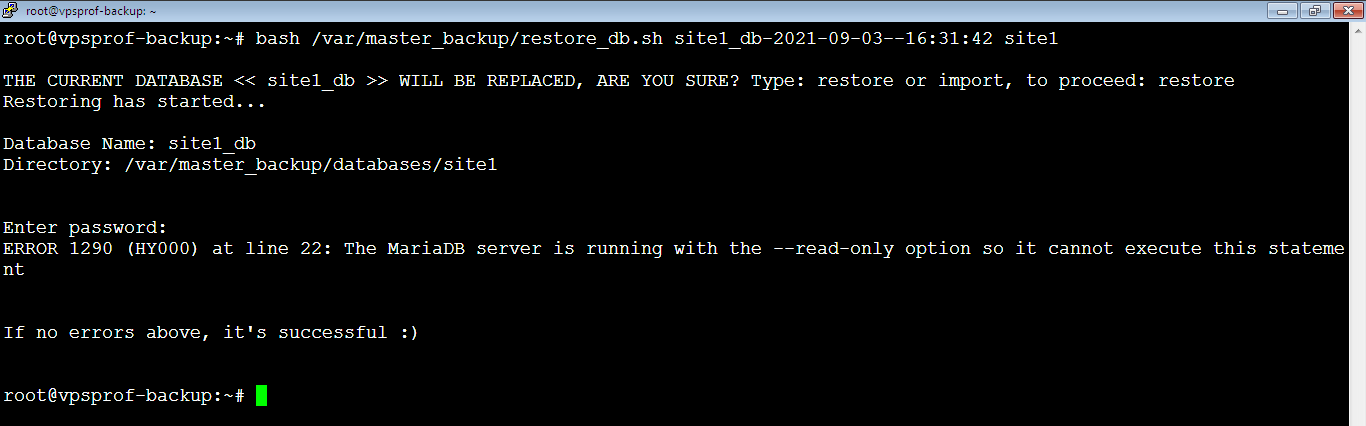
Lock Slave's Database
4. [Slave] Lock database on Slave again after finishing the import process by activating read-only. That is to say, set it to 1 as below:
read-only = 15. [Slave] Restart MariaDB on Slave:
root@vpsprof-backup:~# service mariadb restartg. Resume Replication with New Database
Restart MariaDB Server on Master and Unlock Database
1. [Master] Restart MariaDB server on Master for the replication changes to take effect. Also, restarting MariaDB server will release the lock on Master’s database automatically.
root@mail:~# service mariadb restartStart Replication Process
2. [Slave] Start replication process on Slave by entering MariaDB console then running the command:
MariaDB [(none)]> start slave 'master01';Now let’s see if the new database site1_db has been added to replication, check the replication status by running the command:
Show Replication Status
MariaDB [(none)]> show slave 'master01' status\G;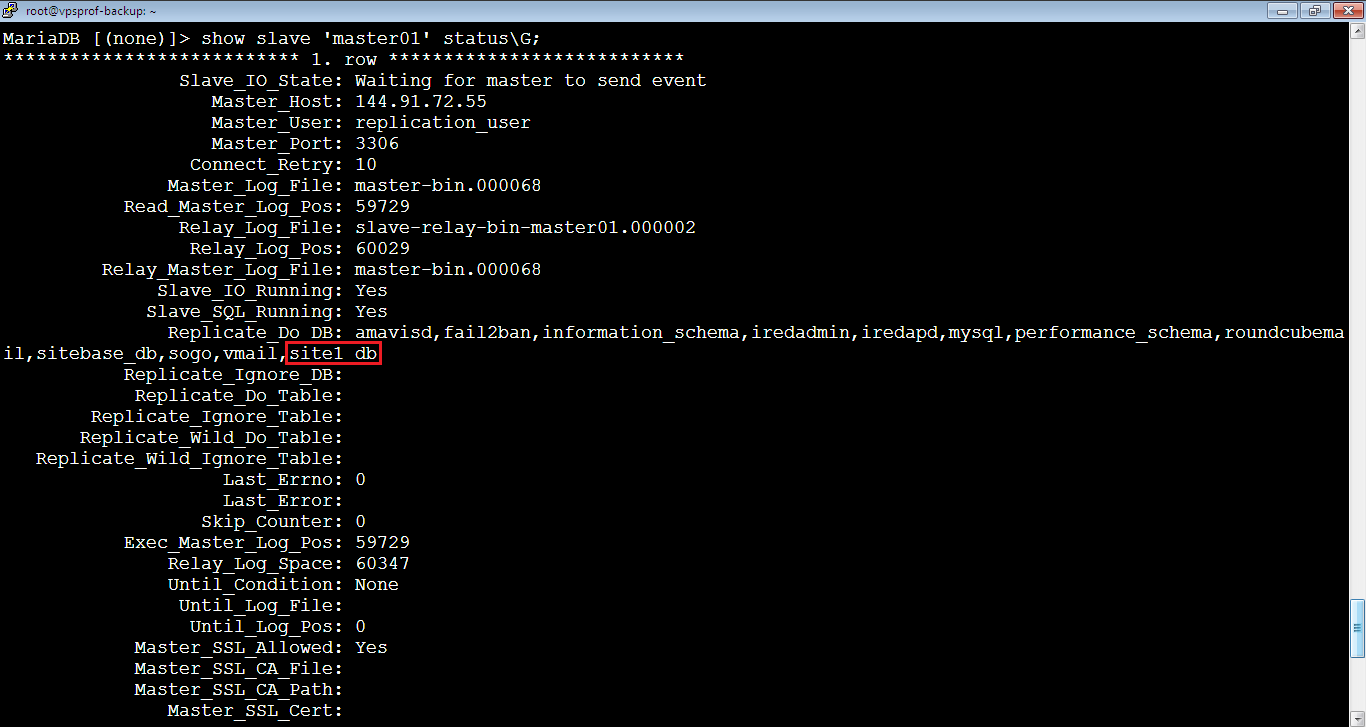
Yes, it’s there!
An Alternative Easier Way to Follow:
In this method, we will generate backup for the whole database (will include the new database for the new project) instad of adding a single database, which is easier and faster, it takes only 3 to 5 minutes to finish.
1. Enable read-only on Master 50-server.cnf file. Also, add the new database to the same file of Master and Slave..
root@mail:~# nano /etc/mysql/mariadb.conf.d/50-server.cnfreplicate-do-db = new_project_dbReboot your MariaDB then. Note that once you reboot MariaDB, master_log_pos will equal 343 and will not change unless you disable read-only on 50-server.cnf file.
2. Generate backup for all database on Master and synced with the Slave server
3. Import the database on slave once it arrives from the sync process using the file import_db.sh file
4. Stop slave on Slave server
MariaDB [(none)]> stop slave 'master01';5. Start new connection on Slave:
MariaDB [(none)]> change master 'master01' to master_host='Master_IP_Address',
master_user='Replication_User_In_Use',
master_password='Password_of_Replication_User',
master_port=3306,
master_log_file='Master_Binary_Log_File_Name',
master_log_pos=Master_Binary_Log_File_Position,
master_connect_retry=10,
master_use_gtid=slave_pos,
master_ssl=1;
6. Start Slave:
MariaDB [(none)]> start slave 'master01';7. Disable read-only on master 50-server.cnf