
You can add multiple email domains to have web-based panels for each domain and also more email addresses under the added domain.
When you add a new email domain to your mail server, you can have:
Web-based panels for each email domain
Each new email domain can be used to view the web-based panels which we were previously explained (Roundcube, iRedAdmin, SOGo and Netdata).
New email addresses attached to the new email domain
You can get unlimited email addresses under the new added domain indeed. When you add new email addresses, they can have their own MX records or can use any other MX records for any domain on your email server.
- a. Create MX Record and A Record (2 steps)
- b. Setup SPF Record (1 step)
- c. Generate DKIM Record (7 steps)
- d. Setup DMARC (1 step)
- e. Configure Virtual Hosts (6 steps)
Before getting started, you should add the new domain to the admin panel (mail.vpsprof.com/iredadmin) and you should add the user, for example: support@new-domain.com. If you’re migrating your email server (or your email domain) from server X to server Y, make sure to disable the domains on server X from iRedAdmin panel by clicking Domains and Accounts tab then tick the domain you want to migrate and under “choose action” list below, choose “disable“. This way the domain will be disable on that server and can be used on another server.
Before configuring DNS records, you should register a domain. You can check our post on how to register a new domain here: Domain Registration.
a. Create MX Record and A Record
There’re two options when you want to create your MX records as follows:
1. Login to Your New Email Addresses From a Web-based Panels Under the New Email Domain
If you want to access the web-based panels from the new domain, i.e. your domain will act as a full email provider service like Gmail or Yahoo, then the DNS MX record should be like below:
| DNS Record Type | Host | Content, Value or the Answer | TTL (Time To Live) |
|---|---|---|---|
| MX | @ | mail.new-domain.com. | 1 min (or the minimum allowed) |
And your DNS A record should be like below.
| DNS Record Type | Host | Content, Value or the Answer | TTL (Time To Live) |
|---|---|---|---|
| A | 144.91.72.55 | 1 min (or the minimum allowed) |
As you see, the IP above is same as the IP we used for the A record for the first domain (vpsprof.com). It works but it’s better to buy a new IP address for the new domain to have a different reverse DNS for the IP (PTR record) to add extra credibility to the emails sent. The rDNS for the IP: 144.91.72.55 is: mail.vpsprof.com.
Once you buy a new IP address, your rDNS for the new IP address should change. For example, the rDNS for the new domain will be: mail.new-domain.com and will point to the IP address: new-IP-address, instead of: 144.91.72.55. Also, you will need to change the hostname on your server for the new IP address. That is to say, it should be: mail.new-domain.com. In other words, every IP address should have its own hostname and it should point to a different rDNS like below:
| IP Address | Hostname | rDNS |
|---|---|---|
144.91.72.55 | mail.vpsprof.com | mail.vpsprof.com |
new-IP-address | mail.new-domain.com | mail.new-domain.com |
It’s a bit complicated and we will cover it later. So, the configuration of the A record should be like below if you want to have full credibility for the emails sent:
| DNS Record Type | Host | Content, Value or the Answer | TTL (Time To Live) |
|---|---|---|---|
| A | new-IP-address | 1 min (or the minimum allowed) |
2. Login to Your New Email Addresses From a Web-based Panels Under a Pre-Existing Domain
If you want to have new email addresses under a new domain but you want to access the web-based panels under the existing domain (in our case: vpsprof.com), then no need to create a DNS A record for the new domain. Because you will need only to set the MX record to the value of the existing domain hostname, i.e: (mail.vpsprof.com.). To make it clear, if you want to create new email address for the new domain, let’s say: info@new-domain.com, then your DNS record for the new-domain.com on the DNS manager panel should look like:
| DNS Record Type | Host | Content, Value or the Answer | TTL (Time To Live) |
|---|---|---|---|
| MX | @ | mail.vpsprof.com. | 1 min (or the minimum allowed) |
In this case, you will access the Roundcube web-based panel via the link: mail.vpsprof.com/mail. Also, it’s applicable for other web-based panels that come with the email server.
You can refer to our previous article for a detailed explanation on on how to set an A and MX records on the registrar advanced DNS panel here: Setup DNS Records (Add A Record and Add MX Record parts).
b. Setup SPF Record
Create SPF record same as what we did before for the vpsprof.com domain:
| DNS Record Type | Host | Content, Value or the Answer | TTL (Time To Live), if exists |
|---|---|---|---|
| TXT | @ | v=spf1 mx ~all | 1 min (or the minimum allowed) |
Refer to our previous article on how to set an SPF record on the registrar advanced DNS panel here: Improve Email Deliverability (part: b. Create SPF Record).
c. Generate DKIM Record
1. For the DKIM record, you need to tell Amavis to sign every outgoing email for the new mail domain. So, open the config file as below:
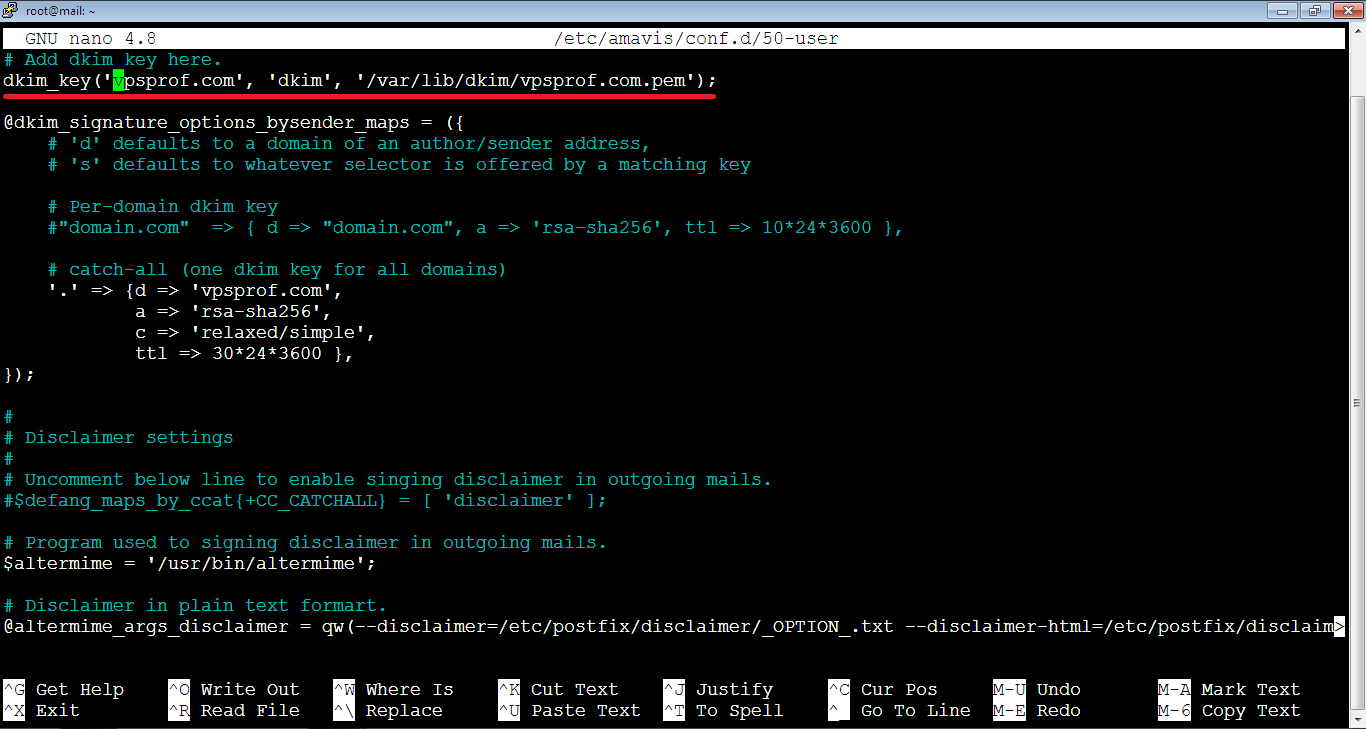
root@mail:~# nano /etc/amavis/conf.d/50-userFind the following line of your first domain (vpsprof.com in our case).
dkim_key('vpsprof.com', 'dkim', '/var/lib/dkim/vpsprof.com.pem'); It looks like this:
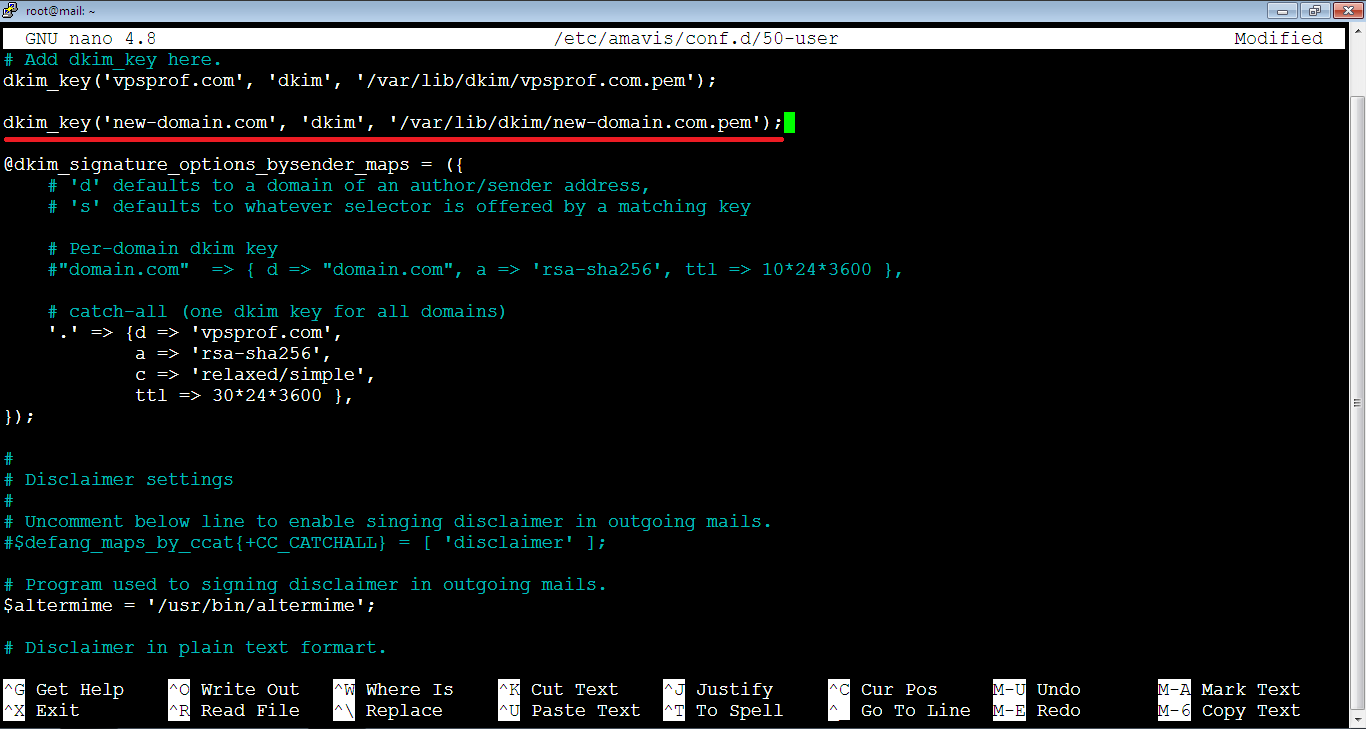
Add another line below it to specify the location of the private key of the new domain as follow:
dkim_key('new-domain.com', 'dkim', '/var/lib/dkim/new-domain.com.pem');It should look like this:
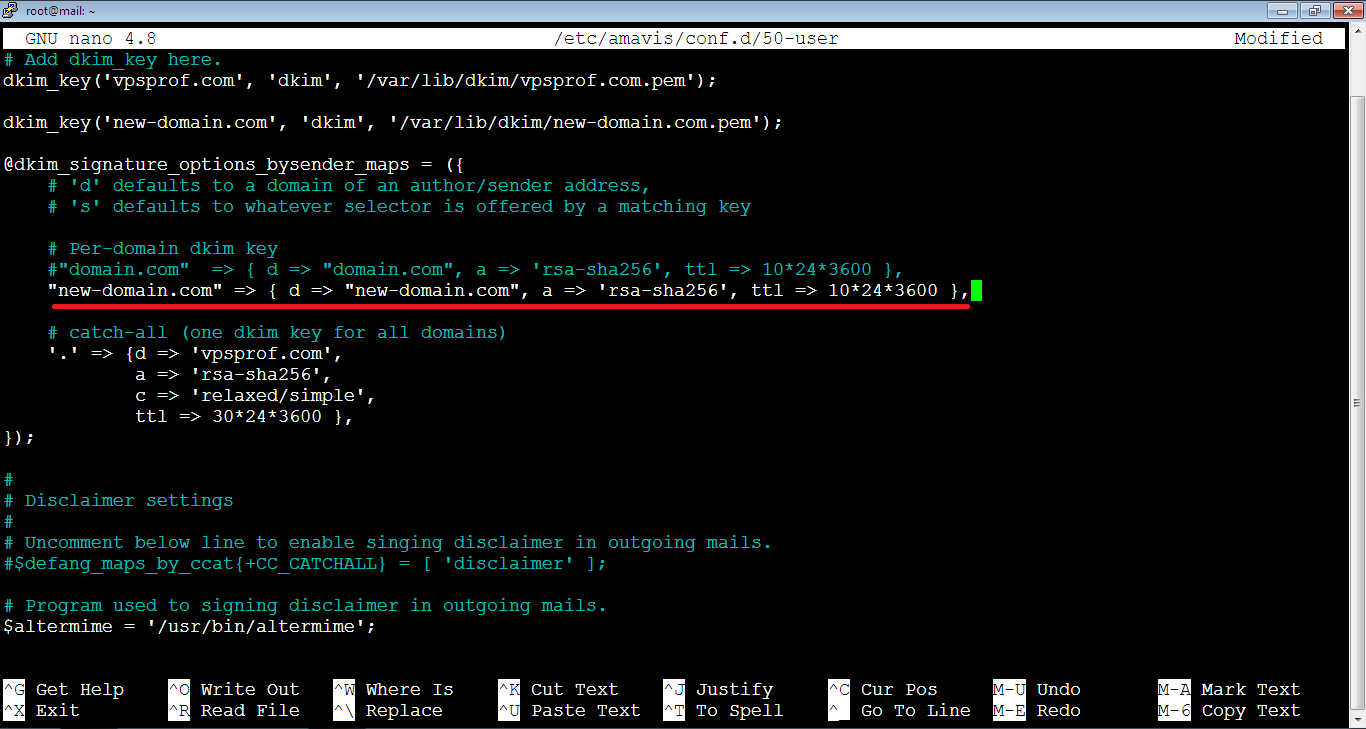
2. Inside the @dkim_signature_options_bysender_maps section and under the below line:
#"domain.com" => { d => "domain.com", a => 'rsa-sha256', ttl => 10*24*3600 },Add this line:
"new-domain.com" => { d => "new-domain.com", a => 'rsa-sha256', ttl => 10*24*3600 },Note that the new added line should look like below in the file. Close and save the file.
Generate the Code
3. Generate the private key for the new domain running the following command:
amavisd-new genrsa /var/lib/dkim/new-domain.com.pem 2048
4. Then, restart Amavis service by running the command:
root@mail:~# systemctl restart amavis
5. Display the public keys for all the domains by the command:
root@mail:~# amavisd-new showkeysNote that all public keys will show up as seen below:
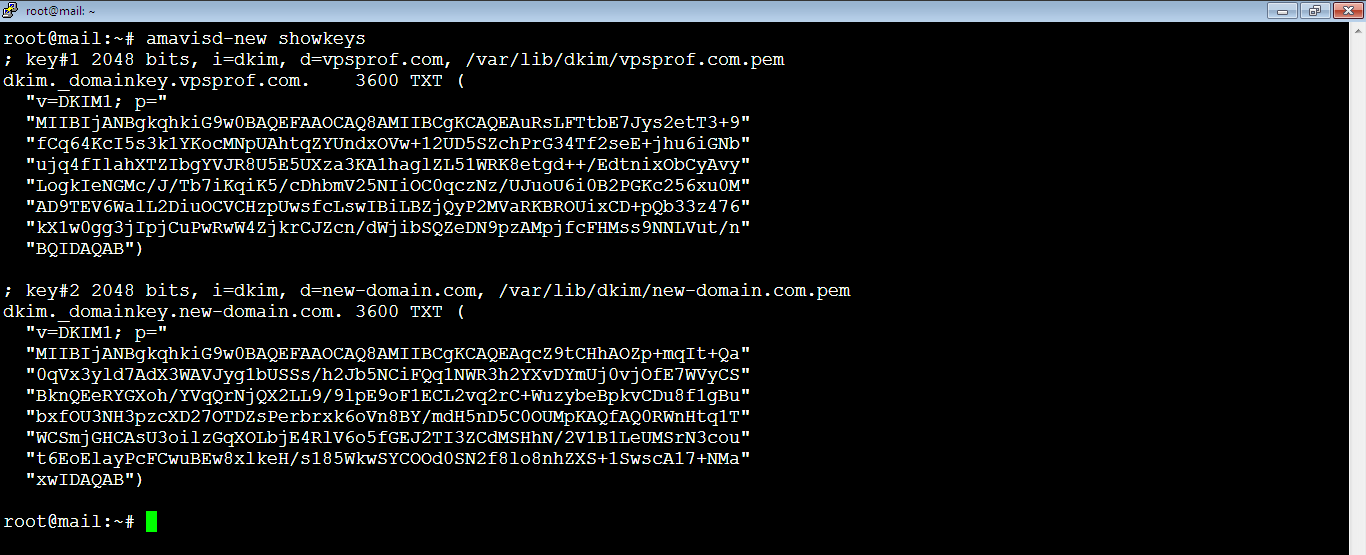
Take the key for the new-domain.com domain. The DKIM public key is in the parentheses same as the procedure we made for the first domain. It should look like below after deleting all double quotes.
v=DKIM1; p=
MIIBIjANBgkqhkiG9w0BAQEFAAOCAQ8AMIIBCgKCAQEAqcZ9tCHhAOZp+mqIt+Qa
0qVx3yld7AdX3WAVJyg1bUSSs/h2Jb5NCiFQq1NWR3h2YXvDYmUj0vjOfE7WVyCS
BknQEeRYGXoh/YVqQrNjQX2LL9/9lpE9oF1ECL2vq2rC+WuzybeBpkvCDu8f1gBu
bxfOU3NH3pzcXD27OTDZsPerbrxk6oVn8BY/mdH5nD5C0OUMpKAQfAQ0RWnHtq1T
WCSmjGHCAsU3oilzGqXOLbjE4RlV6o5fGEJ2TI3ZCdMSHhN/2V1B1LeUMSrN3cou
t6EoElayPcFCwuBEw8xlkeH/s185WkwSYCOOd0SN2f8lo8nhZXS+1SwscA17+NMa
xwIDAQAB
In case displaying the public key for all domains failed and you got the below error:
Error in config file "/etc/amavis/conf.d/50-user": Can't open PEM file /var/lib/dkim/new-domain.com.pem: Permission denied at /usr/sbin/amavisd-new line 639.You should check the ownership of the new domain in the dkim directory by running the below command
root@mail:~# ls -la /var/lib/dkimIf it’s root:root, you need to change the ownership to amavisd by running the below command on the whole dkim directory:
root@mail:~# chown amavis:amavis /var/lib/dkim/ -RAfter that, run the command again. You should see the new DKIM key:
root@mail:~# amavisd-new showkeysAdd DKIM in Email Domain DNS Manager
6. So, set it on the DNS manager of your new domain by creating a TXT record as below:
| DNS Record Type | Host | Content, Value or the Answer | TTL (Time To Live), if exists |
|---|---|---|---|
| TXT | dkim._domainkey | v=DKIM1; p= | 90 seconds (or the minimum allowed) |
Refer to our previous article on how to set a DKIM record on the registrar advanced DNS panel here: Improve Email Deliverability (part: c. Generate DKIM Record).
Check if the TXT record is okay by running the command:
root@mail:~# dig TXT dkim._domainkey.new-domain.com7. After saving your DKIM record on the DNS manager, test the DKIM record by running the following command. We recommend you wait for 15 to 30 minutes before testing because sometimes the DNS records takes some time to update due to the cache.
root@mail:~# amavisd-new testkeysYou should get something like below, note that it’s just an example to use the domain: new-domain.com

If your domain doesn’t pass, then as we did previously with the vpsprof.com domain, you need to wait for few minutes as sometimes the DNS manager caches the records for some time. If it doesn’t work, remove the current DKM key and generate new one as we did before here then give a try again, it should work.
Important Note
After adding new email domains, make sure that amavis is running by running the below command. If amavis is inactive, your email server will not be able to send emails.
root@mail:~# service amavis statusIf it’s inactive, you will see something like this:
root@mail:~# service amavis status
× amavis.service - Interface between MTA and virus scanner/content filters
     Loaded: loaded (/lib/systemd/system/amavis.service; enabled; vendor preset: enabled)
     Active: failed (Result: exit-code) since Sat 2023-04-29 19:41:52 CEST; 26min ago
       Docs: http://www.ijs.si/software/amavisd/#doc
    Process: 36761 ExecStartPre=/usr/bin/find /var/lib/amavis -maxdepth 1 -name amavis-* -type d -exec rm -rf {} ; (code=exited, status=0/SUCCESS)
    Process: 36762 ExecStartPre=/usr/bin/find /var/lib/amavis/tmp -maxdepth 1 -name amavis-* -type d -exec rm -rf {} ; (code=exited, status=0/SUCCESS)
    Process: 36763 ExecStart=/usr/sbin/amavisd-new foreground (code=exited, status=13)
   Main PID: 36763 (code=exited, status=13)
        CPU: 454ms

Apr 29 19:41:51 mail.vpsprof.com systemd[1]: amavis.service: Failed with result 'exit-code'.
Apr 29 19:41:52 mail.vpsprof.com systemd[1]: amavis.service: Scheduled restart job, restart counter is at 5.
Apr 29 19:41:52 mail.vpsprof.com systemd[1]: Stopped Interface between MTA and virus scanner/content filters.
Apr 29 19:41:52 mail.vpsprof.com systemd[1]: amavis.service: Start request repeated too quickly.
Apr 29 19:41:52 mail.vpsprof.com systemd[1]: amavis.service: Failed with result 'exit-code'.
Apr 29 19:41:52 mail.vpsprof.com systemd[1]: Failed to start Interface between MTA and virus scanner/content filters.
Because we noticed that sometimes after adding a new domain, amavis stops and we don’t know the exact reason. So start it again by running the command. Everything should be fine and your email server will be back to send emails normally.
root@mail:~# service amavis startd. Setup DMARC
To enable DMARC, you should create an email address: dmarc@new-domain.com on the iRedAdmin panel then create DMARC record on your DNS Manager for your new domain as we did before for the domain vpsprof.com below:
| DNS Record Type | Host | Content, Value or the Answer | TTL (Time To Live) if exists |
|---|---|---|---|
| TXT | _dmarc | v=DMARC1; p=none; pct=100; rua=mailto:dmarc@new-domain.com | 1 min (or the minimum allowed) |
Refer to our previous article on how to set a DMARC record on the registrar advanced DNS panel here: Improve Email Deliverability (part: d. Setup DMARC).
You can test the new email deliverability by following the instructions here.
e. Configure Virtual Hosts
Proceed with this step if you want to login to mail panels from your new domain. If you want to use the original domain (mail.vpsprof.com) to login to email panels, you don’t need to apply the instructions in this step. Virtual hosts configuration means to configure a certain domain to point out to the IP address of the machine. There should be an A record on the domain DNS panel in order to be able to have the panels under the new URL on the same server as below, then we need to do the following:
| DNS Record Type | Host | Content, Value or the Answer | TTL (Time To Live) |
|---|---|---|---|
| A | 144.91.72.55 | 1 min (or the minimum allowed) |
1. Create/open a new virtual hosts empty file for your domain in sites-enabled directory using the below command then hit Enter key.
root@mail:~# nano /etc/nginx/sites-enabled/mail.new-domain.com.conf
Note that the name of the file name should end up with .conf
2. We will add inside the empty file we opened the below non SSL configuration (which is inside the file: /etc/nginx/sites-enabled/00-default.conf)
server {
    # Listen on ipv4
    listen 80;
    #listen [::]:80;

    server_name _;

    # Redirect all insecure http:// requests to https://
    return 301 https://$host$request_uri;
}
Set the value of server_name to: mail.new-domain.com, so the file should look like this:
server {
    # Listen on ipv4
    listen 80;
    #listen [::]:80;

    server_name mail.new-domain.com;

    # Redirect all insecure http:// requests to https://
    return 301 https://$host$request_uri;
}
3. Enter at the end of the file, the below SSL configuration:
# HTTPS
server {
    listen 443 ssl http2;
    #listen [::]:443 ssl http2;
    server_name _;

    root /var/www/html;
    index index.php index.html;

    include /etc/nginx/templates/misc.tmpl;
    include /etc/nginx/templates/ssl.tmpl;
    include /etc/nginx/templates/iredadmin.tmpl;
    include /etc/nginx/templates/roundcube.tmpl;
    include /etc/nginx/templates/sogo.tmpl;
    include /etc/nginx/templates/netdata.tmpl;
    include /etc/nginx/templates/php-catchall.tmpl;
    include /etc/nginx/templates/stub_status.tmpl;
}
Set the value of server_name to: mail.new-domain.com, so the file should look like this:
# HTTPS
server {
    listen 443 ssl http2;
    #listen [::]:443 ssl http2;
    server_name mail.new-domain.com;

    root /var/www/html;
    index index.php index.html;

    include /etc/nginx/templates/misc.tmpl;
    include /etc/nginx/templates/ssl.tmpl;
    include /etc/nginx/templates/iredadmin.tmpl;
    include /etc/nginx/templates/roundcube.tmpl;
    include /etc/nginx/templates/sogo.tmpl;
    include /etc/nginx/templates/netdata.tmpl;
    include /etc/nginx/templates/php-catchall.tmpl;
    include /etc/nginx/templates/stub_status.tmpl;
}
4. Test the configuration of Nginx by running the command:
root@mail:~# nginx -tIf the configuration is okay, restart Nginx:
root@mail:~# service nginx reloadObtain TLS Certificate
5. Use Certbot webroot plugin to obtain a TLS certificate for all your mail domains, so you will have a single TLS certificate with multiple domain names on it, using the command:
root@mail:~# certbot certonly --webroot --agree-tos -d mail.vpsprof.com,mail.new-domain.com --cert-name mail.vpsprof.com --email postmaster@vpsprof.com -w /var/www/htmlNote that vpsprof.com is our first domain that already exists, our new domain is: new-domain.com. Please don’t add any space after the comma between the two domains. In case you do, you will get this error: Requested domain is not a FQDN because it contains an empty label.

So, once we run the command correctly, we get a prompt like below:
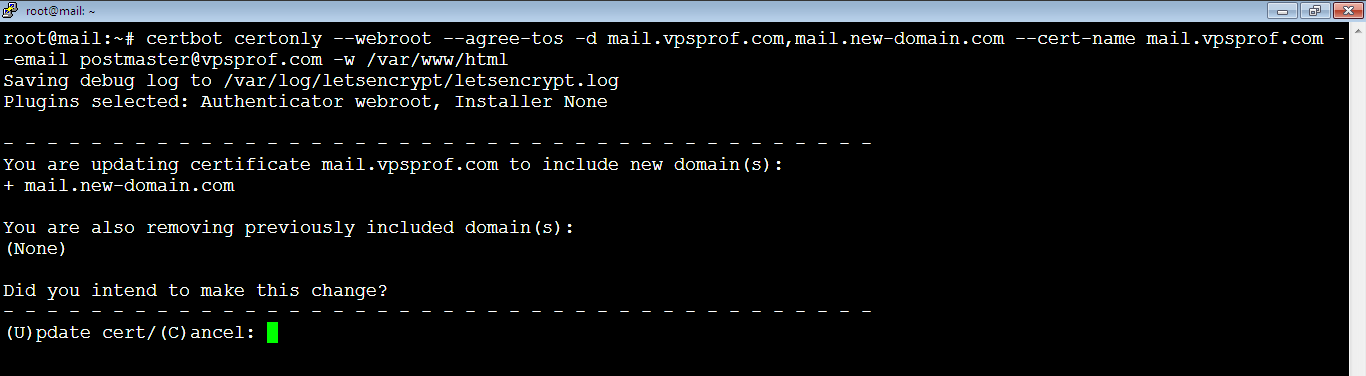
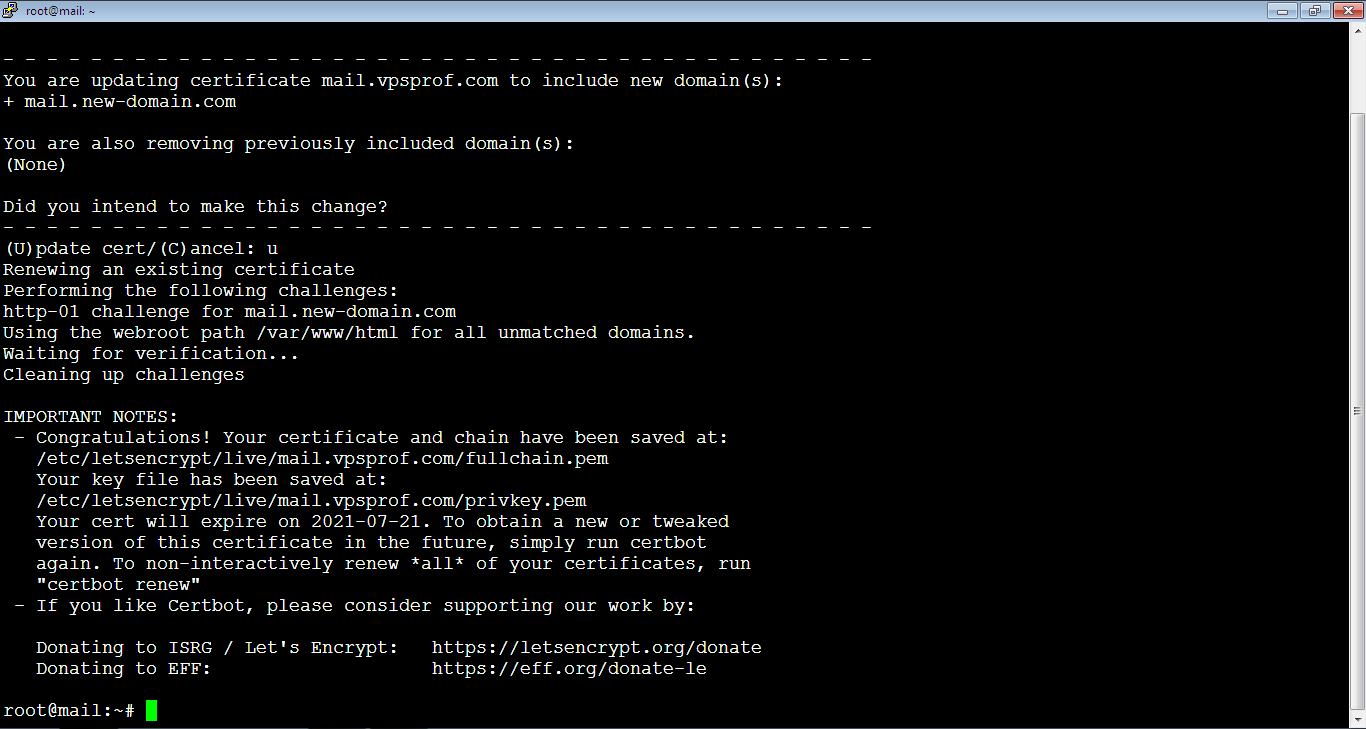
Type: U, or: u, then hit Enter key. When it’s done, you will get a success message like this:
6. Reload the three services in order to to activate the TLS certificate of the new domain. If you don’t reload the below services, you will get a security warning when accessing the new domain panels like: https://new-domain.com/iredadmin
root@mail:~# service nginx reloadroot@mail:~# service postfix reloadroot@mail:~# service dovecot reloadEventually, you can login to the admin panels using the new domain and can create email addresses too.