
To prevent our email messages from being flagged as spam messages, we should improve our email server deliverability by going through the following steps:
- a. Setup PTR Record (2 steps)
- b. Create SPF Record (2 steps)
- c. Generate DKIM Record (3 steps)
- d. Setup DMARC Record (3 steps)
- e. Test Your Email Deliverability (1 step)
Before configuring DNS records that’re responsible for the email deliverability, you should have a domain. You can check our detailed article on how to register a new domain here: Domain Registration.
a. Setup PTR Record
The Pointer Record (PTR) maps between your IP address and the FQDN (fully qualified domain name) which we already set previously.
1. Now, let’s check the PTR record of your IP address, run any of the below commands:
root@mail:~# dig -x 144.91.72.55 +short
root@mail:~# host 144.91.72.55
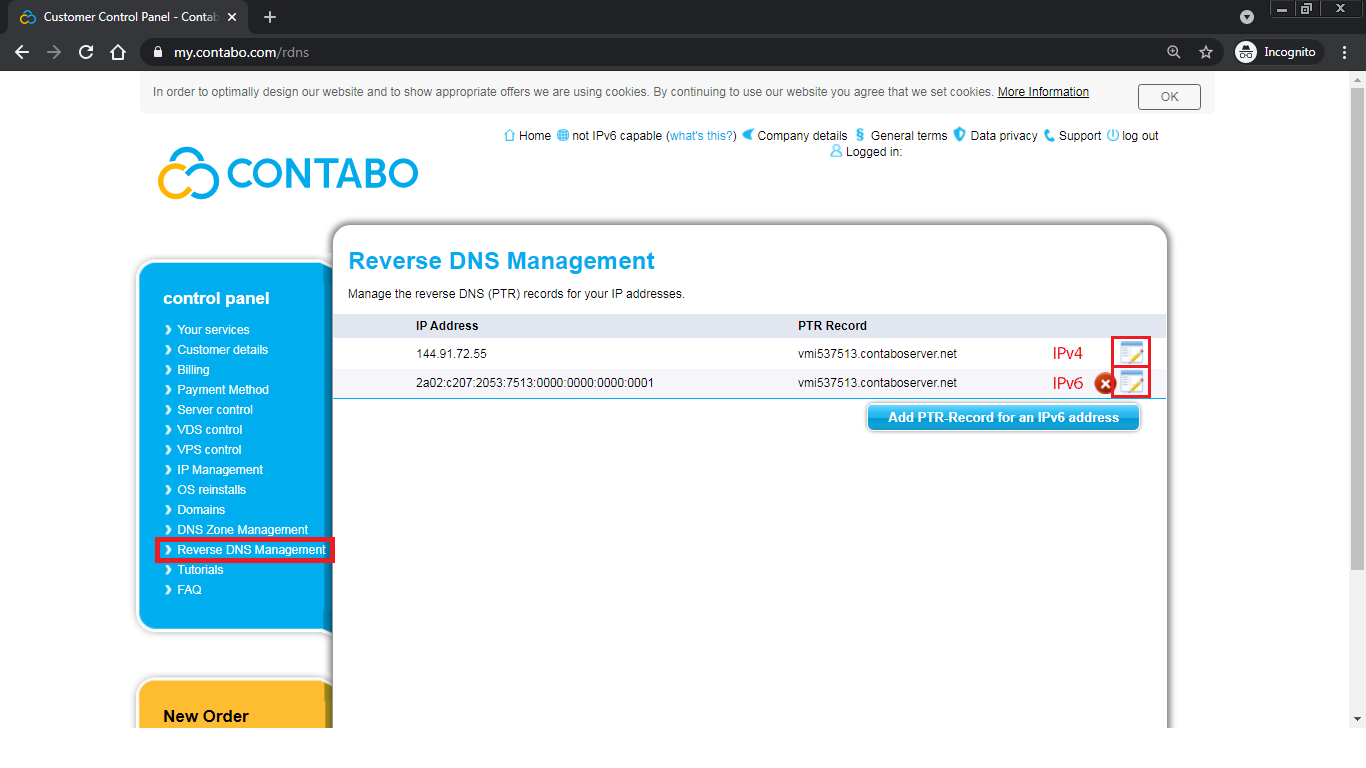
2. Go to the VPS panel: https://my.contabo.com, then login with your credentials. After that, click on: Reverse DNS Management link on left panel as below. Then, click on the Edit button for the IPv4 and the IPv6 addresses to edit both of them.
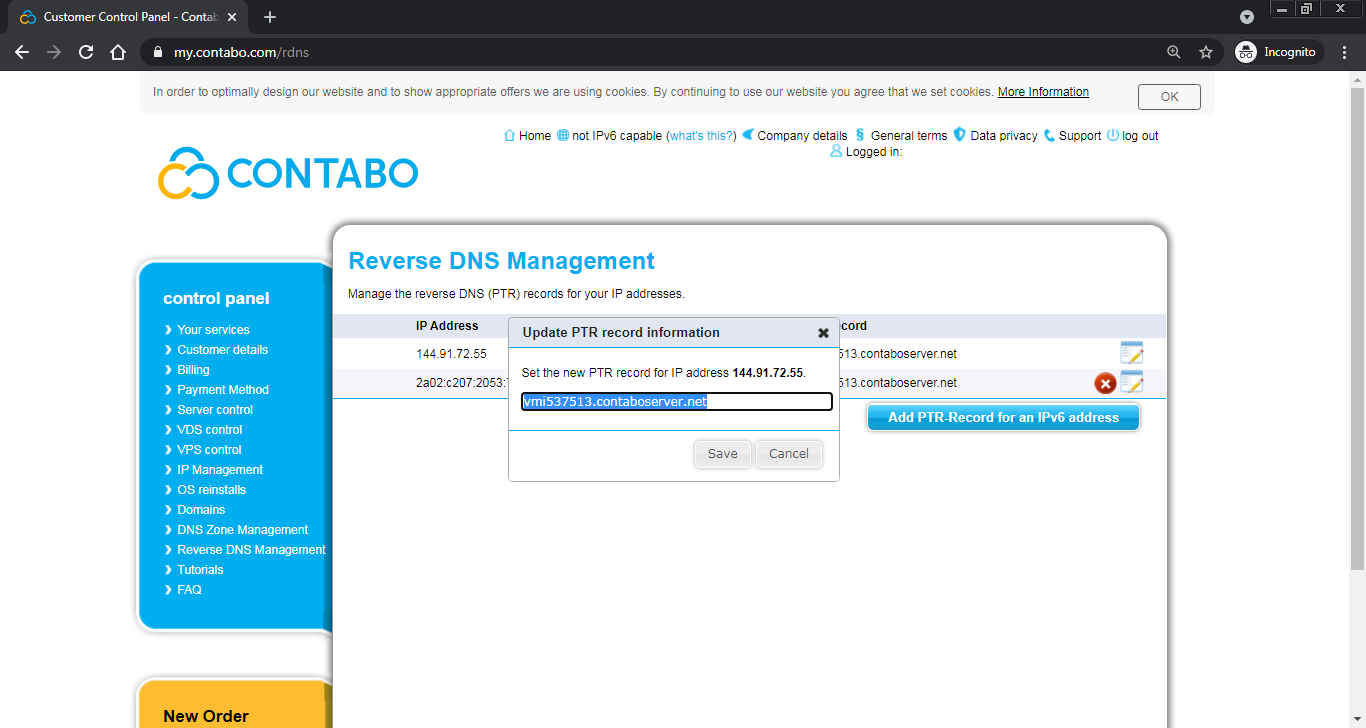
As you see below, the default reverse DNS will show up when clicking on the button to edit the IPv4 reverse DNS.
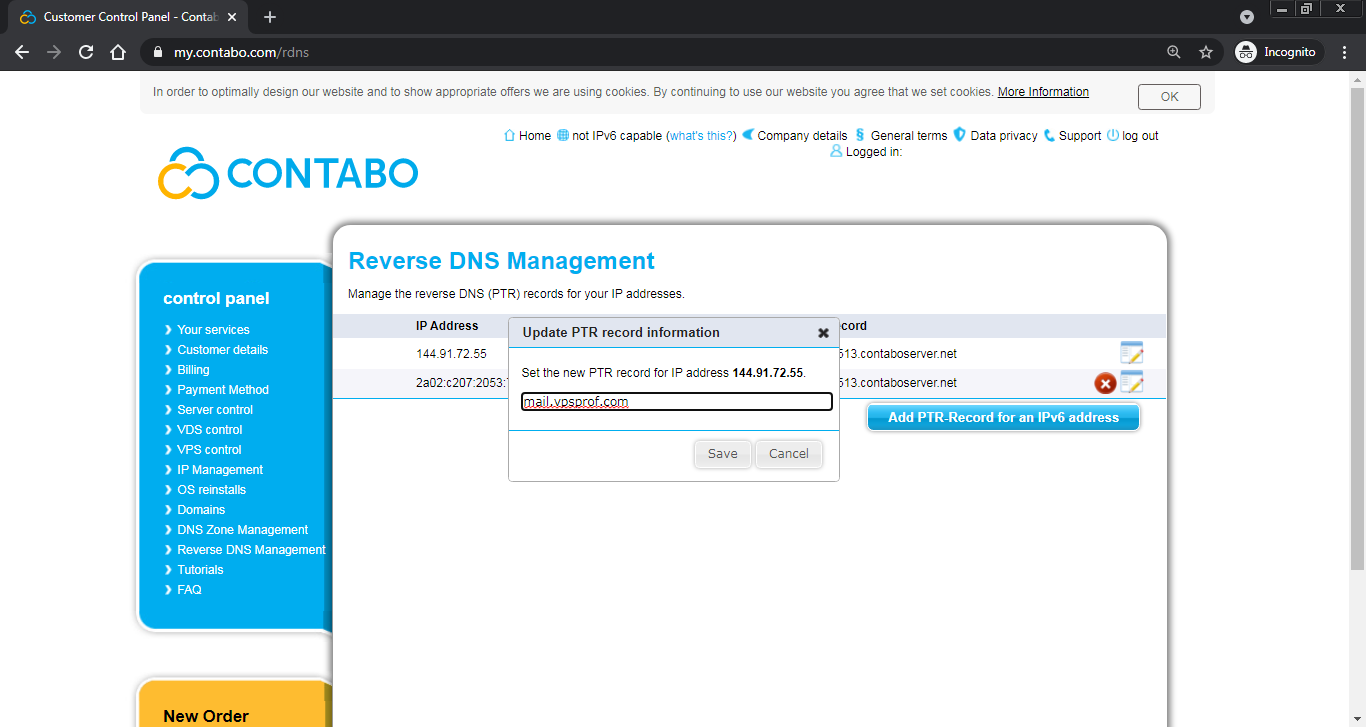
Enter your FQDN: mail.vpsprof.com, but make sure to enter your own domain instead of vpsprof.com. Then, click on Save button.
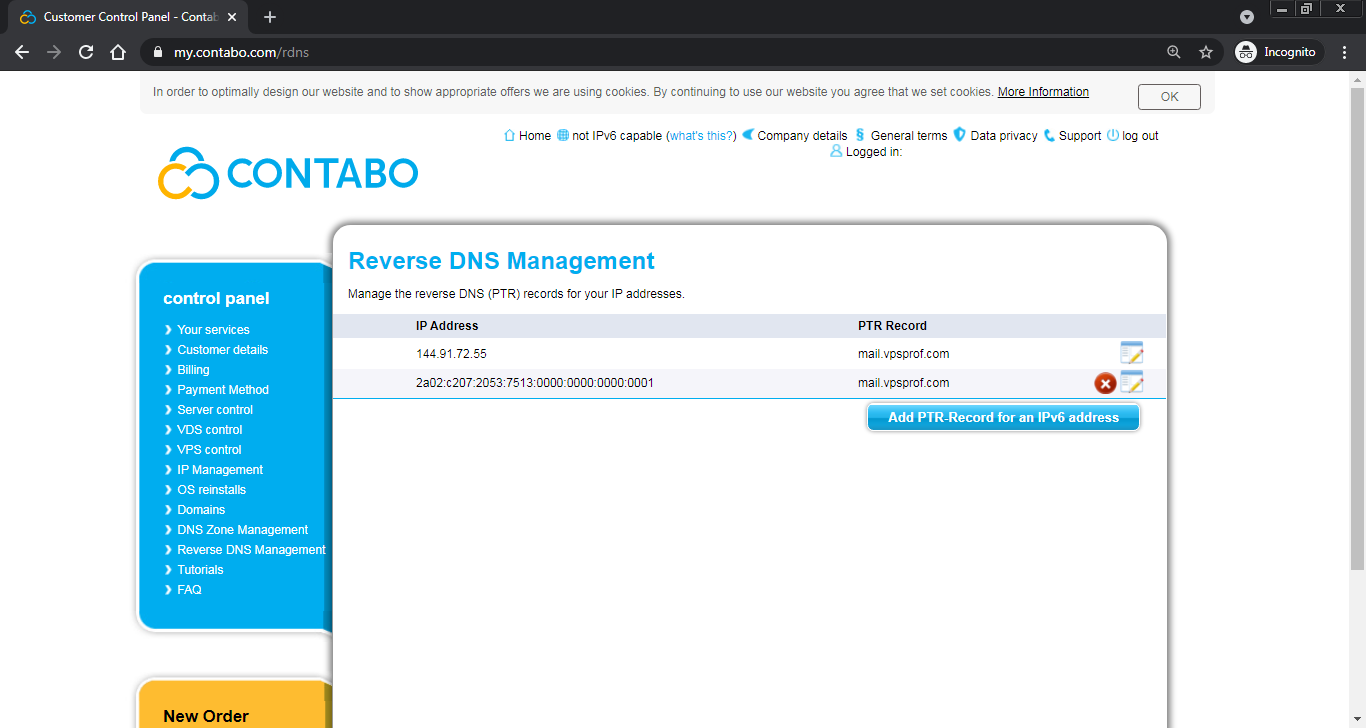
Once we edit both reverse DNS’s (IPv4 and IPv6), the DNS management panel will look like below:
You need to wait for 48 hours before seeing change.
b. Create SPF Record
To set the Sender Policy Framework record (SPF), we need to:
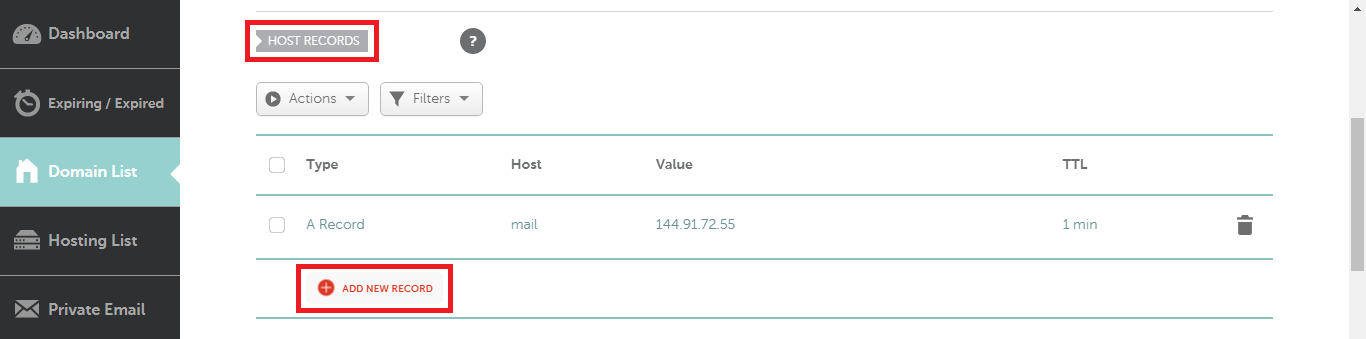
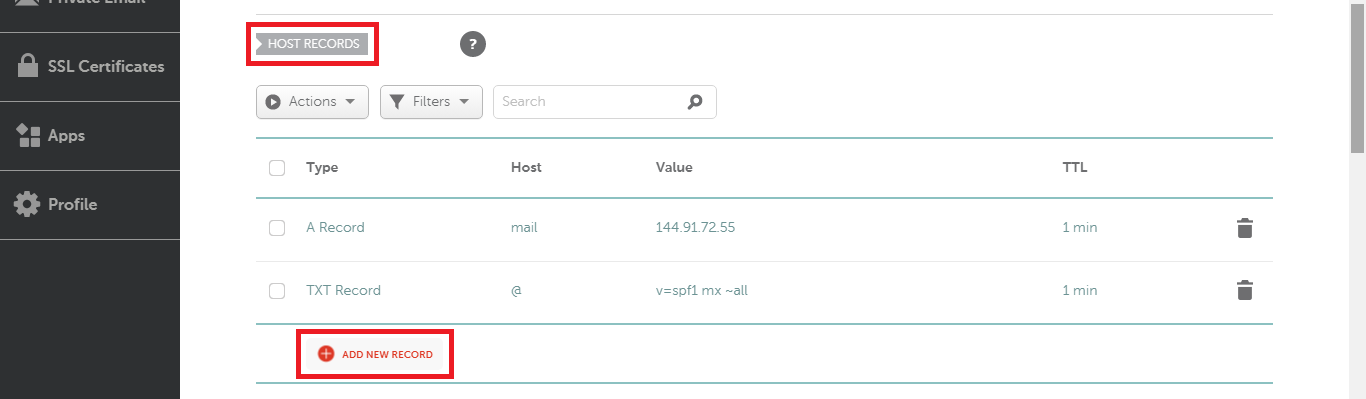
1. Go to DNS records on your website registrar DNS manager, we already showed you how to go to the advanced DNS settings on NameCheap here: Domain Registration. First, hover over Account on NameCheap homepage. Next, click on Domain List. Then, click on Manage button for the domain you want to edit. Finally, click on Advanced DNS.
Under HOST RECORDS, click on ADD NEW RECORD as seen below:
Choose TXT Record option as below. Then, set the value of TXT Record variables in the DNS settings page (NameCheap in our case) to the values in the table below. After that, click on the right sign button to save them as seen below:
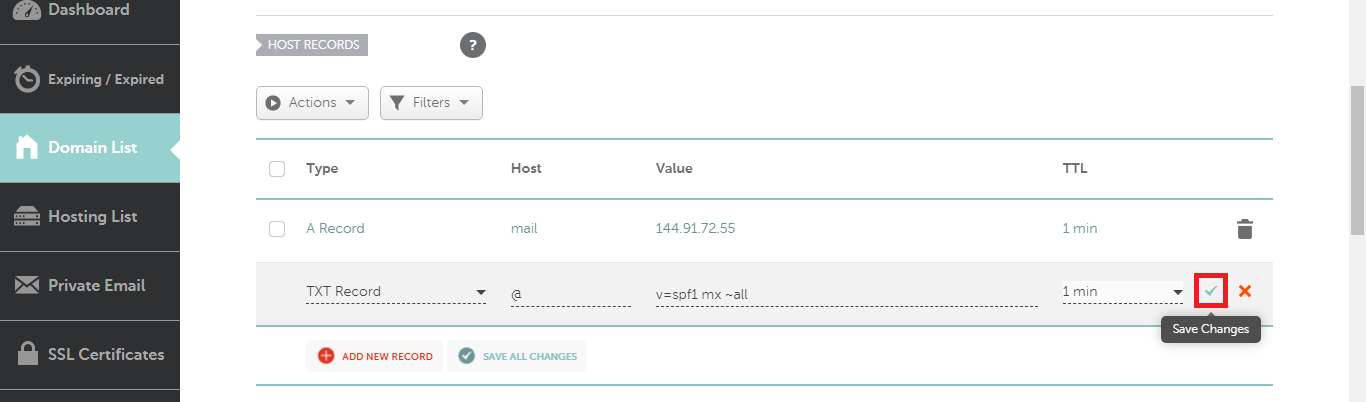
| DNS Record Type | Host | Content, Value or the Answer | TTL (Time To Live), if exists |
|---|---|---|---|
| TXT | @ | v=spf1 mx ~all | 1 min (or the minimum allowed) |
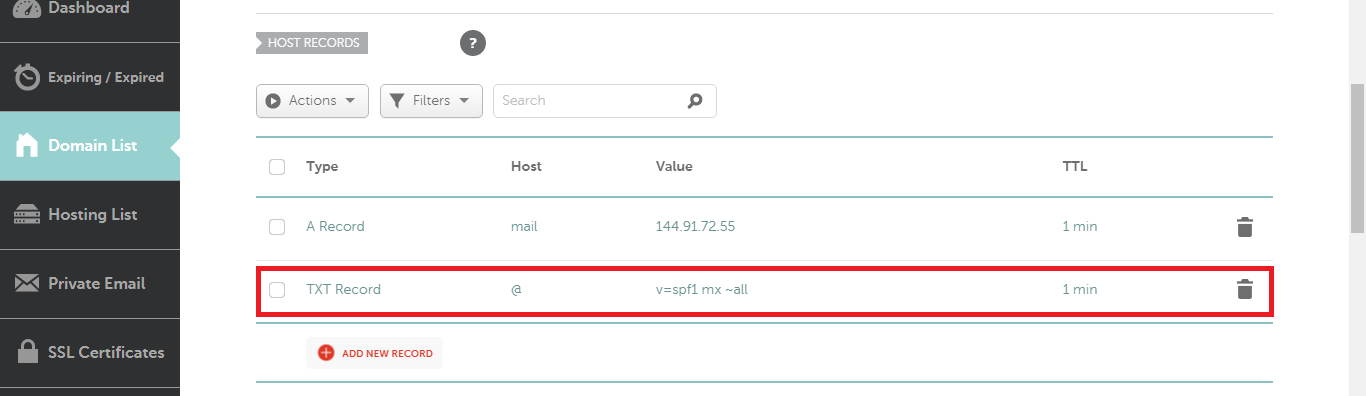
And as you see below, the TXT Record has been saved and it’s ready.
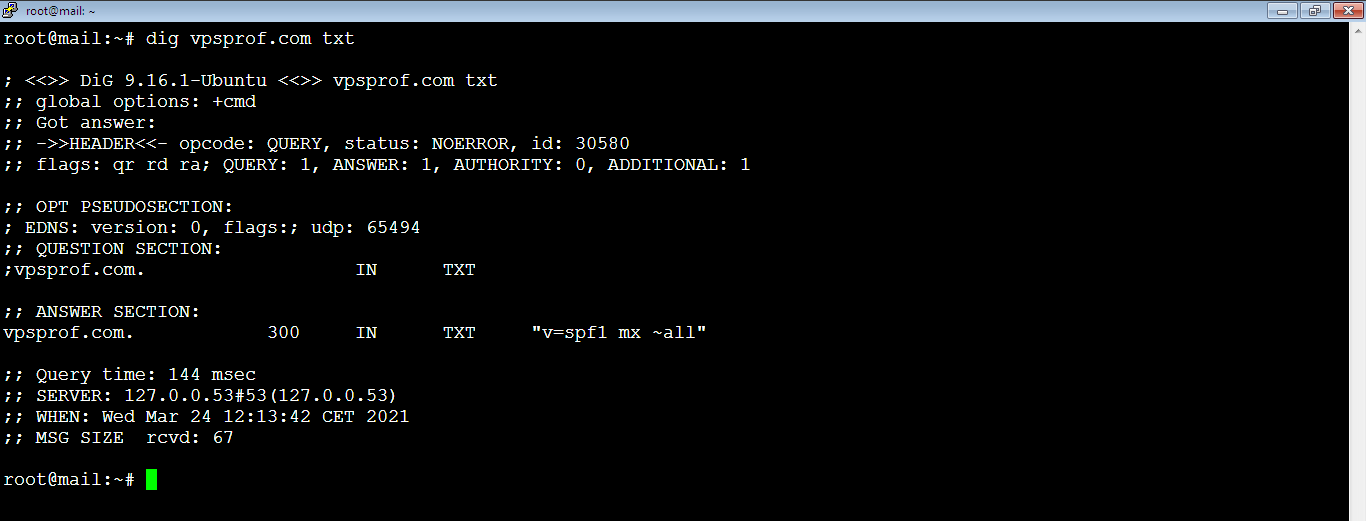
2. Check if the SPF record is propagated to the public internet by the command:
root@mail:~# dig vpsprof.com txt The result will look like this:
c. Generate DKIM Record
The Domain Keys Identified Mail record (DKIM) uses a private key to digitally sign emails sent from your domain. On the other hand, receiving SMTP servers verify the signature by using the public key, which is published on the DKIM record for your domain on the registrar’s DNS manger panel. Because iRedMail configures the DKIM for your server automatically, you only need to create a DKIM record in the DNS manager.
1. Find the DKIM public key by running the below command:
root@mail:~# amavisd-new showkeysYou will see something like below. Since every email server has different public DKIM records, you don’t need to use our DKIM records. Alternatively, you should generate them from your own server.
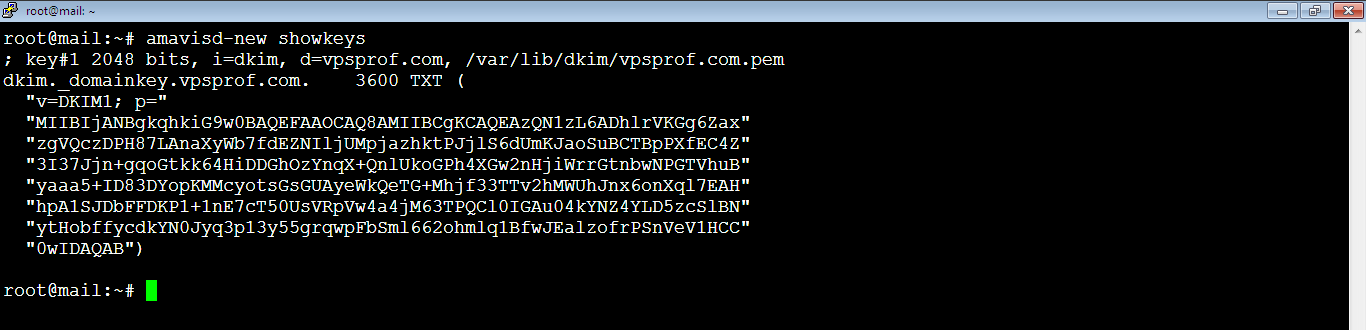
The DKIM public key is in the parentheses above. It should look like follows:
"v=DKIM1; p="
"MIIBIjANBgkqhkiG9w0BAQEFAAOCAQ8AMIIBCgKCAQEAzQN1zL6ADhlrVKGg6Za"
"zgVQczDPH87LAnaXyWb7fdEZNIljUMpjazhktPJjlS6dUmKJaoSuBCTBpPXfEC4"
"3I37Jjn+gqoGtkk64HiDDGhOzYnqX+QnlUkoGPh4XGw2nHjiWrrGtnbwNPGTVhu"
"yaaa5+ID83DYopKMMcyotsGsGUAyeWkQeTG+Mhjf33TTv2hMWUhJnx6onXql7EA"
"hpA1SJDbFFDKP1+1nE7cT50UsVRpVw4a4jM63TPQCl0IGAu04kYNZ4YLD5zcSlB"
"ytHobffycdkYN0Jyq3p13y55grqwpFbSml662ohmlq1BfwJEalzofrPSnVeV1HC"
"0wIDAQAB"
But to add it to our DNS manager panel, we need to delete all double quotes so finally it should look like below. Don’t forget to use the DKIM code that’s generated by your own server, not the one below.
v=DKIM1; p=
MIIBIjANBgkqhkiG9w0BAQEFAAOCAQ8AMIIBCgKCAQEAzQN1zL6ADhlrVKGg6Za
zgVQczDPH87LAnaXyWb7fdEZNIljUMpjazhktPJjlS6dUmKJaoSuBCTBpPXfEC4
3I37Jjn+gqoGtkk64HiDDGhOzYnqX+QnlUkoGPh4XGw2nHjiWrrGtnbwNPGTVhu
yaaa5+ID83DYopKMMcyotsGsGUAyeWkQeTG+Mhjf33TTv2hMWUhJnx6onXql7EA
hpA1SJDbFFDKP1+1nE7cT50UsVRpVw4a4jM63TPQCl0IGAu04kYNZ4YLD5zcSlB
ytHobffycdkYN0Jyq3p13y55grqwpFbSml662ohmlq1BfwJEalzofrPSnVeV1HC
0wIDAQAB
2. Let’s set the DKIM record on the DNS manager by creating a TXT record. In our case, we’re using NameCheap. Click on ADD NEW RECORD under HOST RECORDS (same as what we did with the SPF record) as seen below:
Choose TXT Record option as below. Then, set the value of the TXT Record variables in the DNS settings page (NameCheap in our case) to the values in the table below. After that, click on the right sign button to save them as seen below:
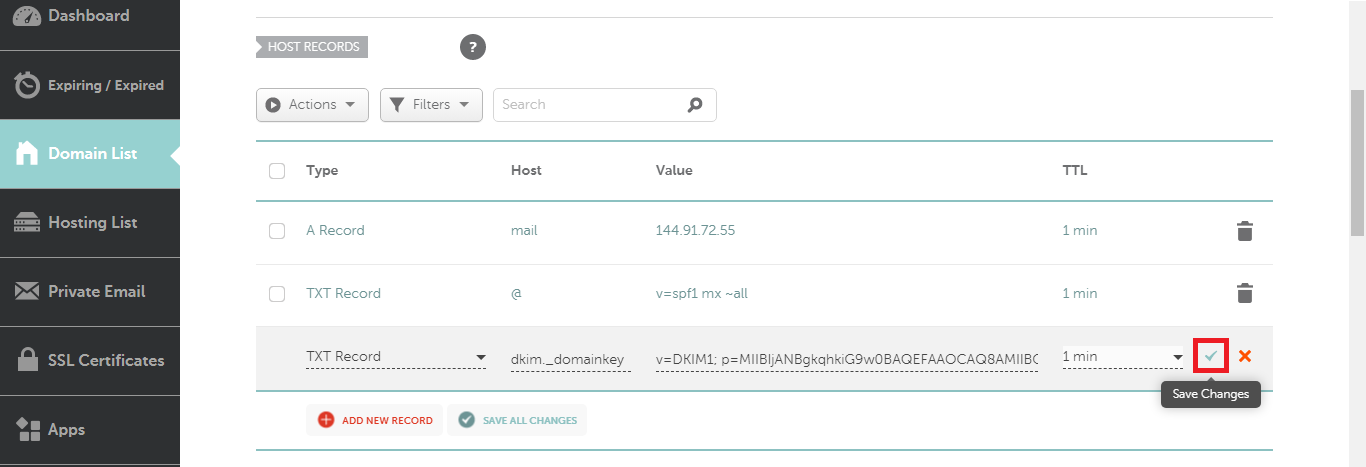
| DNS Record Type | Host | Content, Value or the Answer | TTL (Time To Live), if exists |
|---|---|---|---|
| TXT | dkim._domainkey | v=DKIM1; p= | 1 min (or the minimum allowed) |
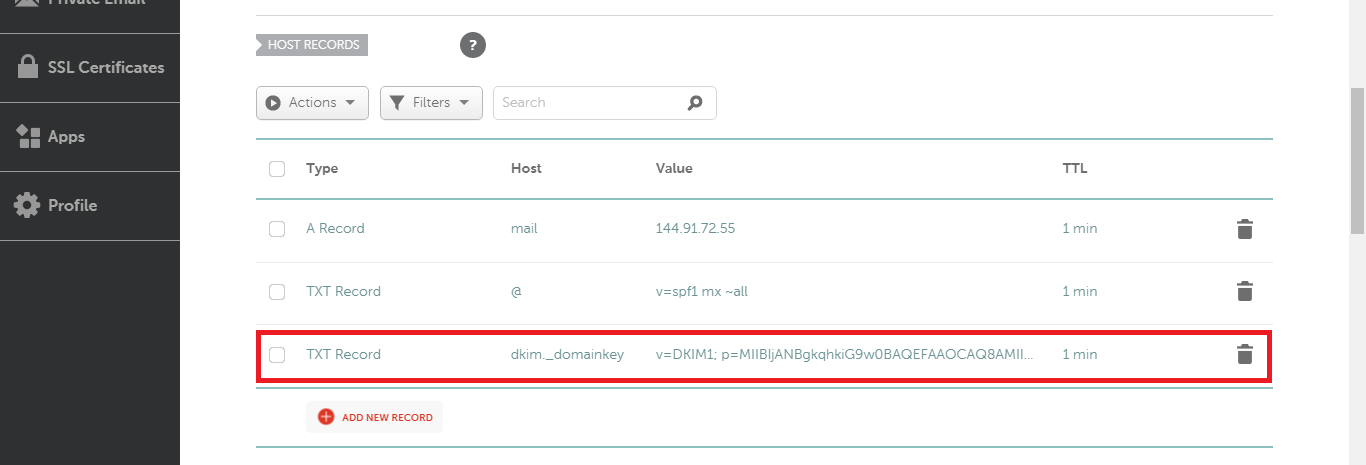
And here how the DKIM record looks like after saving:
Test DKIM Record
Before testing DKIM key, make sure it has propagated by running the command:
root@mail:~# dig TXT dkim._domainkey.vpsprof.comYou should see the same DKIM you added on your domain DNS settings as below. If not, you need to wait until it gets propagated.
root@mail:~# dig TXT dkim._domainkey.vpsprof.com

; <<>> DiG 9.18.12-0ubuntu0.22.04.3-Ubuntu <<>> TXT dkim._domainkey.vpsprof.com
;; global options: +cmd
;; Got answer:
;; ->>HEADER<<- opcode: QUERY, status: NOERROR, id: 53926
;; flags: qr rd ra; QUERY: 1, ANSWER: 1, AUTHORITY: 0, ADDITIONAL: 1

;; OPT PSEUDOSECTION:
; EDNS: version: 0, flags:; udp: 65494
;; QUESTION SECTION:
;dkim._domainkey.vpsprof.com. IN TXT

;; ANSWER SECTION:
dkim._domainkey.vpsprof.com. 86400 IN TXT "v=DKIM1; p=   MIIBIjANBgkqhk                                                                                        iG9w0BAQEFAAOCAQ8AMIIBCgKCAQEApZe5+0IgYZt954wXLsyh   VW4V6tuXtguex/UCXfUtqXApr6+                                                                                        DJ9n+mkQspl7pJwzTw7MN3dK1r9FcUvBD4dXw   L932bt2qhiCLvn1Hl9bjMCyUY/3eoCWpOKaLeW5r                                                                                        rvAKEeYdKix1asrtFvN03olt   M00sqM3suxNHiif3kKWLe9y3w0R4Dx/oHPKMRNCt" "yLGN3tzBmZ                                                                                        5F1nea1fIkUJJL   oXlPi16rO4zq5fcCxTY01ORPCo8YwgHWV8f3mnSc5mGcSceMoGNETCWdVlO782W                                                                                        W   3Whq+EWQQFk2Eu4Ng3A8UySZgfZXm7kWVth5KygKYaTPmD74t6pbmzORyVWt+sjF   nQIDAQAB"

;; Query time: 803 msec
;; SERVER: 127.0.0.53#53(127.0.0.53) (UDP)
;; WHEN: Thu Nov 30 10:22:22 CET 2023
;; MSG SIZE  rcvd: 503
3. After saving your DKIM record on DNS manager, test the DKIM record by running the below command. We recommend you wait for 15 to 30 minutes before testing because sometimes the DNS records takes some time to update due to the cache. Sometimes you need to wait for 24 to 48 hours to propagate.
root@mail:~# amavisd-new testkeysIf it’s successful, you will see the below message:

If not and if you get the below error message:
TESTING#1 vpsprof.com: dkim._domainkey.vpsprof.com => invalid (public key: OpenSSL error: bad base64 decode)
The first thing to do is to update and upgrade the packages on your server by running the commands:
root@mail:~# apt updateroot@mail:~# apt upgradeThen test again:
root@mail:~# amavisd-new testkeysIf it doesn’t work, we recommend to delete the current DKIM key and generate new one, by follownig the below steps:
- Remove the current DKIM key by running the below command:
root@mail:~# rm /var/lib/dkim/vpsprof.com.pem- Create new DKIM record by running the following command:
root@mail:~# amavisd-new genrsa /var/lib/dkim/vpsprof.com.pem 2048The response will be like this:

- Now, we will repeat the steps we applied previously, let’s get the key by running the command:
root@mail:~# amavisd-new showkeys- Apply it to your DNS manager then test again by running the below command:
root@mail:~# amavisd-new testkeysIn case you get any of the below error messages:
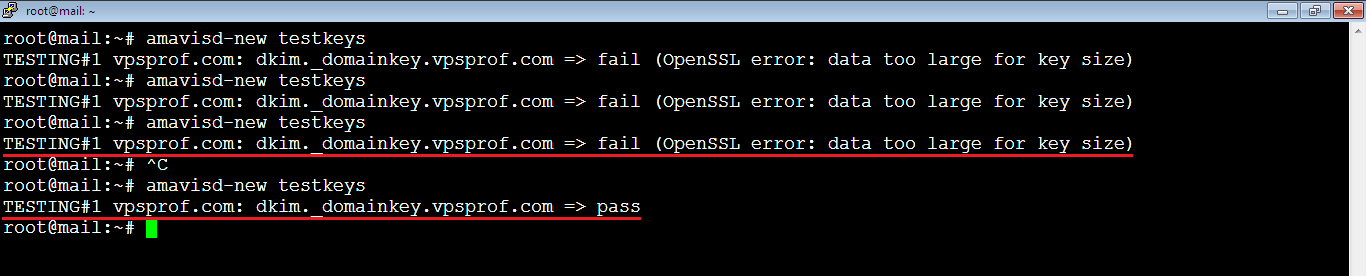
TESTING#1 vpsprof.com: dkim._domainkey.vpsprof.com => fail (OpenSSL error: bad RSA singnature)TESTING#1 vpsprof.com: dkim._domainkey.vpsprof.com => fail (OpenSSL error: data too large for key size)Don’t worry, just wait few minutes or hours then try again, it’s a matter of propagation, it should work once propagated, as you see:
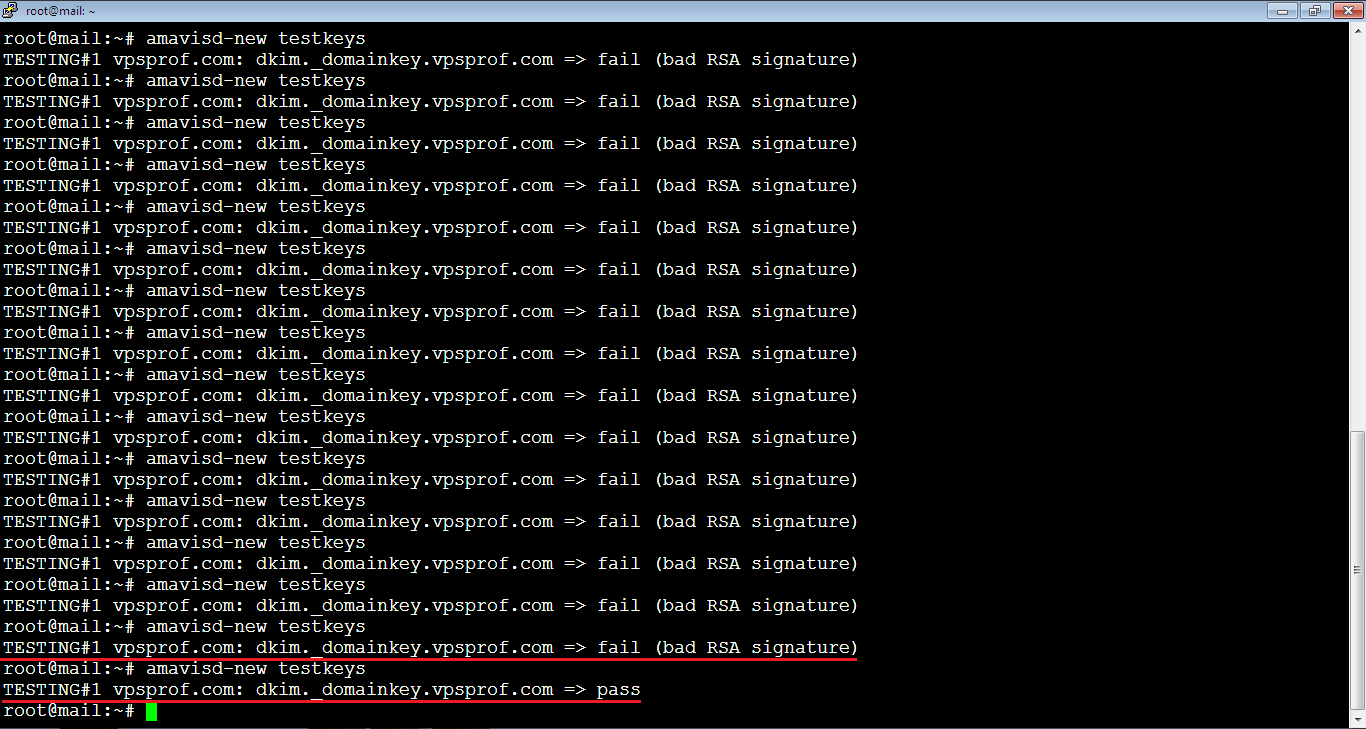
The following error is the second error which requires some time to wait to pass.
d. Setup DMARC Record
The Domain-based Message Authentication (DMARC) is for reporting and conformance. That is to say, DMARC can help receiving email servers to identify legitimate emails and prevent your domain name from being used by email spoofing. Let’s setup DMARC by following the steps below:
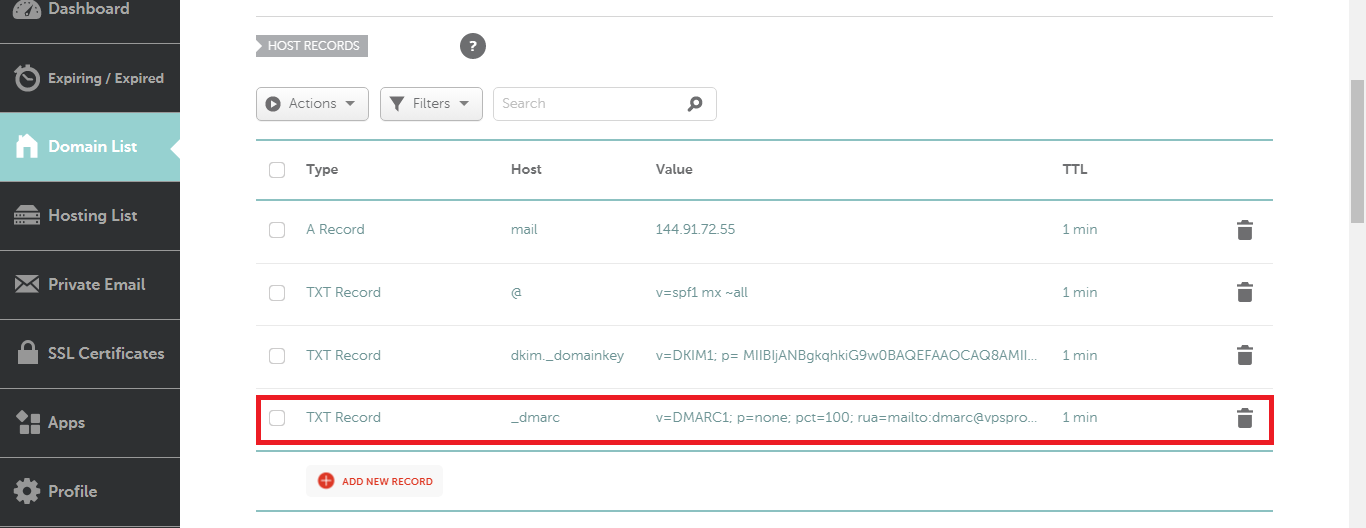
1. Set DMARC records on your DNS manager as per the values in the table below. It’s similar to the DKIM procedure, we need to create TXT record.
| DNS Record Type | Host | Content, Value or the Answer | TTL (Time To Live) if exists |
|---|---|---|---|
| TXT | _dmarc | v=DMARC1; p=none; pct=100; rua=mailto:dmarc@vpsprof.com | 90 seconds (or the minimum allowed) |
Your DNS Settings should look like below (NameCheap Advanced DNS settings):
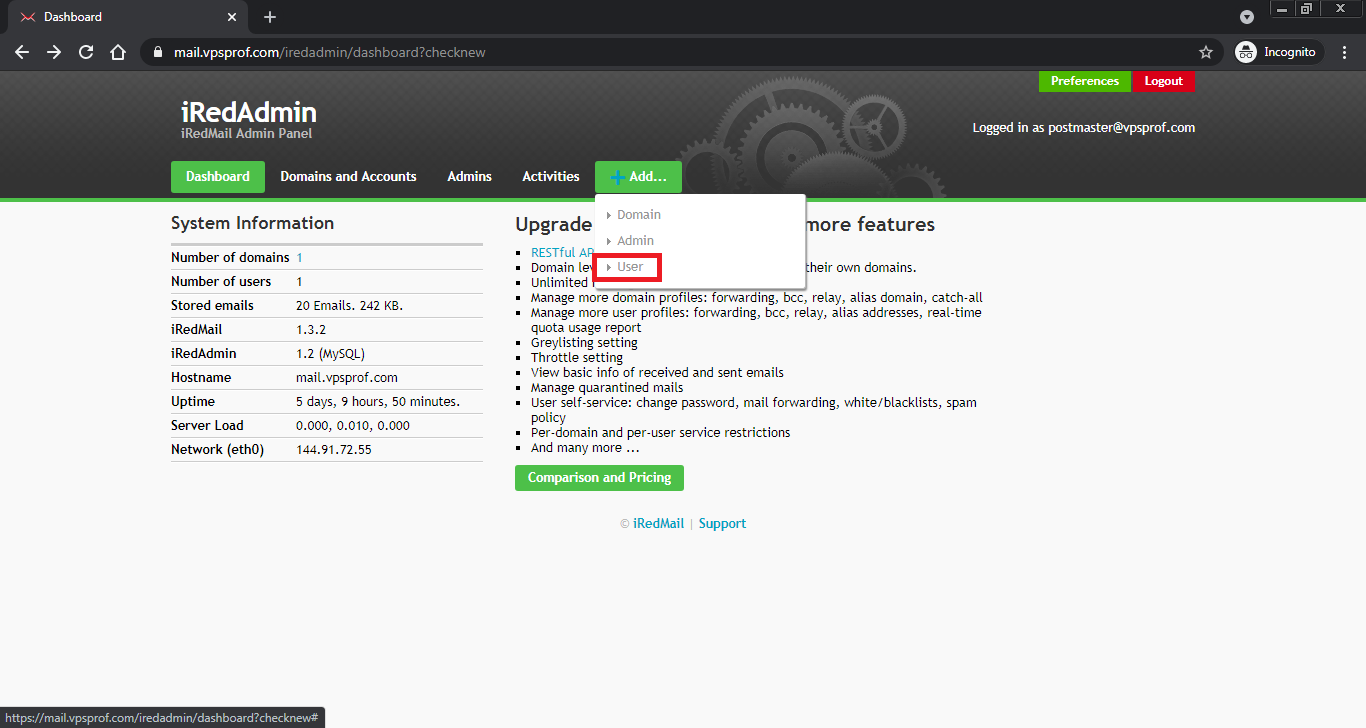
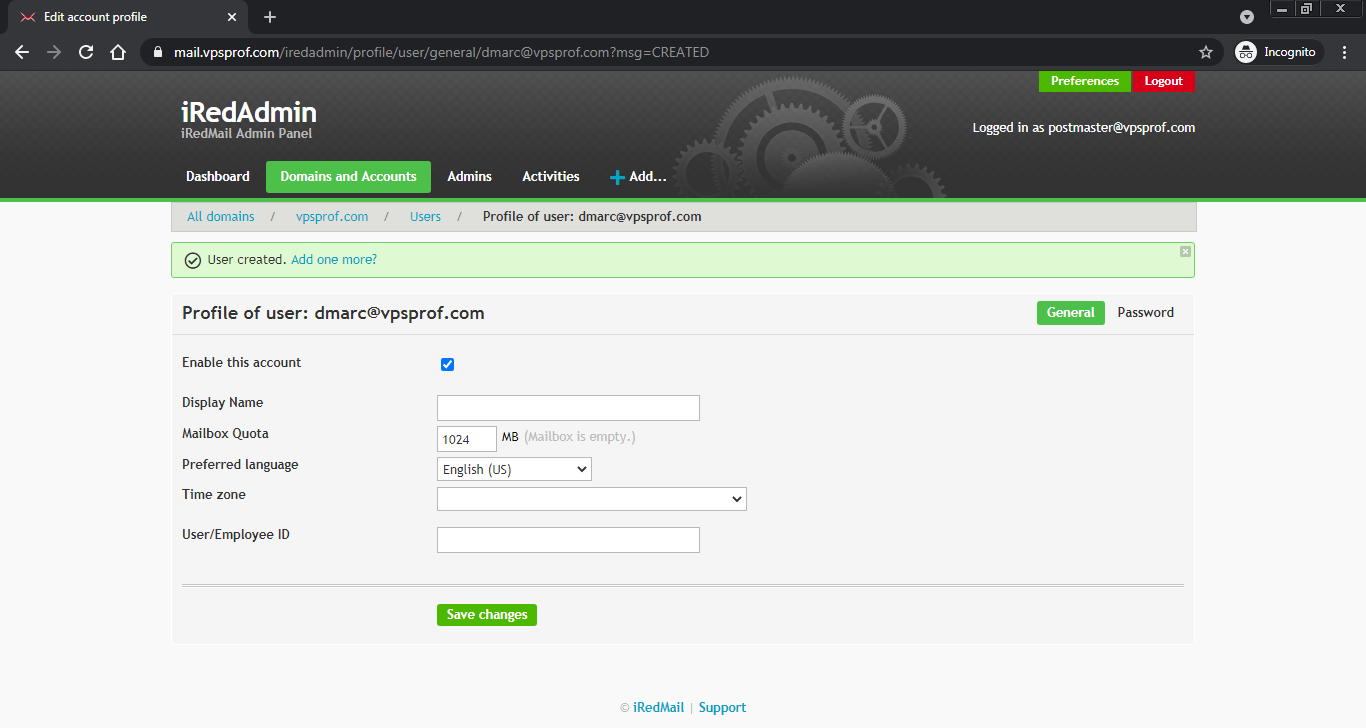
2. Create new email address: dmarc@vpsprof.com by going to your iRedAdmin panel: https://mail.vpsprof.com/iredadmin, first. Then, login with your credentials (username: postmaster@vpsprof.com). After that, go to Add -> User in the drop down menu as below:
3. Enter the mail address user: dmarc, and the new password as below. The password should contain at least: one letter, one uppercase letter, one digit and one special character. When you’re done, click on Add button.

And that’s it, the mail address has been added successfully!
e. Test Your Email Deliverability
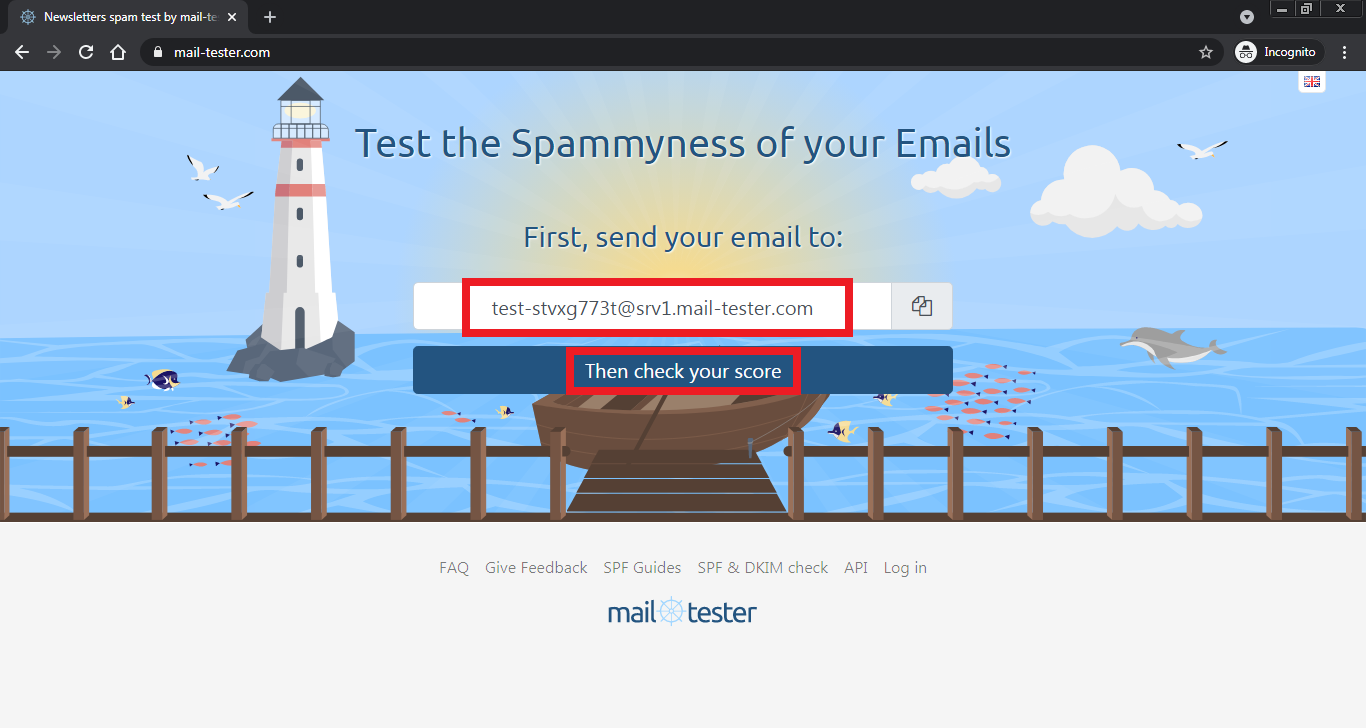
After creating PTR, SPF and DKIM records, go to the mail tester website: https://www.mail-tester.com. When you’re on the website, you will see a test email address which is: test-stvxg773t@srv1.mail-tester.com as below. So, we will send a test email from our email address (postmaster@vpsprof.com) to this test email address. Then, we will check the score by clicking on: Then check your score button as seen below.
Email Deliverability Test Message
The email content we’ve tested is shown below. Bear in mind, the content shouldn’t be so short like hello, it should be a meaningful text as it affects the test score.
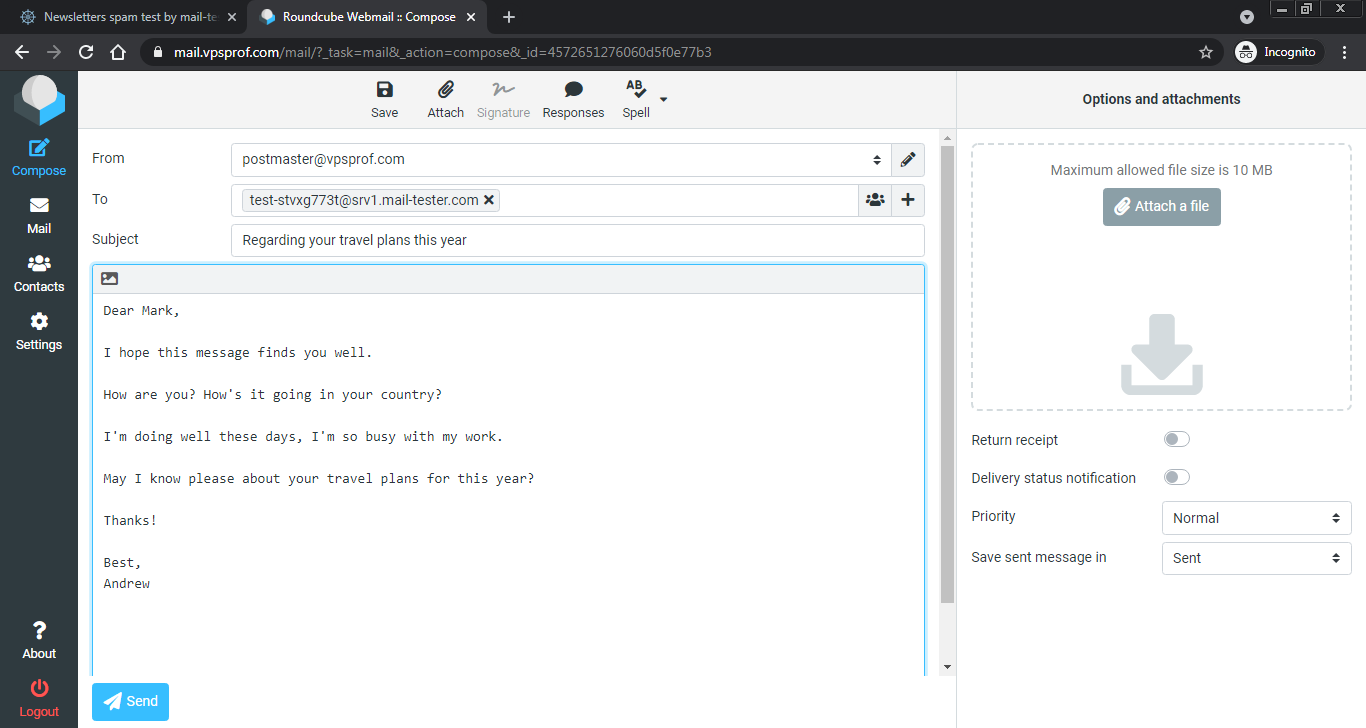
Here’s the content, you can copy/paste it.
Subject: Regarding your travel plans this year
Body:
Dear Mark,

I hope this message finds you well.

How are you? How's it going in your country?

I'm doing well these days, I'm so busy with my work.

May I know please about your travel plans for this year?

Thanks!

Best,
Andrew
As you see, we got a full mark score!
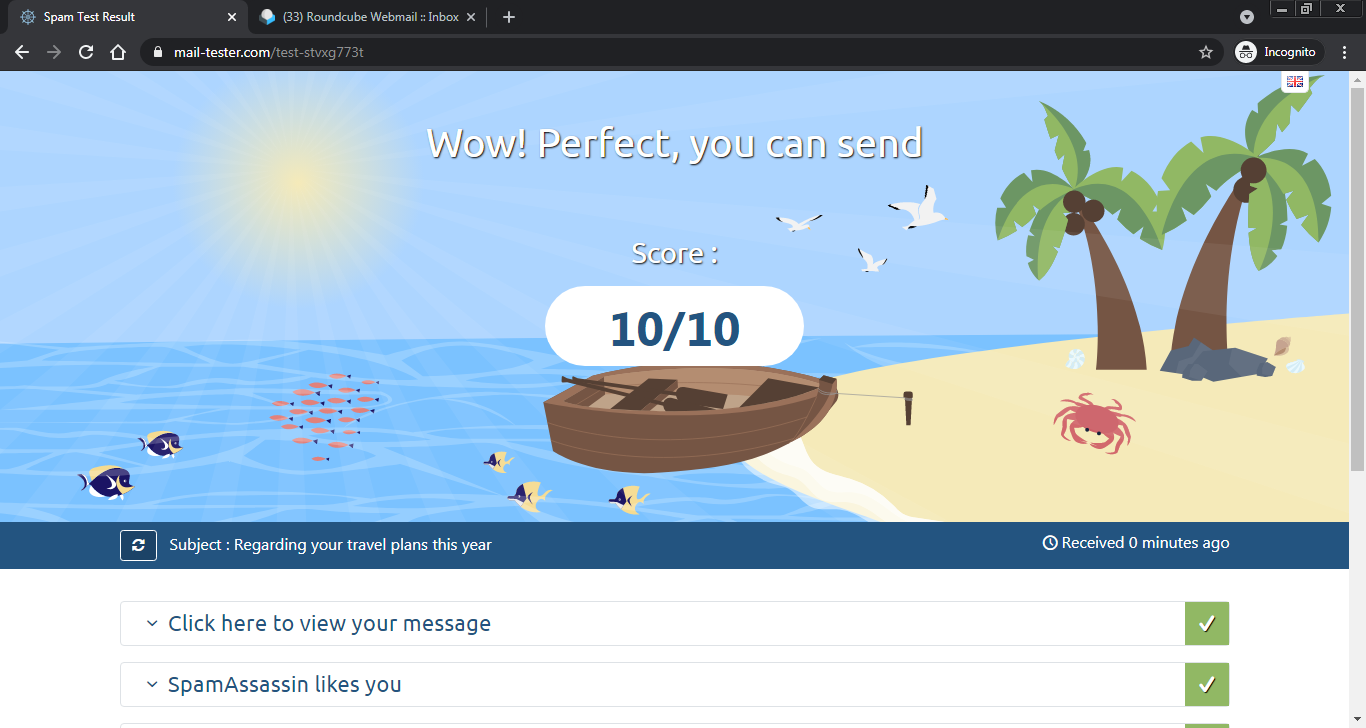
You can see any issue in the email deliverability test result report. You should check if your PTR, SPF and DKIM records are valid. Also, you should wait until the rDSN is fully propagated. Otherwise, you will get a lower score as we tried this before. Here’s the result of our test: https://www.mail-tester.com/test-stvxg773t (the link doesn’t work anymore).