
We will install Roundcube webmail via Roundcube admin panel quickly and easily on Ubuntu 20.04 LTS.
- a. Download Roundcube (5 steps)
- b. Install PHP, Nginx and MariaDB in case They Don’t Exist (2 steps)
- c. Create Roundcube Database (3 steps)
- d. Adjust DNS Records for Your Domain (1 step)
- e. Obtain SSL Certificate & Configure Virtual Hosts (3 steps)
- f. Start Roundcube Admin Panel (10 steps)
- g. Test SMTP and IMAP (4 steps)
Roundcube is a very popular free web-based email client. It integrates with email servers to send and receive emails. That is to say, Roundcube is a powerful tool that supports SMTP and IMAP email protocols. In this article, we will show you in simple steps how to use Roundcube admin panel to install Roundcube on your VPS server.
To install Roundcube easily on your server, follow the steps below:
a. Download Roundcube
1. We will create a directory for the webmail inside the website main directory. For example, you will access the mail by going to a link similar to this link: www.vpsprof.com/webmail.
Run the command below in order to create the website directory sitebase in the server:
root@mail:~# mkdir /var/www/html/sitebase
Also, create a webmail directory inside the website directory by running the command below:
root@mail:~# mkdir /var/www/html/sitebase/webmail
2. Enter your website directory sitebase by running the below command:
root@mail:~# cd /var/www/html/sitebase3. To download the latest version of Roundcube, go to Roundcube official website download page: https://roundcube.net/download
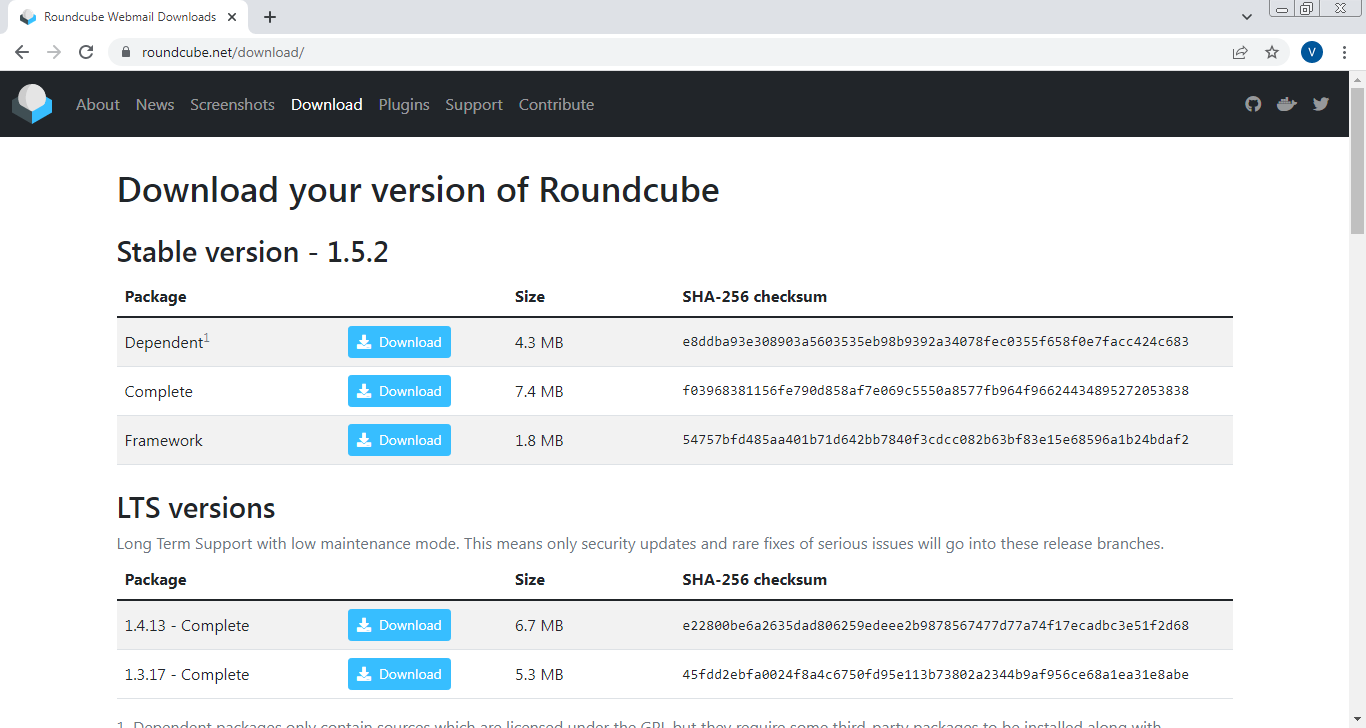
Then, click on secondary click (right mouse click) on the Download button. After that, click on Copy link address to get the link of the latest version as follows:
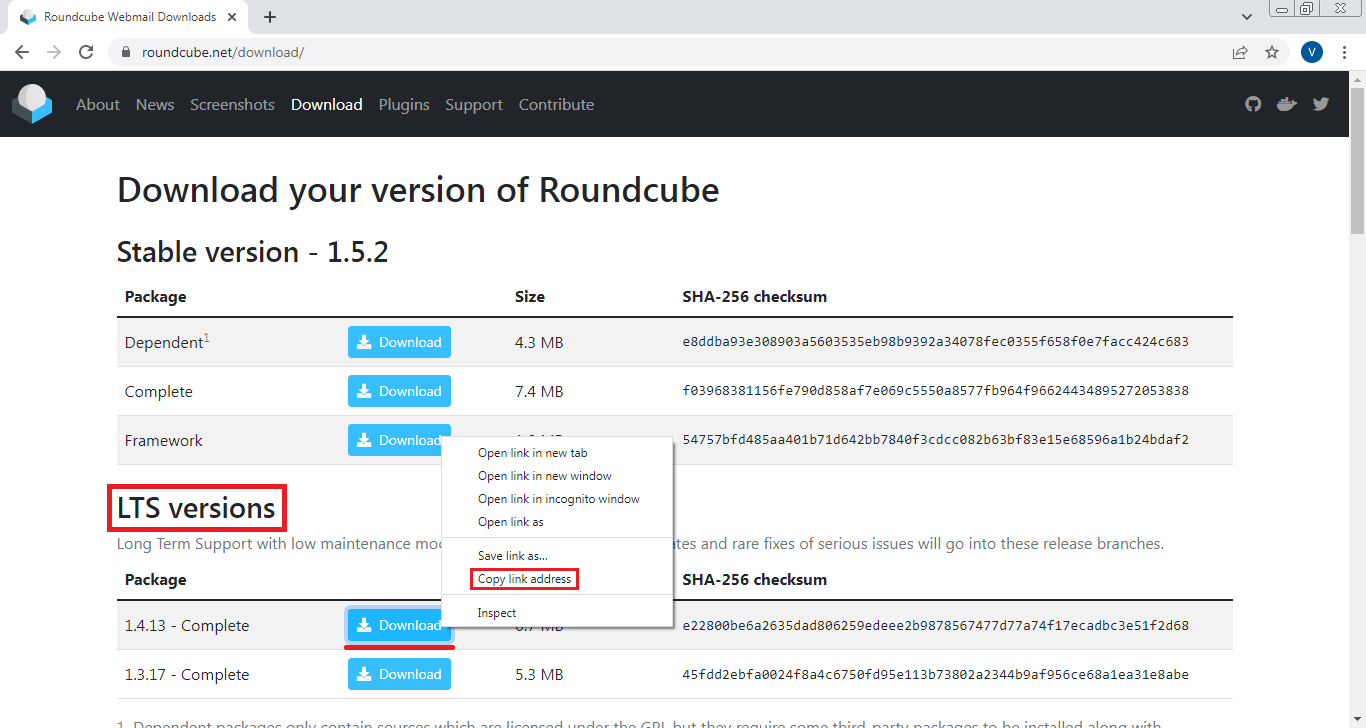
Note that this is the link address which we have copied: https://github.com/roundcube/roundcubemail/releases/download/1.4.13/roundcubemail-1.4.13-complete.tar.gz.
So, let’s use the aforementioned link to download Roundcube via wget by running the below command:
root@mail:/var/www/html/sitebase# wget https://github.com/roundcube/roundcubemail/releases/download/1.4.13/roundcubemail-1.4.13-complete.tar.gz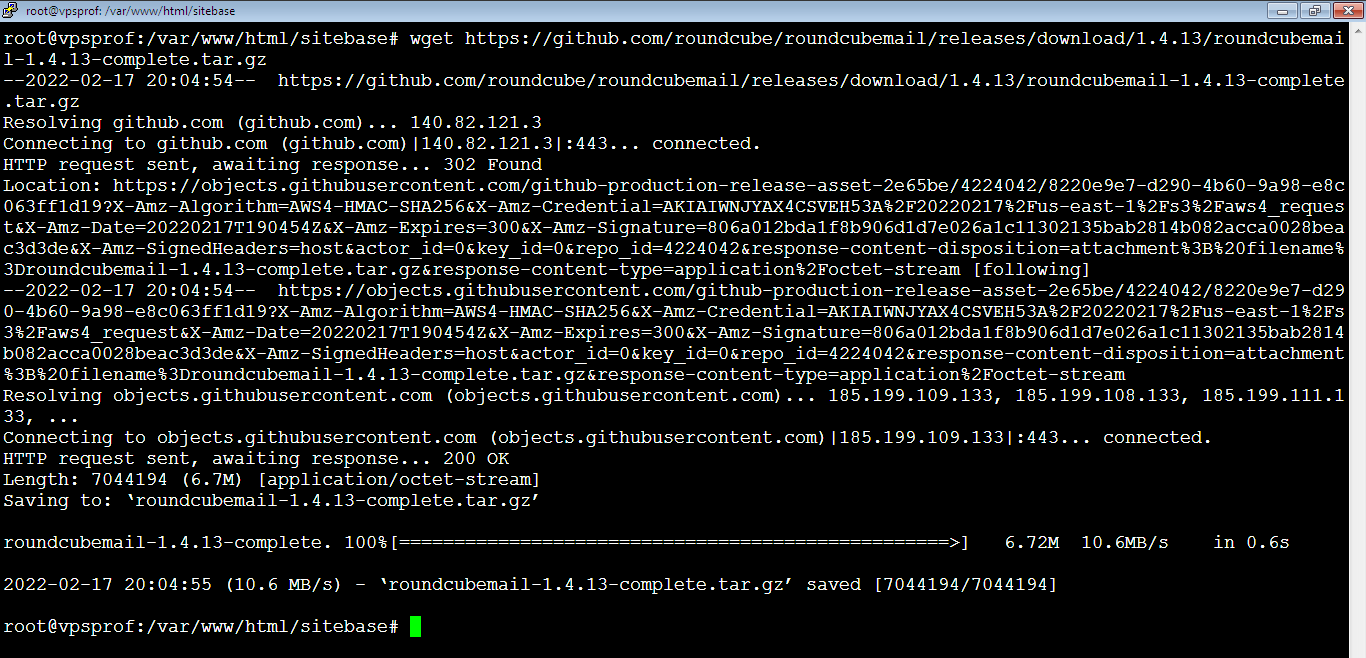
4. When it’s done, unzip the downloaded file:
root@mail:/var/www/html/sitebase# tar xfz roundcubemail-1.4.13-complete.tar.gz5. Move the content inside the zipped folder to webmail directory:
root@mail:/var/www/html/sitebase# mv roundcubemail-1.4.13/* webmail6. Delete the folders that we’re no longer in need for them:

root@mail:/var/www/html/sitebase# rm roundcubemail-1.4.13-complete.tar.gzroot@mail:/var/www/html/sitebase# rm -rf roundcubemail-1.4.13b. Install PHP, Nginx and MariaDB in case They Don’t Exist
1. Refer to our super easy articles that explain how to install PHP, Nginx and MariaDB services on Ubuntu 20.04 LTS in case you haven’t installed any of them. Note that Roundcube supports PHP versions which are greater than 7.4 and less than 8.0 (until this date).
2. Also, you need to install mbstring extension:
apt install php7.4-mbstringAs well as XML extension which is required for the DOM and XML:
apt install php7.4-xml And MySQL extension:
apt install php7.4-mysqlc. Create Roundcube Database
Roundcube installation requires a database in order to save its own data. Note that the email addresses won’t be saved in Roundcube database, they are saved in IMAP folders.
1. Login to MariaDB console, then run the following command:
MariaDB [(none)]> CREATE DATABASE roundcube_db;
2. Create MySQL user for roundcube:
MariaDB [(none)]> CREATE USER 'roundcube_user'@'localhost' IDENTIFIED BY '123456789';
3. Grant all privileges on roundcube_db to roundcube_user by running the following command:
MariaDB [(none)]> GRANT ALL PRIVILEGES ON roundcube_db.* TO 'roundcube_user'@'localhost' WITH GRANT OPTION;
Note that you can refer to Create New MySQL Database article to learn more about database commands.
d. Adjust DNS Records for Your Domain
Go to your DNS settings in your domain registrar panel. Then, create an A Record for your domain that you would like to host on your server as below:
| DNS Record Type | Host | Content, Value or the Answer | TTL (Time To Live) |
|---|---|---|---|
| A | @ | 144.91.72.55 | 1 min (or the minimum allowed) |
| DNS Record Type | Host | Content, Value or the Answer | TTL (Time To Live) |
|---|---|---|---|
| A | www | 144.91.72.55 | 1 min (or the minimum allowed) |
We already explained how to configure DNS records and add A record in DNS Settings article (Add A Record part) and Nginx Virtual Hosts Configuration article (part: a. Adjust DNS Records For Your Domain).
e. Obtain SSL Certificate & Configure Virtual Hosts
1. To obtain an SSL certificate, refer to Nginx Virtual Hosts Configuration article (part: b. Obtain SSL Certificate).
2. To configure virtual hosts, refer to Nginx Virtual Hosts Configuration (part: c. Manage Nginx Virtual Hosts Directories (sites-available and sites-enabled)) and go for the case: If iRedMail is Not Installed, in case iRedMail is not installed.
3. Change the ownership of webmail folder in order to grant Roundcube an access to write/save files into temp and logs directories:
root@vpsprof:/var/www/html/sitebase# chown -R www-data:www-data /var/www/html/sitebase/webmailf. Start Roundcube Admin Panel
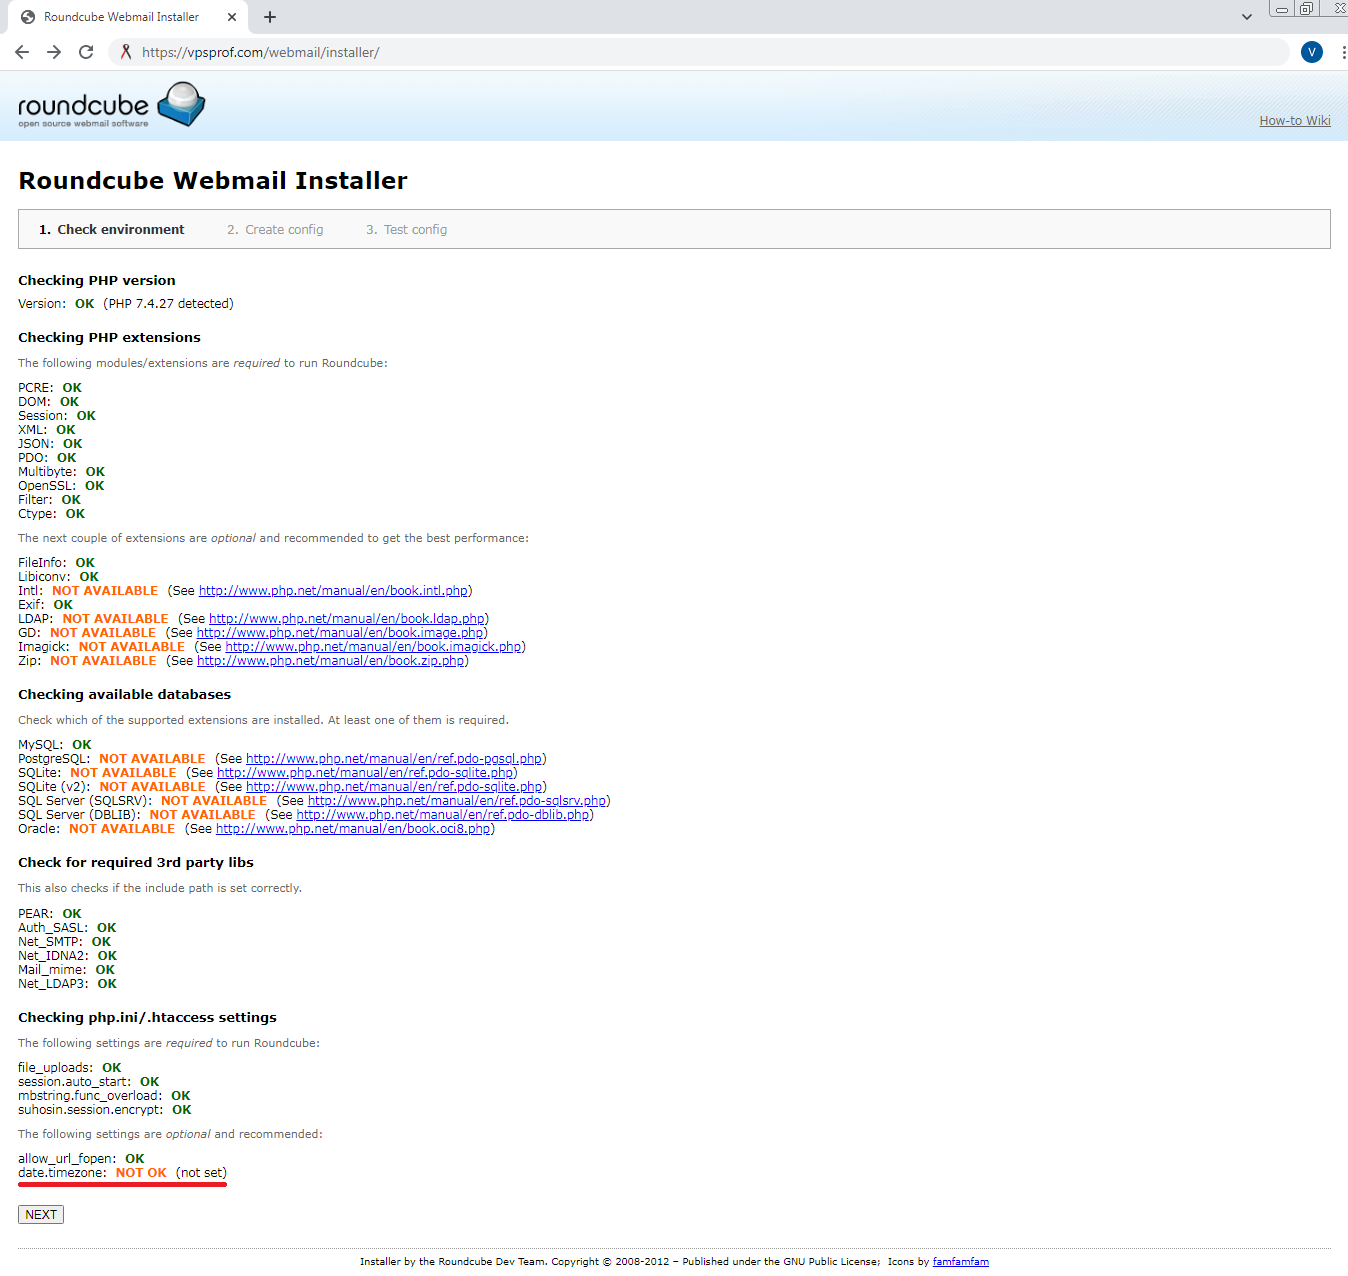
Roundcube Admin Panel Environment Check
1. Before using Roundube webmail, we need to access Roundcube admin panel installer page by navigating to the equivalent of this URL in your browser: https://vpsprof.com/webmail/installer
In case you you have any problem with accessing Roundcube admin panel, you should check your webserver error log by running the command below. In our case, we use Nginx webserver:
root@vpsprof:/var/www/html/sitebase# tail -100 /var/log/nginx/error.log2. As you see, everything is fine except the timezone. To fix it, just go to php.ini file by running the following command:
root@vpsprof:/var/www/html/sitebase# nano /etc/php/7.4/fpm/php.iniThen, search for date.timezone line and add the following line below it with your preferable timezone without semicolon at the beginning:
date.timezone = America/New_YorkAfter that, restart php-fpm service for the changes to take effect by running the command:
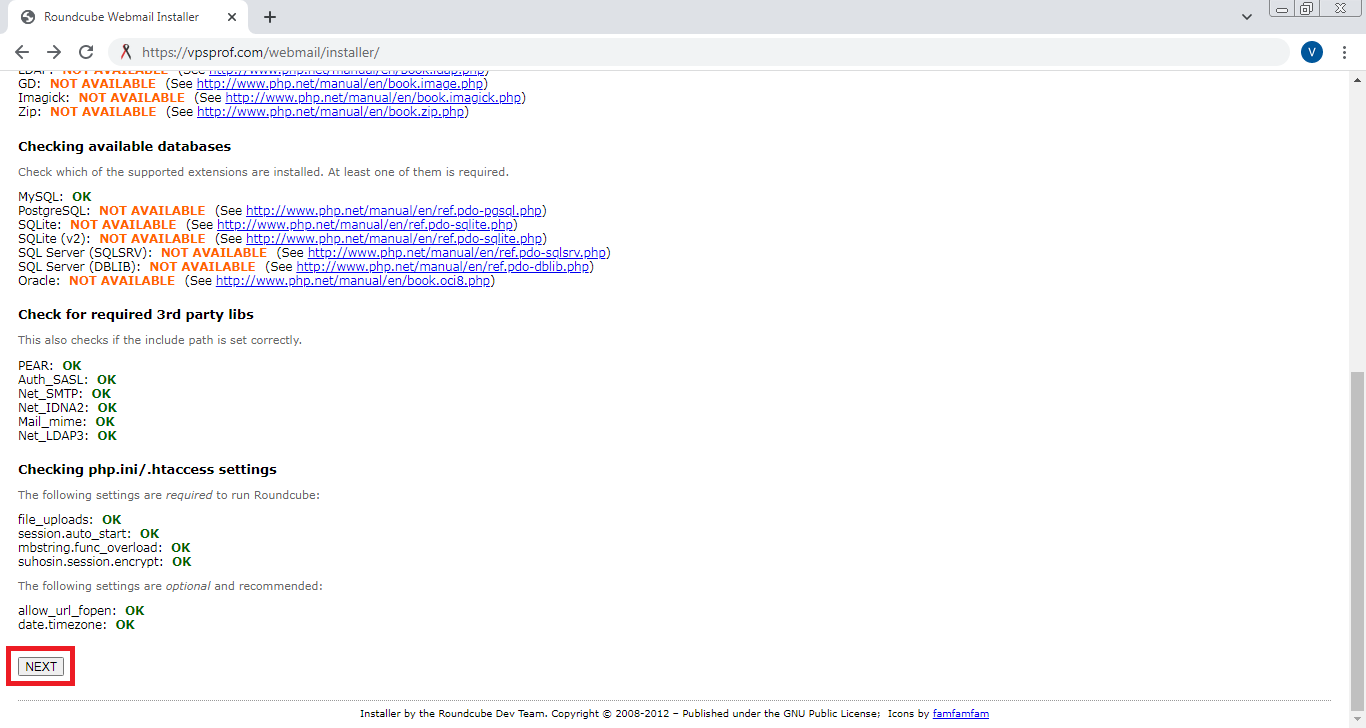
root@vpsprof:/var/www/html/sitebase# service php7.4-fpm restart3. Now, refresh the page, everything should be fine then click on NEXT as below:
Roundcube Admin Panel Configuration
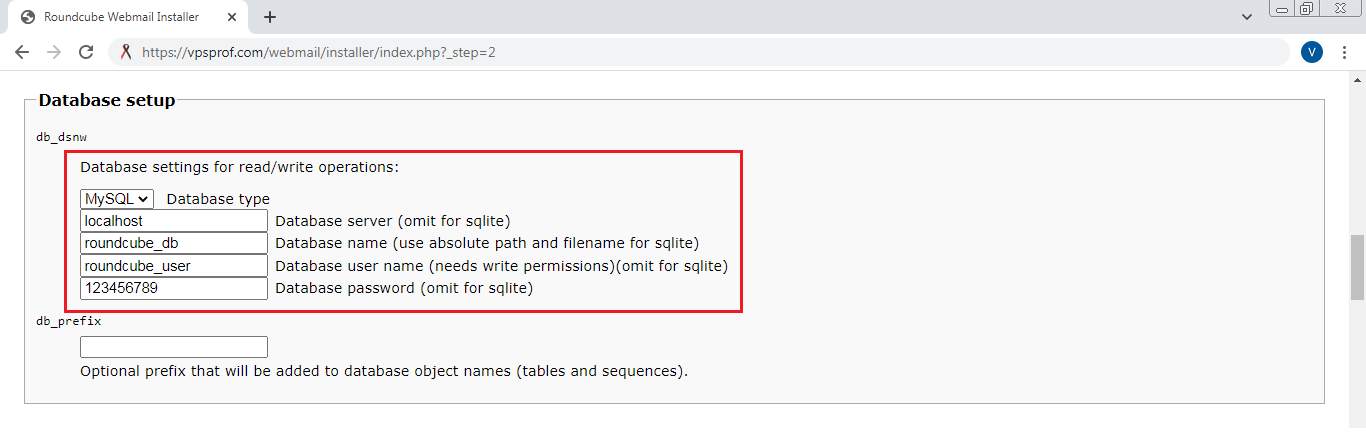
4. In the next step (page), we will need to configure database base setup according to our database variables that we created earlier as below:
5. Edit IMAP settings as below:
IMAP Host:
ssl://mail.vpsprof.comDefault Port:
993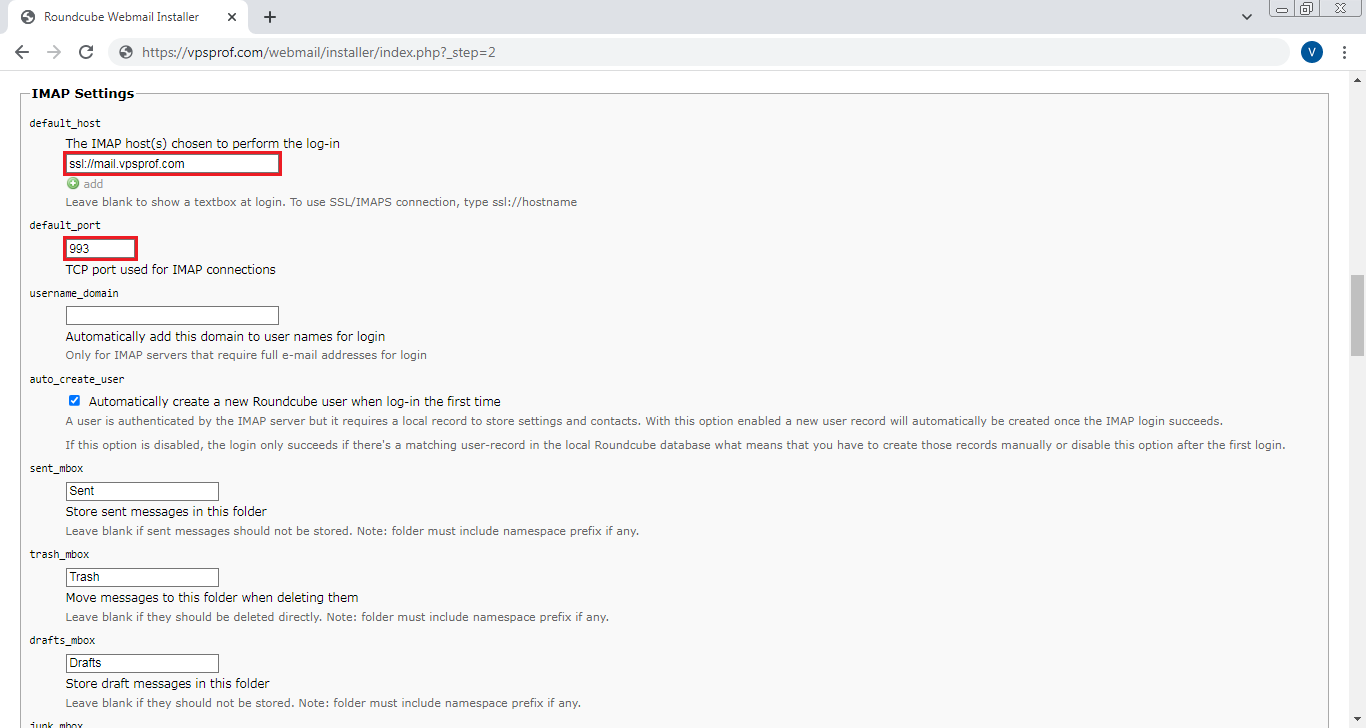
6. Edit SMTP settings as below:
SMTP Server:
tls://mail.vpsprof.com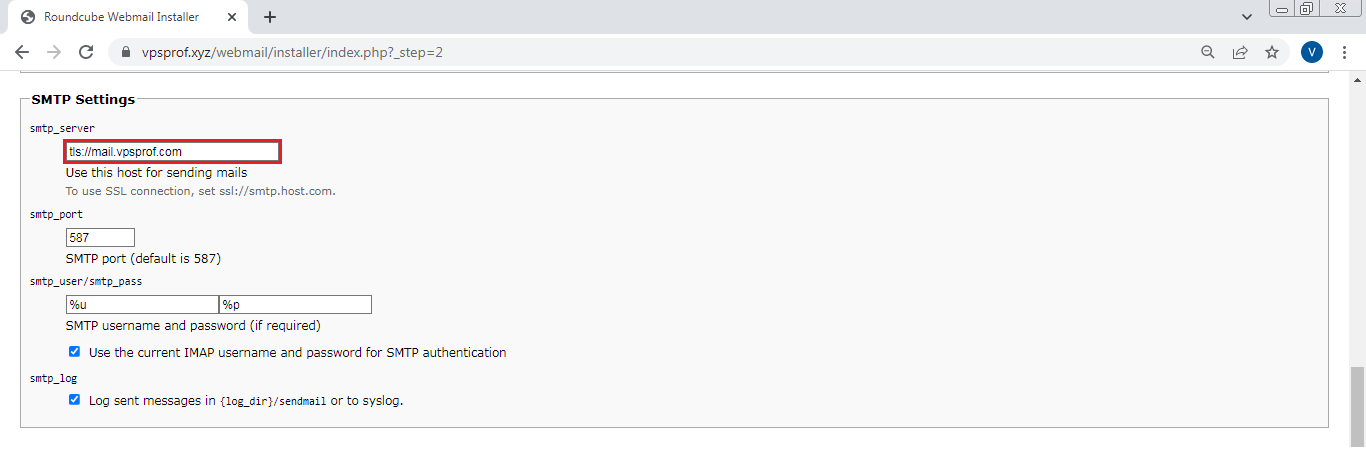
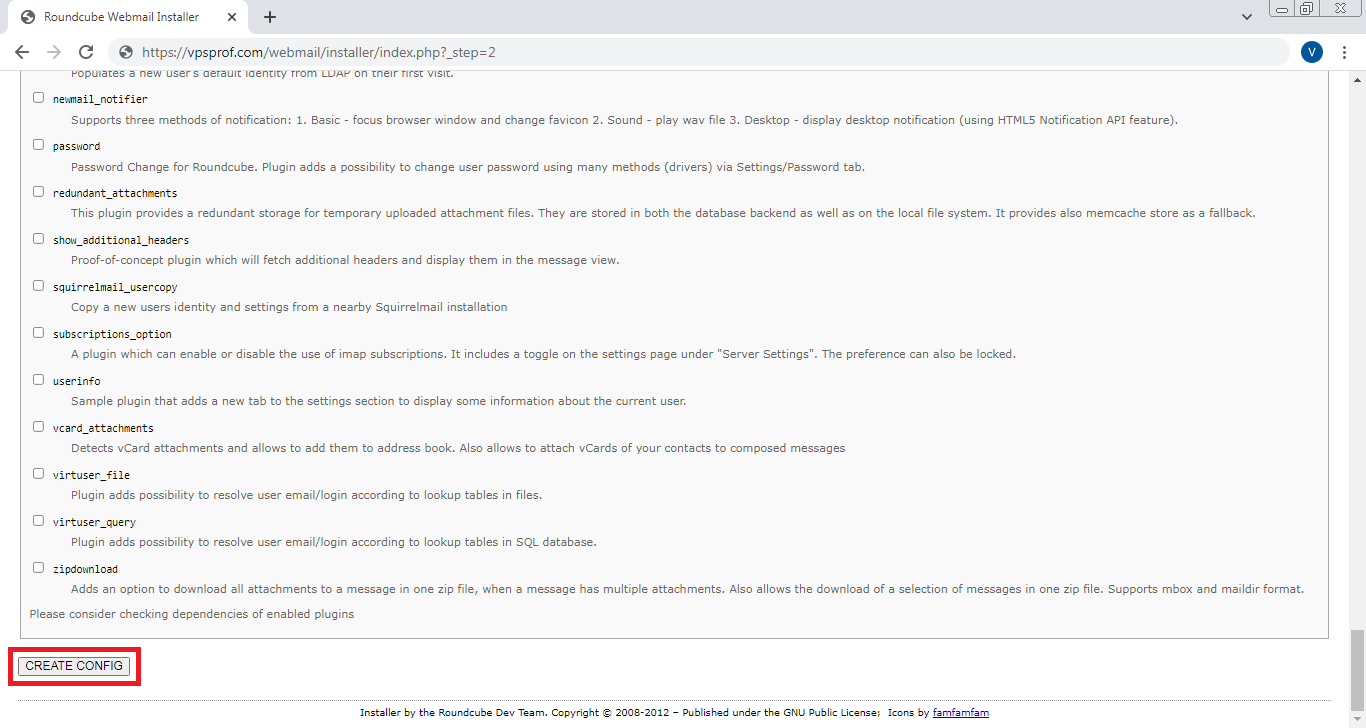
7. For the rest of the settings and the plugins, you can turn on the ones you need then click on CREATE CONFIG:
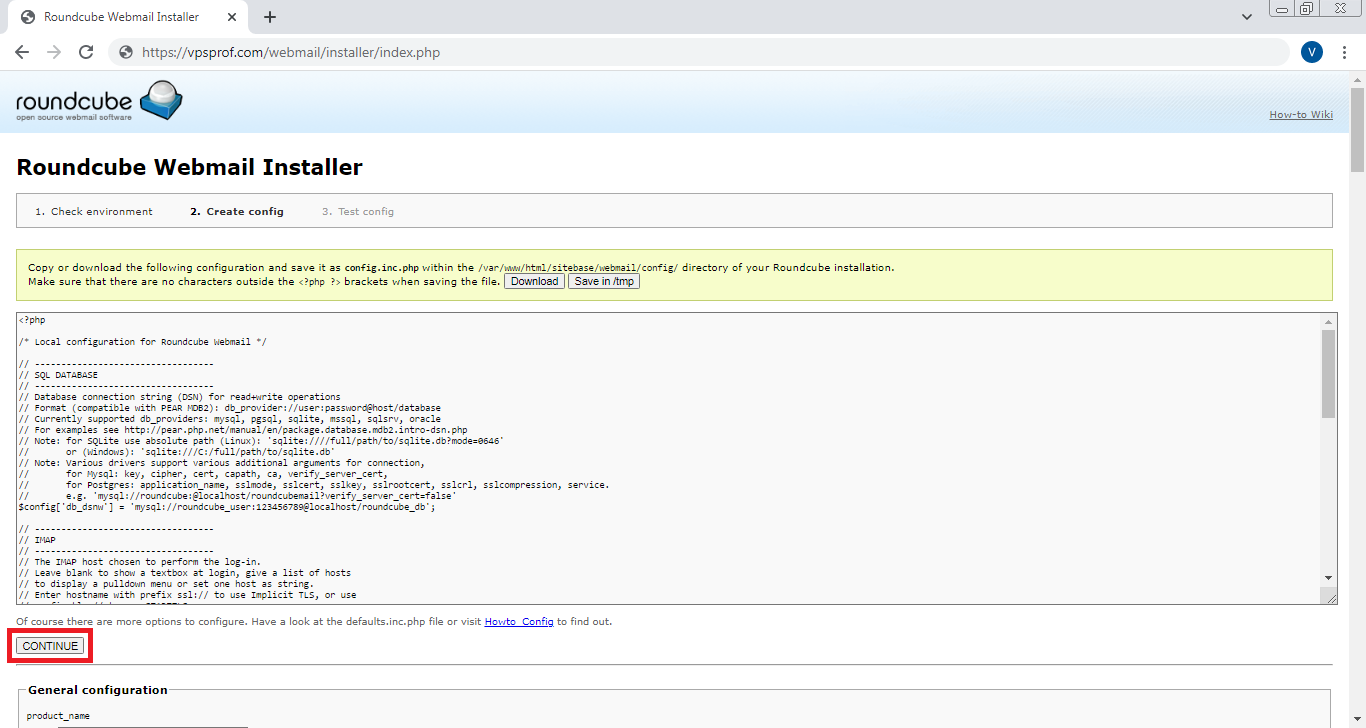
8. As you see below, we need to create a config file config.inc.php in config directory then load it with the PHP code.

For this purpose, let’s open config.inc.php file as below:
root@vpsprof:~# nano /var/www/html/sitebase/webmail/config/config.inc.phpThen, add the PHP code inside it as you see here. After that, close and save the file.

9. Once you’re done, click on CONTINUE button.
Roundcube Admin Panel Test
10. As you see, everything is okay, but we need to initialize the database. So, click on Initialize database button:
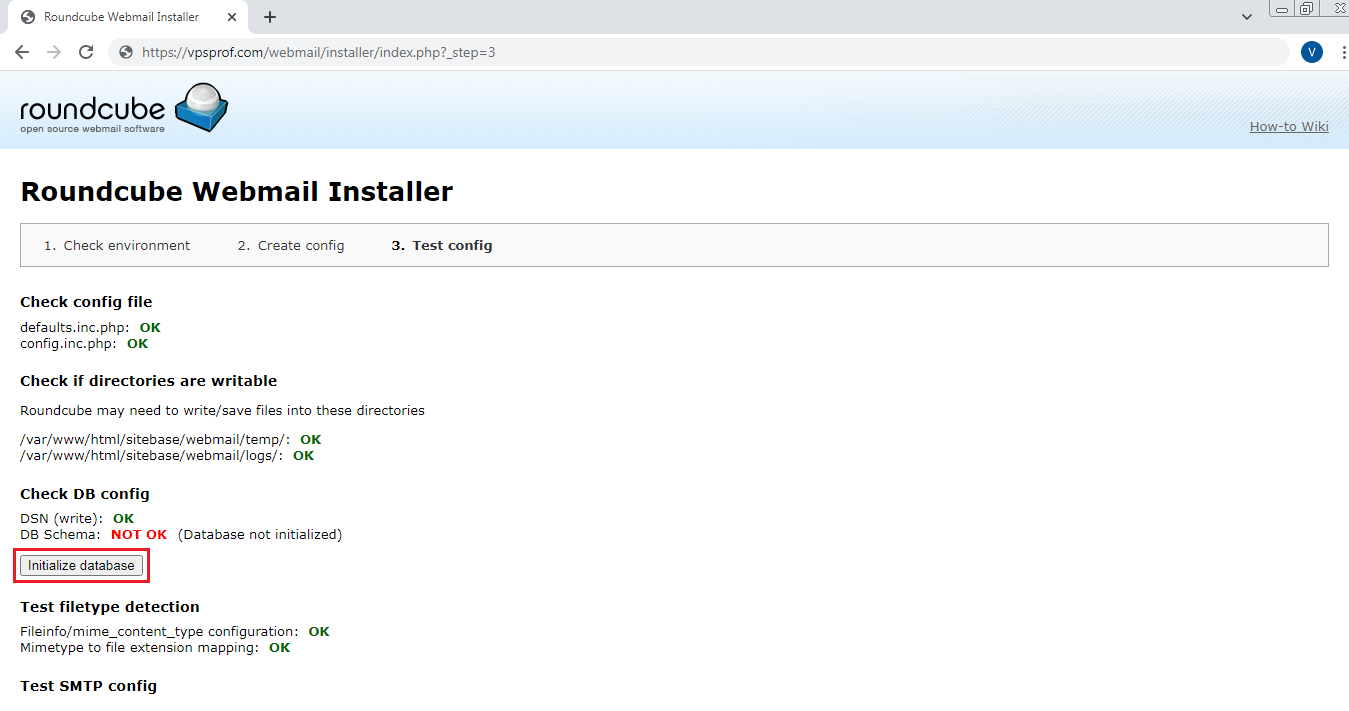
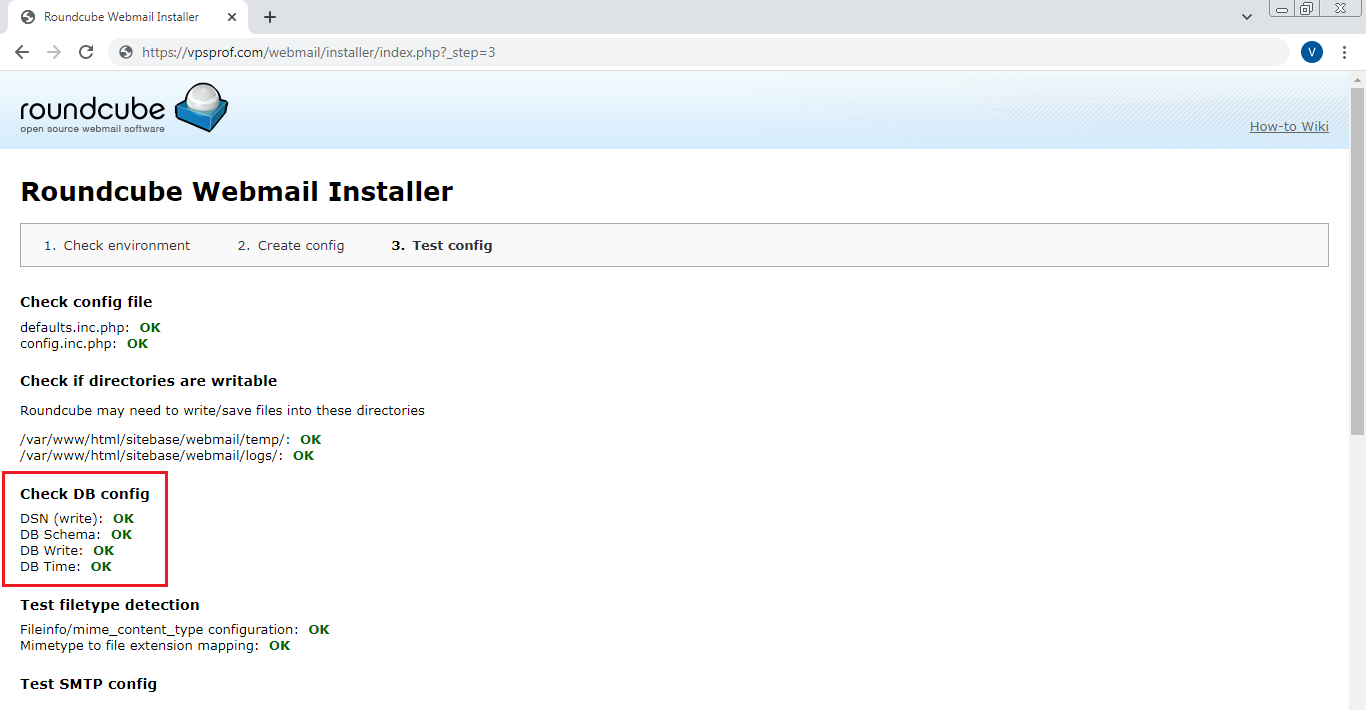
Once you click on Initialize database button, the database will be initialized as you see here:
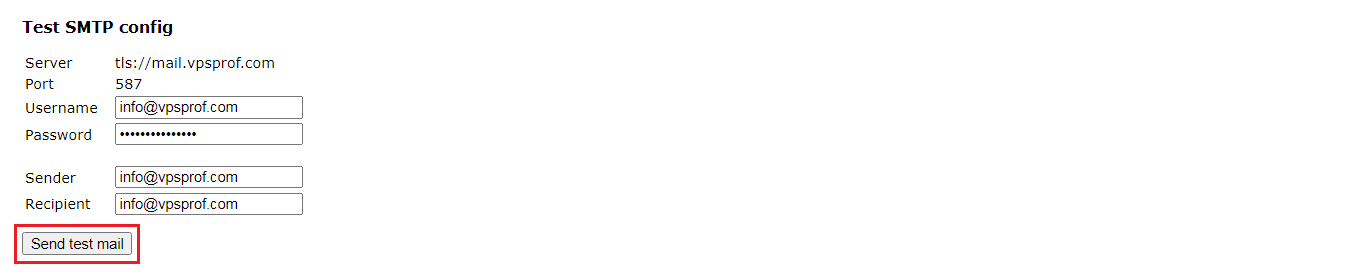
g. Test SMTP and IMAP
1. To test SMTP, enter the values as per below then click on Send test email. Note that the Username and Sender can be any email address you own. The Recipient can be any email address.
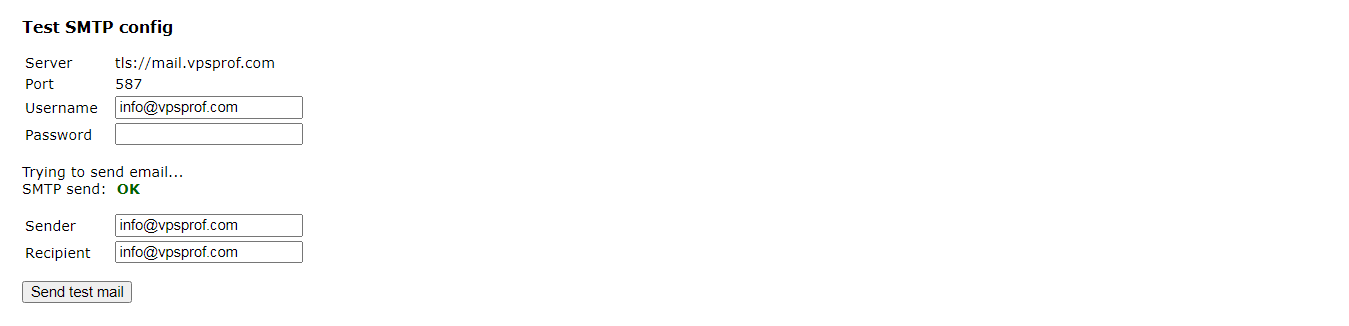
As you see, the test email has been sent successfully!
2. To Test IMAP, enter the values as per below then click on Check login.

As you see, the login has failed, the error message says:
Connecting to ssl://mail.vpsprof.com...
IMAP connect:  NOT OK (Login failed for info@vpsprof.com against mail.vpsprof.com from 37.17.195.171. Could not connect to ssl://mail.vpsprof.com:993: Unknown reason)
To fix the problem, just add the following line anywhere inside config.inc.php file
$config['imap_conn_options'] = array ( 'ssl' => array ( 'verify_peer' => false ) );Check IMAP login again, as you see, it works now:

3. Delete the installer by running the below command:
root@vpsprof:~# rm -r /var/www/html/sitebase/webmail/installer4. Now, you’re able to login to Roundcube using the email address you own and its password.
To learn more about Roundcube webmail and other admin panels that come with iRedMail and to see how to send your first email, check this article: Roundcube Webmail and Admin Panels Login.