It’s very easy to migrate your email server from one server to another. If you want to migrate your email server to another server, it’s better to follow the below steps:
A. Install iRedMail Server on the New Server
Follow the steps we already explained in this article Download & Install iRedMail to download and install iRedMail. But befofre the installation, you should follow the steps before like Domain Registration then DNS Settings.
B. Migrate the Folders to the New Server
To Migrate the folders, follow the following steps:
1. [New Server] create a new email domain and alias like support@domain.com on iRedAdmin. Then, follow the steps in this article: Add Extra Email Domain
2. [Old Server] Disable the domain that you want to migrate on iRedAdmin panel by clicking on Domains and Accounts tab (or a similar to this link: https://mail.vpsprof.com/iredadmin/domains). Then, mark the domain you want to disable and from Choose Action dropdown list, choose Disable then click on Apply.
3. [Old Server] If you will migrate the email address (or user): support@vpsprof.com, you need to go to path like below to reach the Maildir directory which has all the email folders
root@mail:~# cd /var/vmail/vmail1/vpsprof.com/s/u/p/support-2023.04.29.19.08.03/MaildirNote that the folders /s/u/p/ represents the first three letters of the alias support. If the alias is info, the folders will be /i/n/f
In some email server versions that’re installed manually without iRedMail, the path to Maildir is like below:
/var/mail/vhosts/vpsprof.com/support/curThe inbox is saved in cur directory.
If you want to migrate Sent, Drafts, Junk, Trash, etc. folders, they’re hidden (with a dot prefix like .Sent, .Draft), to view hidden folders, just use: ls -a, you can use also: ls -al.
root@mail:/var/vmail/vmail1/vpsprof.com/s/u/p/support-2023.04.29.19.08.03/Maildir# ls -la
total 176
drwx------ 9 vmail vmail  4096 Dec  1 14:28 .
drwx------ 3 vmail vmail  4096 Apr 29  2023 ..
drwx------ 5 vmail vmail  4096 Aug 16 19:28 .Drafts
drwx------ 5 vmail vmail  4096 Aug 14 09:34 .Junk
drwx------ 5 vmail vmail  4096 Nov 30 13:39 .Sent
drwx------ 5 vmail vmail  4096 May 31  2023 .Trash
drwx------ 2 vmail vmail 12288 Nov 30 13:40 cur
-rw------- 1 vmail vmail     0 Apr 29  2023 dovecot-acl-list
-rw------- 1 vmail vmail    11 May  1  2023 dovecot-keywords
-rw------- 1 vmail vmail  6858 Dec  1 14:28 dovecot-uidlist
-rw------- 1 vmail vmail     8 Apr 29  2023 dovecot-uidvalidity
-r--r--r-- 1 vmail vmail     0 Apr 29  2023 dovecot-uidvalidity.644d5969
-rw------- 1 vmail vmail  2920 Dec  1 14:28 dovecot.index
-rw------- 1 vmail vmail 57812 Dec  1 14:28 dovecot.index.cache
-rw------- 1 vmail vmail 25580 Dec  1 14:28 dovecot.index.log
-rw------- 1 vmail vmail  1362 Nov 30 13:40 dovecot.index.thread
-rw------- 1 vmail vmail   744 Aug 15 14:52 dovecot.list.index
-rw------- 1 vmail vmail  2892 Nov 30 13:40 dovecot.list.index.log
-rw------- 1 vmail vmail    96 Apr 29  2023 dovecot.mailbox.log
drwx------ 2 vmail vmail  4096 Dec  1 14:28 new
-rw------- 1 vmail vmail    28 Apr 29  2023 subscriptions
drwx------ 2 vmail vmail  4096 Dec  1 14:28 tmp
Find the Email Address Folders
You will need to enter Old Email Folder and New Email Folder values in the golden area above. So to make it easy, we will just enter the value of the first three parameters below then click on Submit button.
First 3 Letters DirectoriesDomainNew Server IP
After that, you can use the values you submitted to find the values of the Old Email Folder and the New Email Folder as below.
Old Server
Run the below command:
root@mail:~# ls /var/vmail/vmail1/vpsprof.com/s/u/p/The result should be something below. Enter it as Old Email Folder in the paramters above in the golden area.
support-2023.04.29.19.08.03New Server
Run the same command:
root@mail:~# ls /var/vmail/vmail1/vpsprof.com/s/u/p/The result should be something like below. Enter it as New Email Folder in the paramters above in the golden area.
support-2023.05.27.18.09.06Note that after adding the email domain and user to iRedAdmin panel, if you don’t login to your new email address on the new server via Roundcube or any email client, the new email domain won’t be added to /var/vmail/vmail1 directory. So if you’ve not logged yet, you won’t get any result.
Once you enter the values we obtained in the Old Email Folder and the New Email Folder text fields in the golden area above (last two parameters), click on Submit button.
Migrate Inbox Emails
1. [Old Server] Send the content of the forder cur by Rsync to the new server by syncing the directory cur on both servers by running the below command. You should find the path on the new server.
root@mail:~# rsync -vzru -e 'ssh -p 22' /var/vmail/vmail1/vpsprof.com/s/u/p/support-2023.04.29.19.08.03/Maildir/cur/ root@144.91.72.55:/var/vmail/vmail1/vpsprof.com/s/u/p/support-2023.05.27.18.09.06/Maildir/cur/2. [New Server] Change the ownership to vmail for all migrated email files. First, you need to enter Maildir directory by running the command:
root@mail:~# cd /var/vmail/vmail1/vpsprof.com/s/u/p/support-2023.05.27.18.09.06/Maildir/The prompt should look like below:
root@mail:/var/vmail/vmail1/vpsprof.com/s/u/p/support-2023.05.27.18.09.06/Maildir#3. [New Server] Then, run the command:
root@mail:/var/vmail/vmail1/vpsprof.com/s/u/p/support-2023.05.27.18.09.06/Maildir# chown -R vmail:vmail cur/* Make sure you are inside Maildir directory: /var/vmail/vmail1/vpsprof.com/s/u/p/support-2023.04.29.19.08.03/Maildir
Or to make it easier, just run this command without entering that deep directory:
root@mail:~# chown -R vmail:vmail /var/vmail/vmail1/vpsprof.com/s/u/p/support-2023.05.27.18.09.06/Maildir/cur/*If cur folder doesn’t have any email file, you will get the below error, so don’t worry, nothing wrong.
cannot access '/var/vmail/vmail1/vpsprof.com/i/n/f/support-2023.05.27.18.09.06/Maildir/cur/*': No such file or directory
Note: if one file inside cur directory doesn’t have the ownership of vmail:vmail, the whole folders (Inbox, Sent, etc.) won’t load (you will get zero messages), you will get server error on Roundcube: Server Error: UID THREAD: Internal error occurred. Refer to server log for more information.
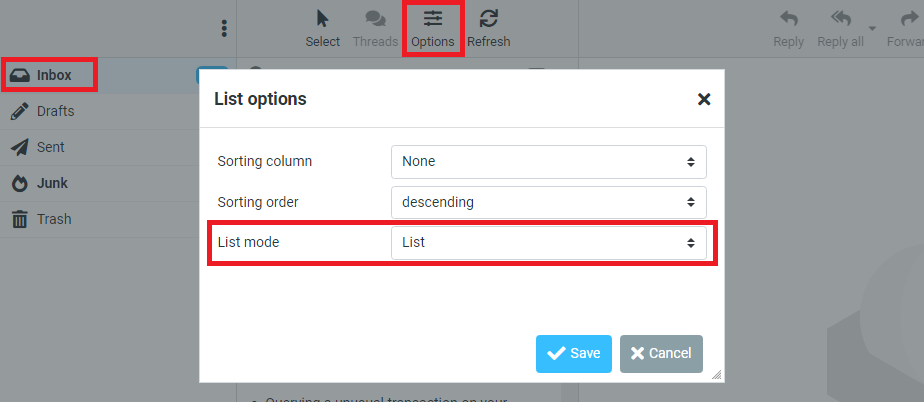
Now, you should compare between the two servers to make sure that you migrated all the emails. Go to Roundcube and login to your email address on both servers. Make sure that list mode is the same on both servers. To find the list mode, go to Inbox folder, then click Options (next to refresh button). After that, choose List (Thread option will not show you if they’re the same). If the List mood is not the same, the number will be different and this will confuse you. Also, you can change other parameters like Sorting column.
You can use the below command, to go back one step in the directory
cd ..And the below command, to go back to the root of the directory
cdMigrate Sent Emails
1. [Old Server] We will follow the same method we did for Inbox emails but pay attention to the path, it has .Sent hidden folder. Run Rsync to send the email files from the old server to the new server
root@mail:~# rsync -vzru -e 'ssh -p 22' /var/vmail/vmail1/vpsprof.com/s/u/p/support-2023.04.29.19.08.03/Maildir/.Sent/cur/ root@144.91.72.55:/var/vmail/vmail1/vpsprof.com/s/u/p/support-2023.05.27.18.09.06/Maildir/.Sent/cur/2. [New Server] Change the ownership to vmail for all migrated email files. First, you need to enter Maildir/.Sent directory by running the command:
root@mail:~# cd /var/vmail/vmail1/vpsprof.com/s/u/p/support-2023.05.27.18.09.06/Maildir/.SentThe prompt should look like below:
root@mail:/var/vmail/vmail1/vpsprof.com/s/u/p/support-2023.05.27.18.09.06/Maildir/.Sent#3. [New Server] Then, run the command:
root@mail:/var/vmail/vmail1/vpsprof.com/s/u/p/support-2023.05.27.18.09.06/Maildir/.Sent# chown -R vmail:vmail cur/*Or change it easier in one step by running the below command without entering that deep directory:
root@mail:~# chown -R vmail:vmail /var/vmail/vmail1/vpsprof.com/s/u/p/support-2023.05.27.18.09.06/Maildir/.Sent/cur/*Now, you should compare between the two servers to make sure that you migrated all the emails by applying what we did before for the Inbox folder. Go to Roundcube and login to your email address on both servers. Make sure that list mode is the same on both servers. To find the list mode, go to Sent folder, then click Options (next to refresh button). After that, choose List (Thread option will not show you if they’re the same). If the List mood is not the same, the number will be different and this will confuse you.
Migrate Draft Emails
1. [Old Server] Run Rsync to send the email files from the old server to the new server
root@mail:~# rsync -vzru -e 'ssh -p 22' /var/vmail/vmail1/vpsprof.com/s/u/p/support-2023.04.29.19.08.03/Maildir/.Drafts/cur/ root@144.91.72.55:/var/vmail/vmail1/vpsprof.com/s/u/p/support-2023.05.27.18.09.06/Maildir/.Drafts/cur/2. [New Server]. Change the ownership to vmail for all migrated email files by running the below command:
root@mail:~# chown -R vmail:vmail /var/vmail/vmail1/vpsprof.com/s/u/p/support-2023.05.27.18.09.06/Maildir/.Drafts/cur/*Migrate Trash Emails
1. [Old Server] Run Rsync to send the email files from the old server to the new server
root@mail:~# rsync -vzru -e 'ssh -p 22' /var/vmail/vmail1/vpsprof.com/s/u/p/support-2023.04.29.19.08.03/Maildir/.Trash/cur/ root@144.91.72.55:/var/vmail/vmail1/vpsprof.com/s/u/p/support-2023.05.27.18.09.06/Maildir/.Trash/cur/2. [New Server]. Change the ownership to vmail for all migrated email files by running the below command:
root@mail:~# chown -R vmail:vmail /var/vmail/vmail1/vpsprof.com/s/u/p/support-2023.05.27.18.09.06/Maildir/.Trash/cur/*Migrate Junk Emails
1. [Old Server] Run Rsync to send the email files from the old server to the new server
root@mail:~# rsync -vzru -e 'ssh -p 22' /var/vmail/vmail1/vpsprof.com/s/u/p/support-2023.04.29.19.08.03/Maildir/.Junk/cur/ root@144.91.72.55:/var/vmail/vmail1/vpsprof.com/s/u/p/support-2023.05.27.18.09.06/Maildir/.Junk/cur/2. [New Server]. Change the ownership to vmail for all migrated email files by running the below command:
root@mail:~# chown -R vmail:vmail /var/vmail/vmail1/vpsprof.com/s/u/p/support-2023.05.27.18.09.06/Maildir/.Junk/cur/*I tested every step here. It works like a charm!! Even if you have too old dovecot, I was able to move the email files from old dovecot to a new iRedMail. Also, all the flags will be transferred, like if the email is marked as read or not, it will show up perfectly!
Note: You can move inbox from different email addresses and it works like a charm, I mean, you can move from server1 (info@gainbybrain.com) to server2 (hello@vpsprof.com), you just need to change the ownership to vmail:vmail in the new server to view the inbox, ONLY (tested).